|
|
|
Restoration work on this ex-RAF (WW2) lorry continues into the winter of 2010. |
|
|
Restoration Part 35. Click here to return to the main Dodge lorry restoration page. Part of oldclassiccar.co.uk. Contact page. |
|
|
As had been the case in the weeks leading up to October 2010, progress on the truck's restoration continued in a stop/start fashion, with October and much of November seeing some work done, but no great steps forward. Towards the end of November, a meeting was convened and a plan formed to set a specific deadline for completion of the main bulk of work by early 2011. This was deemed to be achievable given the work still outstanding, the level of other work due to be taking place in the workshop, and the number of hands that would be available to do the actual work. At first glance, the final photos of the truck in the previous update, when compared to those in this chapter of the restoration, may not look particularly different, but a decent amount of progress was made during the final five or so weeks of the year, prior to Christmas, as will be described now. |
|
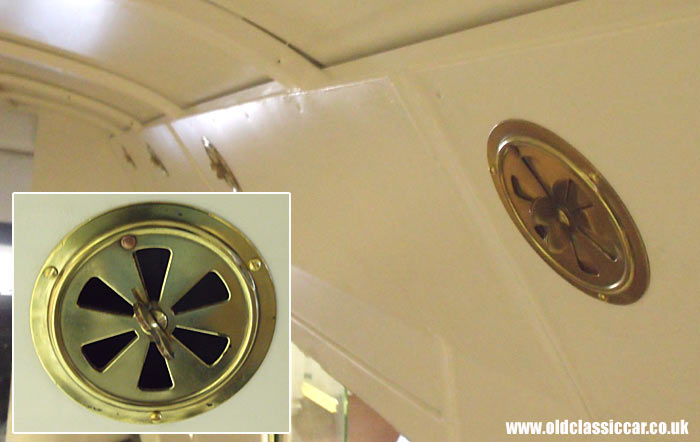
| During the last week of November, and throughout December, I popped over to the workshop whenever I could to 'muck in' with the more straightforward, yet still time-consuming, tasks, thus freeing up VHC to concentrate on the more pressing tasks in hand. One example was the eight brass air vents fitted in the rear compartment when new. They'd been cleaned up a few years back, but needed a more thorough session. An evening at home, sat in front of the fire with a tube of Autosol, brought them up a treat. A handful of brass screws and twenty minutes work saw them re-united with the truck. |
|
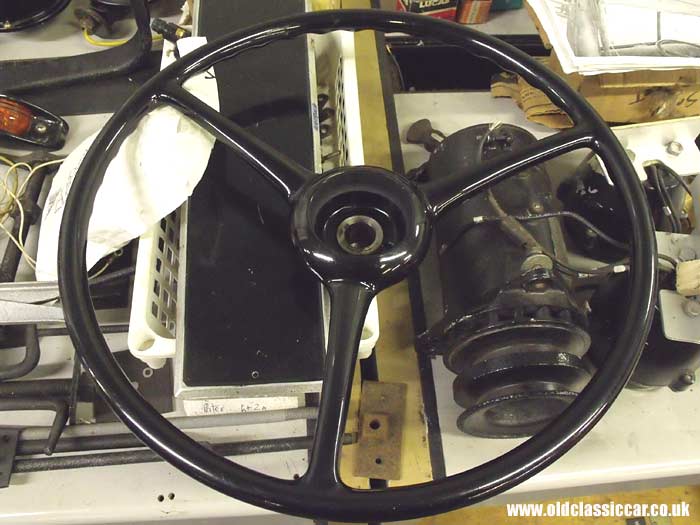
| I bought this new-old-stock Dodge steering wheel from Australia a few years ago. Still boxed, the wheel itself was covered in a thick, waxy, greasy concoction, used to preserve parts while they're sat on a shelf. It took some shifting but it came up looking very well. The original steering wheel (and the top part of the column) had been roughly sawn off the truck before I collected it in 1995, which I was less than impressed about. Fortunately a local(ish) Dodge fan sorted me out with a (slightly smaller) wheel from a 3/4 ton Dodge, but as the 3-ton model had a larger diameter wheel, the hunt was on to find a proper one. Needless to say, when this one turned up in Oz it was bought and shipped over sharpish! |

|
| The side window glass is all original to the truck. The sliding panes in each of the four side windows incorporate a leading edge that features a slight wave to it (ie it isn't straight), presumably to help it slide in the runners. The fixed windows had been in place for some time, and in December it was the turn of the sliding panes to be installed, enabling the inner window frames to finally be screwed into place. Once they have been painted, the newly-made slide handles can be fitted. |
|
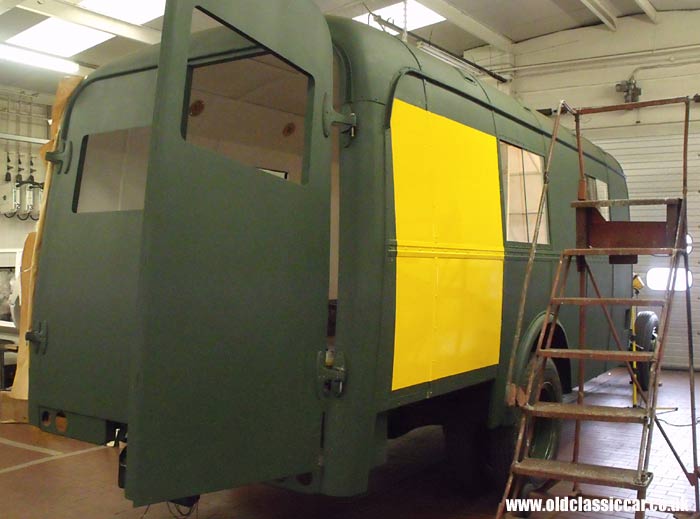
| This shot shows the rear doors back on the truck, for a while at least, while the door furniture is gathered together prior to installation. It was also a good opportunity to see if they'd 'settle' at all in position, something we wanted to check on before the signwriter comes along to do his bit. By this point the two colour panels had also received a fresh coat of paint, although a minor problem with a couple of the edges meant that they'd be re-done again shortly. |

|
| While the others focused their attentions on the rear doors, and the overall paint finish, I spent a fair bit of time inside the truck, giving 2nd (and in some cases 3rd) coats to the interior, primarily at the back - around the inside of the rear door opening - and also inside the cab roof. By this point the two large header panels, made from plywood, had been screwed into place. Parts of the floor also received a fresh coat of satin black, including the wooden panel that runs behind the driver's seat. |

|
| There was only ever one seat fitted up front, for the driver naturally. The two team mechanics simply sat on a wooden toolbox. The single seat was mounted on the mechanism shown above. The circular chrome adjuster, controlling fore-and-aft movement of the seat on its runners, is labelled as 'Leverall', and the name A.W. Chapman is also given. The latter name also appears on the brass height adjuster (and the Thermorad unit that still needs to be fitted into the rear floor). After some fifty years of inactivity, the vertical adjustment of the mechanism had seized solid, so I brought it home for a bit of evening TLC. Several dousings in neat WD40, plus 3-in-1 oil, a little heat, and more than a little patience, saw the adjuster coaxed into life once more. Handily I found a new Chapman seat adjuster on ebay, identical in design to my original but not in brass. As I want to preserve the original brass fitting, the 'new' one, made from steel by the looks of it, was used during the freeing-up sessions. I don't plan to strip it all down to the last nut and bolt, so it'll be de-greased and tidied up over the Christmas break (once I've de-iced the garage's locks that is). |

|
| Something else I looked at during December were the two Lucas trafficators that fit behind the cab doors. The originals had long-gone, so I bought a few donor assemblies from which to - hopefully - make up a good pair. So far I've not quite made up a set as I need one more 6 volt mechanism, of the larger (ie larger than fitted to most cars) type. The externally-mounted housings were stripped and re-painted, and I've two new arms to go on should the need arise. I just need one more mechanism, if anyone out there has something suitable. For now I've built up the second unit with 12 volt internals, but they won't be wired in until the correct bits turn up. |
| Again, away from the truck, and while coats of white interior paint were drying, I decided to re-paint the new-old-stock Bluemels numberplates that had recently been donated to the cause. Despite being unused, they'd picked up a few scuffs and marks over the years, so they too were stripped back, primed and painted. Rather than taking the easy route of having new plates made up, or buying letters to fit onto the blank plates, the plan is to have them signwritten in a suitable typeface. |
| As the wiring is due to be completed in the New Year, I wanted to check over the lights. The 'arrow' turn signals, sourced from various points in the USA, while in good condition, would benefit from a spot of fettling and a fresh coat of paint, so I attended to all four during December also. The bracket that secures a Pyrene fire extinguisher above the driver's door was also carefully stripped, primed and re-painted, ready for fitting soon. Using a box of donor mirrors and brackets, I made up a suitable replacement interior mirror. The front door catch assemblies also required some tidying up before they too could join the pile of bits ready for fitting. |
|
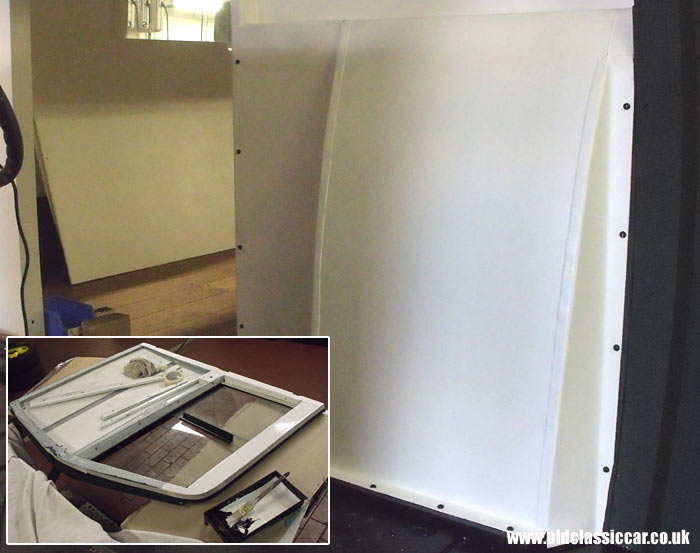
| This white panel (another I'd fettled up and painted) was re-fitted to the partition behind the driver's seat, as soon as the black wooden plank underneath had fully dried. The re-painted front inner door trims can just be seen inside the truck, leaning against the wall in the background. Each had been given a minimum of two coats, inside and out. The inset photograph shows one of the front doors undergoing similar treatment - something else I kept myself occupied with while the others worked on the main vehicle. |
|
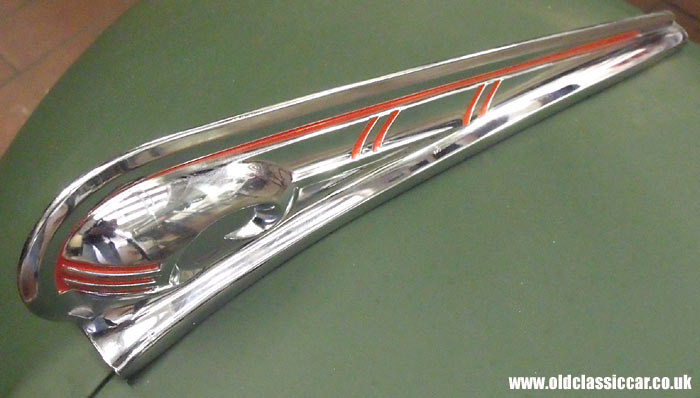
| While some paint was drying, we decided to test-fit the new-old-stock Dodge radiator mascot that I'd bought from the States earlier in the year. At first glance, all the Dodge trucks from 1939 through to 1947 look broadly the same. But, as with most vehicles, there are many detail differences between the years. And this was the case with the mascot I'd bought. Apparently, until 1941 or thereabouts, the mascots had a small narrow 'heal' at their back edge, which slots into an opening on the top of the radiator cowl. Perhaps it was a prone to snap, but mascots from 1942 onwards have a wider heal. This replacement mascot has the larger heal, and required the hole in the cowl to be filed slightly to make it fit. |

|
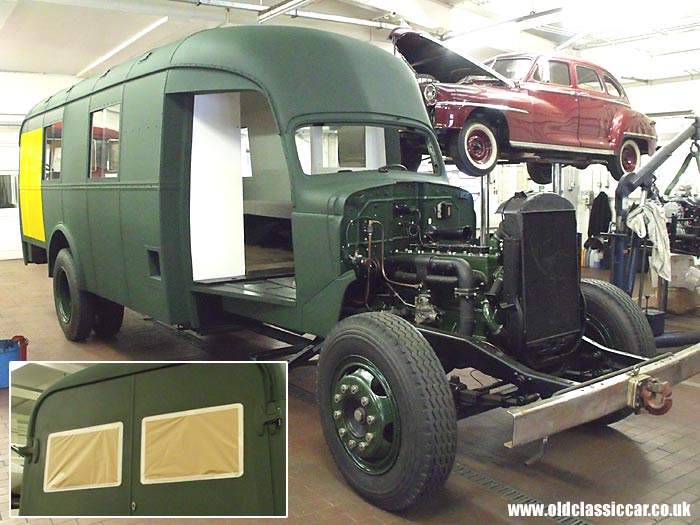
| While I was busying myself painting things white, the others carried on with the rear doors, or rather the furniture that fits to them. With the plywood trims fitted, it was time to re-fit the two rear door stays. With them back on, the next item to cross off the list was the fitment of the (original) rear door glasses. Sealant would hold them in place, but new inner window surrounds had to be made from scratch. Handily the local DIY emporium had lengths of suitable timber in stock. No two angles were exactly the same, especially around the nearside door window which isn't rectangular, so this took a little while to get right, but the end results look good. Like everything on this old truck, nothing is quite as easy as you think it should be! |
| The door closing mechanism was also re-instated on the offside rear door. I could re-use the original exterior door handle, but it's of the non-locking variety. Back in the day, they simply had a clasp and padlock hanging on the rear door to keep the tea-leafs away from the Dodge's precious cargo. As I don't fancy the idea of a padlock banging around and chipping the paint, I've ordered a new locking handle to fit on the outside, while the original inner handle will be re-used. As with most of the other replaced items (including the tyres and most of the old panelwork), the old outer handle will be kept for posterity, just no longer fitted to the truck. |
| For some reason, the lower rear door catches had nothing to engage with, leaving the doors unsecured on their lower edges. Hardly ideal, so Ed (VHC) made up a thick steel plate that incorporates suitable apertures for the catches to engage with. This plate fits to the rear edge of the fixed wooden step, thus enabling the doors to close much better than ever they had done before. |

|
| The key target for December was to finish the exterior paintwork. Despite my ideal scenario of the truck being painted in a topcoat that incorporated a matting agent, I went along with the paint supplier and VHC's plan of leaving it in matt until the signwriting had been done, then bringing up a level of shine using the final clear coat over the lot. The decision was taken to give it a further coat of green during December, so time was spent re-masking the windows and the back doors (they were painted later), before a fresh coat was applied to the entire truck. |
| Once the green had dried fully, the masking was reversed and the two colour panels given a final coat each. The masking tape used on the edges during earlier applications of yellow and orange, hadn't left a perfectly clean edge, so lining tape was used this time. The results are much much better. |

|
| The offside yellow panel is shown above, once the lining tape and masking had been removed. The shape of the top left corner, while it looks a little odd, is just how it was on the old panels, so has been re-created here. In the foreground and sat on a bench, the two inner panels that cover the fuel filler necks, prior to flatting down. |

|
| A general view of the nearside, with the masking removed. Overall, progress during December has been very encouraging. The signwriter is due to come over on January 6th, hence the need to get the paintwork finished before his arrival. He expects to spend five or six days re-creating all the original livery, replicating the various sponsor logos that featured on the original panels for so many years. |
|
| The final job to be done prior to Christmas was the removal of the rear doors, for their final lick of paint. The truck was rolled back so that the doors could be laid upon stands in front of it. With both doors now sporting a new coat of Westminster Green, the paint will have chance to fully harden and settle prior to the resumption of progress at the beginning of January. Various smaller items which also need to be finished in green, such as the headlamp mounts, and rear side locker hinges, have been painted in the same green finish, awaiting a clear top coat. |
| All being well, the New Year should see the original signwriting back in place, and progress made on the front panels while access to the main truck is out-of-bounds. If all goes to plan with the signwriting, attentions will very soon have to turn to the engine, if the deadline is to have a chance of being met. |
| Immediately prior to Christmas, an odd-shaped package arrived in the post. It contained a pair of 2m-long aluminium strips, similar to those found on pre-war cars' running boards, from which a capping to fit on the rearmost ends of the flooring will be made, to both neaten them up, and protect the ends of the planks. |
Other news.I received a very interesting email from a gent during December. He was a (much younger) cousin of the Dodge's owner, and remembered visiting the latter's home and playing in the truck in 1956/1957. Sinclair, the family's chauffeur, would occasionally roll the Alfa outside for the children to sit in, and play at racing drivers! He adds: "... we would spend many hours pretending to be racing drivers. I remember sneaking into the garage and sitting behind the wheel of the Dodge, even the old smells come back to me as I write this note. I am sure he would love to know such loving care is being put into the collection, as I am equally sure that his daughter and family still sneak a glimpse at this unique piece of racing history ..." |
|
Return to the Dodge lorry restoration page for more info on this rebuild. Previous Page: Part 34 - Painting and other restoration work. Next Page: Part 36 - Signwriting the lorry. |
|
|

Custom Search
|
 |
| Old Classic Car (C) R. Jones 2026. Content not to be reproduced elsewhere. |
| Website by ableweb. |
| Privacy Policy, Cookies & Disclaimers |