|
|
| Author |
Message |
Miken
Joined: 24 Dec 2012
Posts: 544
|
 Posted: Mon May 01, 2017 10:36 am Post subject: Posted: Mon May 01, 2017 10:36 am Post subject: |
 |
|
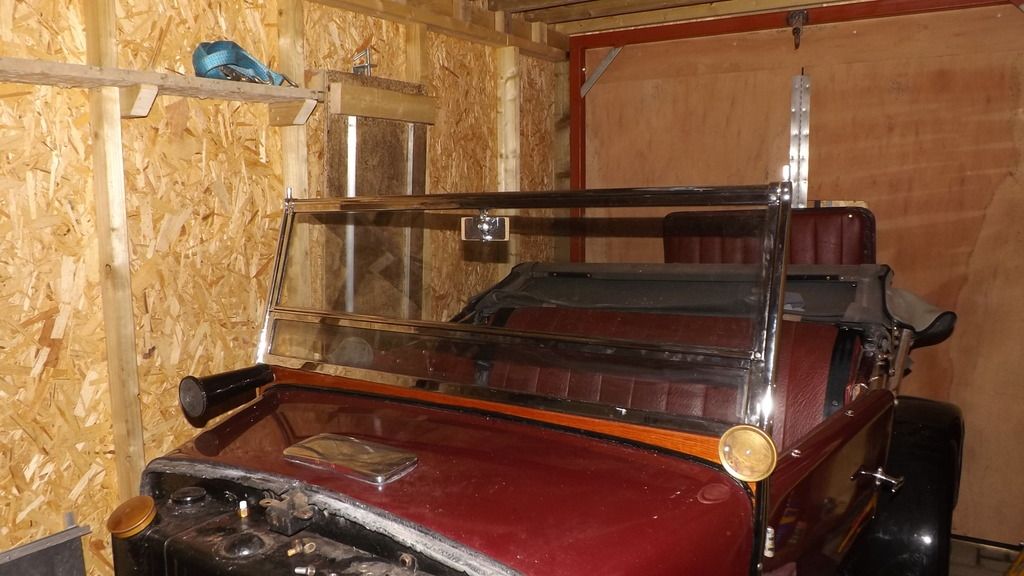
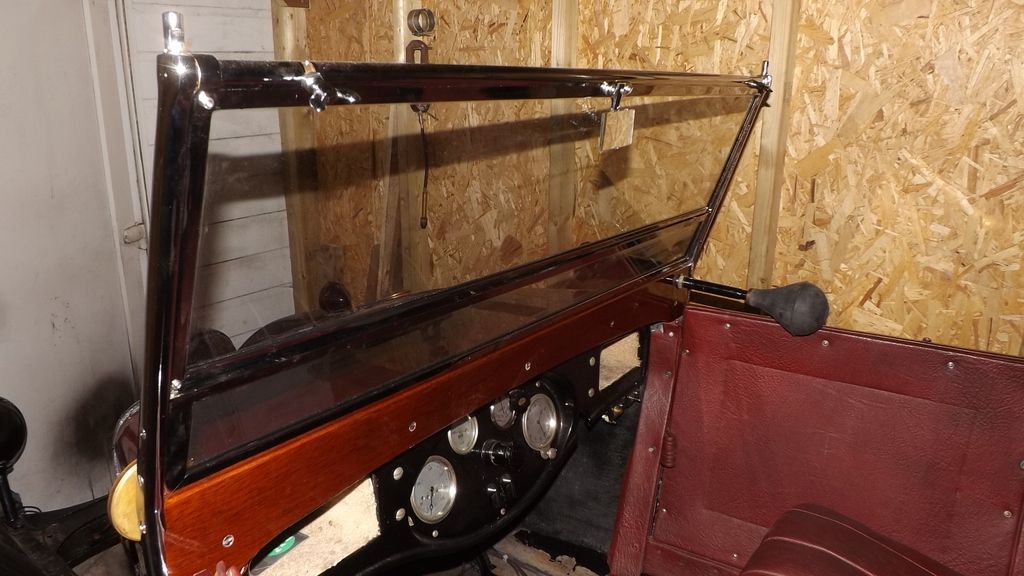
Windscreen back from the platers and fitted with new glass.
I couldn't bring myself to paint the new mahogany board black so 2 pack varnished it.
Bought and fitted a new bulb and reed for the horn from "Taff the horn".
 |
|
| Back to top |
|
 |
alastairq
Joined: 14 Oct 2016
Posts: 1950
Location: East Yorkshire
|
| Posted: Mon May 01, 2017 11:30 am Post subject: |
|
|
In the absence of any appropriate forum buttons, I shall clog the thread up with a ''OOOOh, I do like that, very nice. Proper motorcar!''
Well done, good workmanship...[something I am sadly lacking in]
 |
|
| Back to top |
|
|
Miken
Joined: 24 Dec 2012
Posts: 544
|
| Posted: Sun May 07, 2017 9:33 pm Post subject: |
|
|
Still waiting for my engine parts to come back from being white-metalled.
Its been over 3 months now and im getting rather impatient.
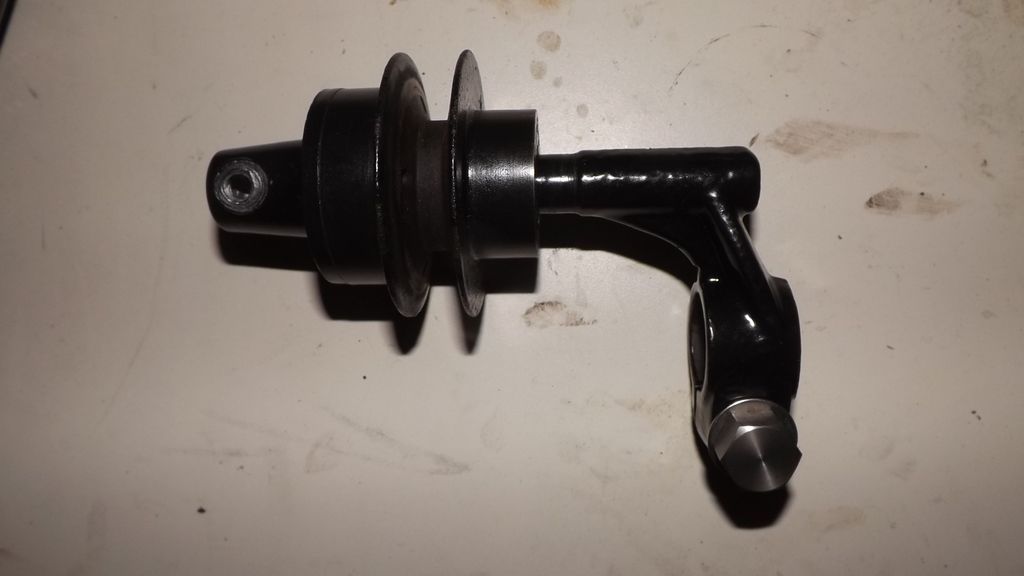
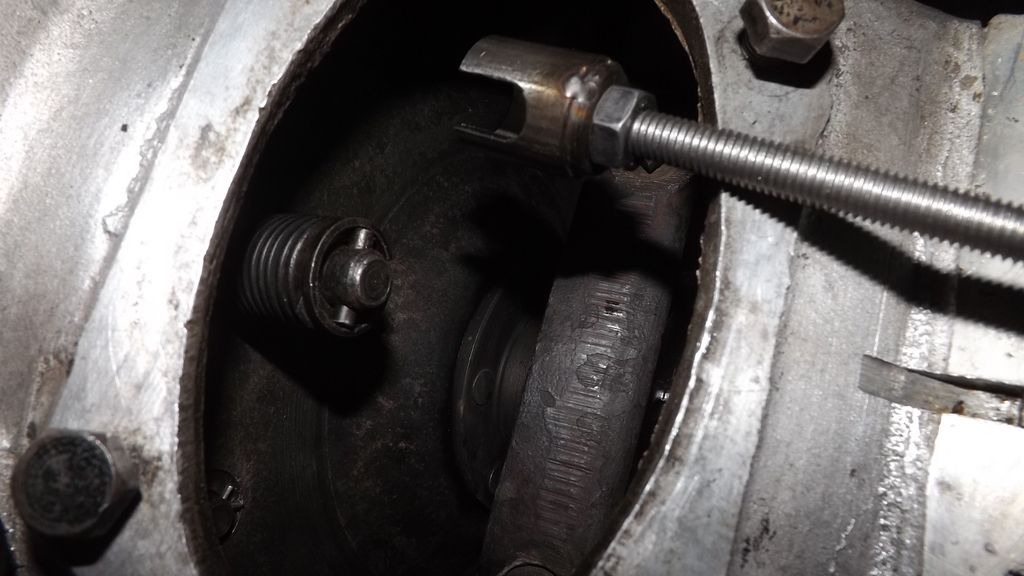
So I have been refurbishing the fan pulley assembly.
Originally it ran on an old fashioned "Hyatt" style needle roller bearing. The rollers rolled directly onto the cast iron bore of the pulley and after 90 years it was all a bit worn and wobbly.
I was able to bore the iron pulley out on my lathe and fit a couple of modern metric size roller bearings and also fit hardened inner rings to the shaft.
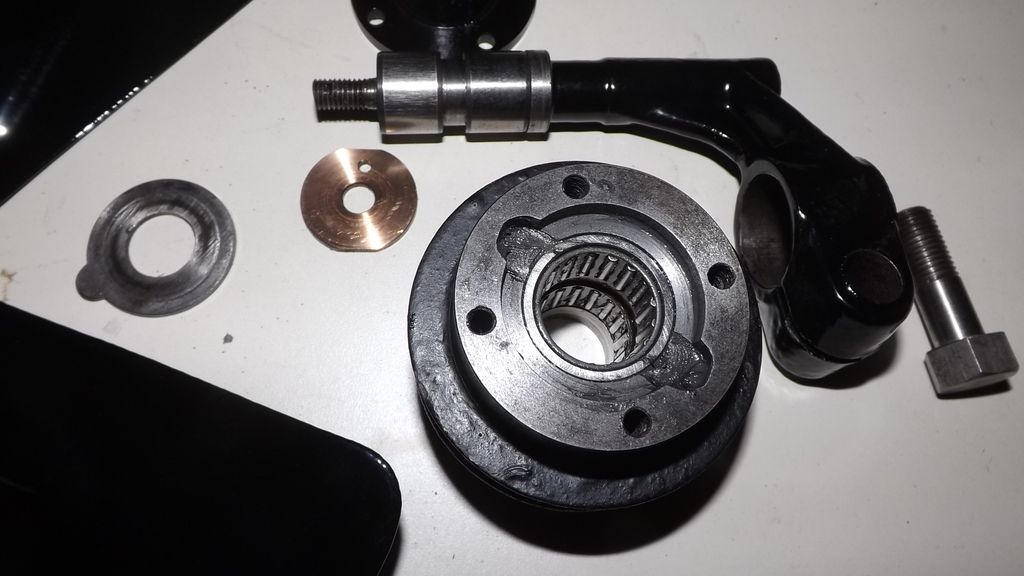
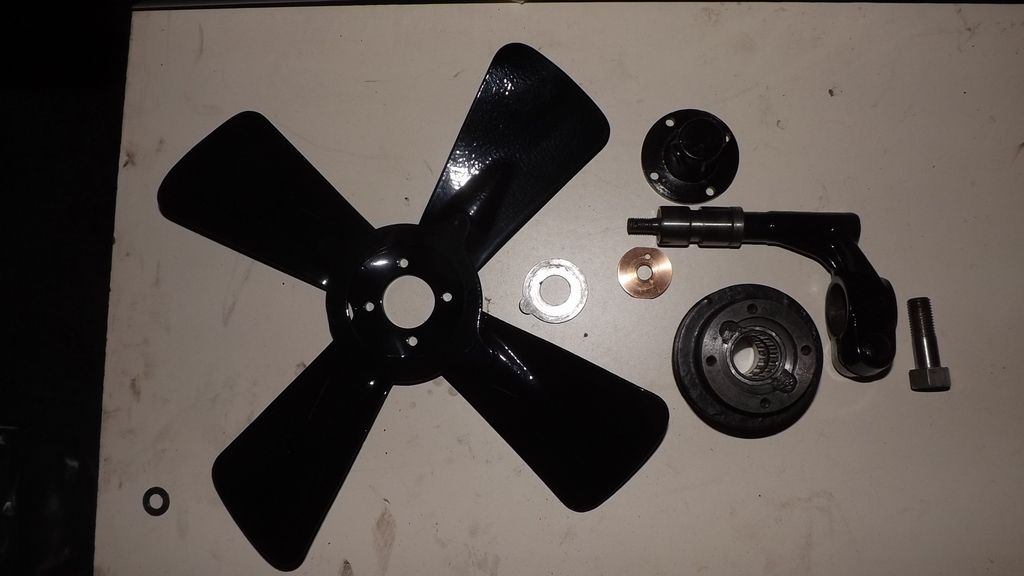
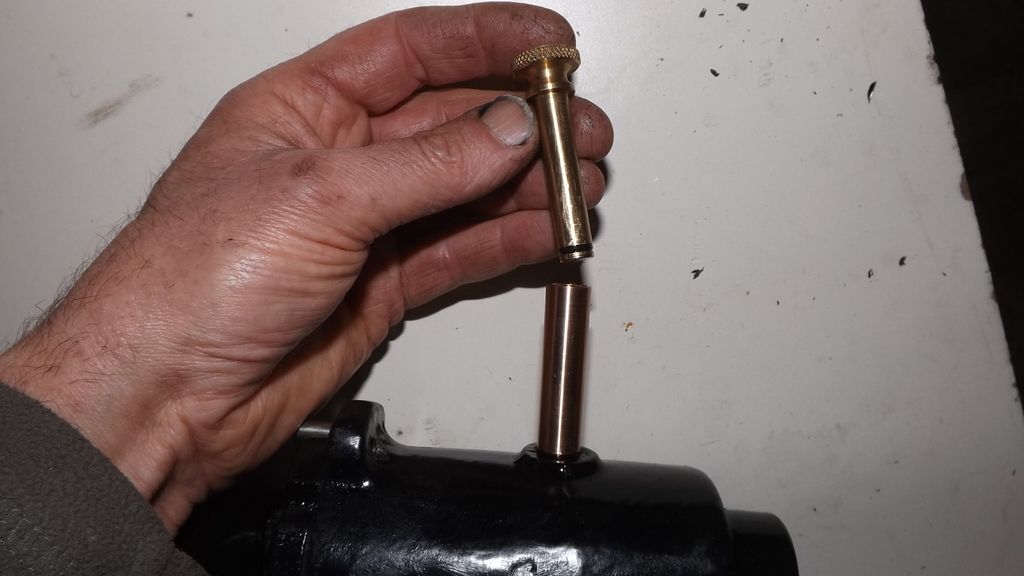
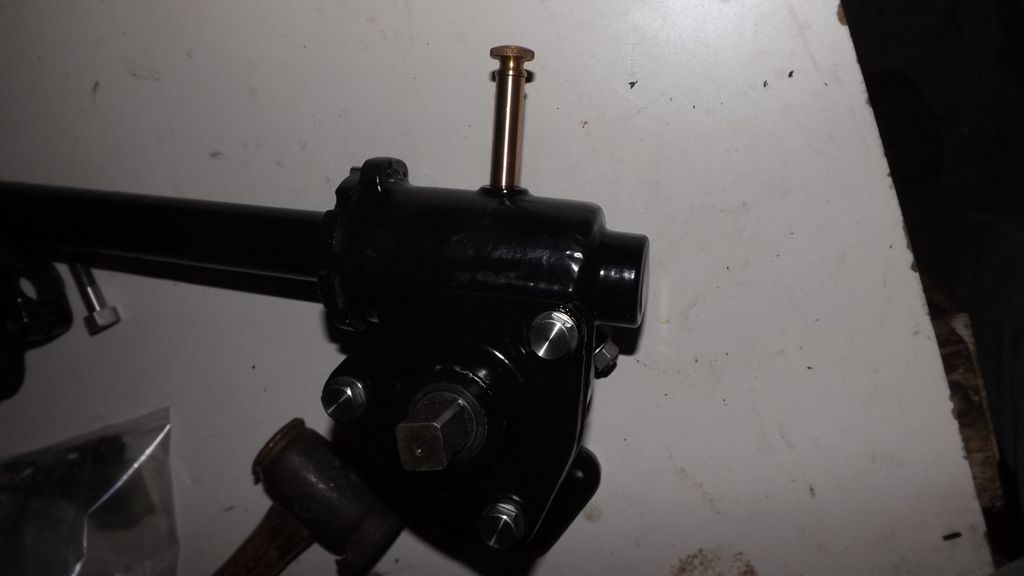
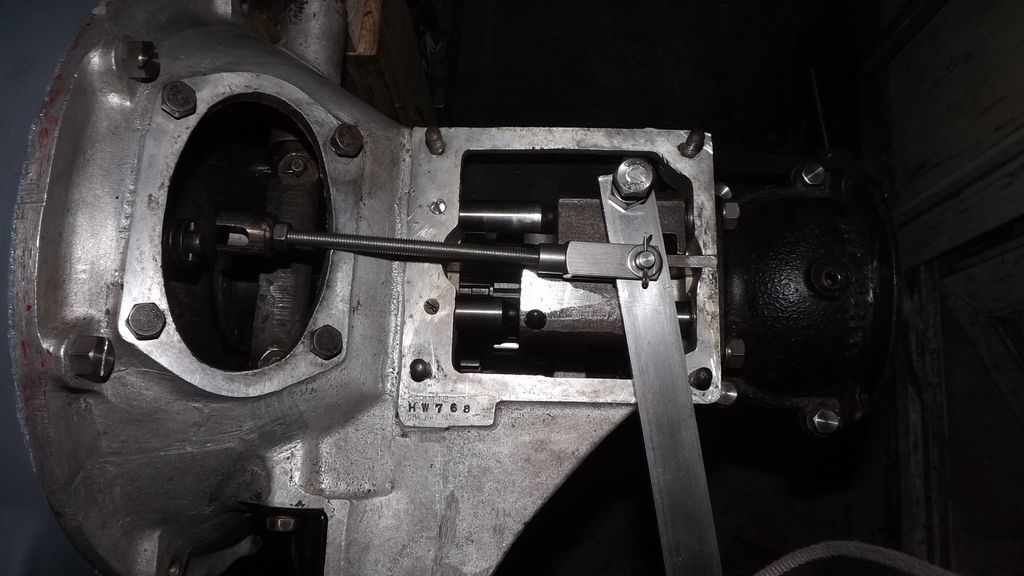
Next I reassembled the steering box and was wondering how I am going to get liquid grease into it during servicing as it had a modern grease nipple. The thought of loading up a grease gun with liquid grease sounded awfully messy. I dont know how it was done originally so I made and fitted this plunger thing to inject the stuff in hydraulically.
I must clean my fingernails.

 |
|
| Back to top |
|
|
Miken
Joined: 24 Dec 2012
Posts: 544
|
| Posted: Thu May 11, 2017 8:29 pm Post subject: |
|
|
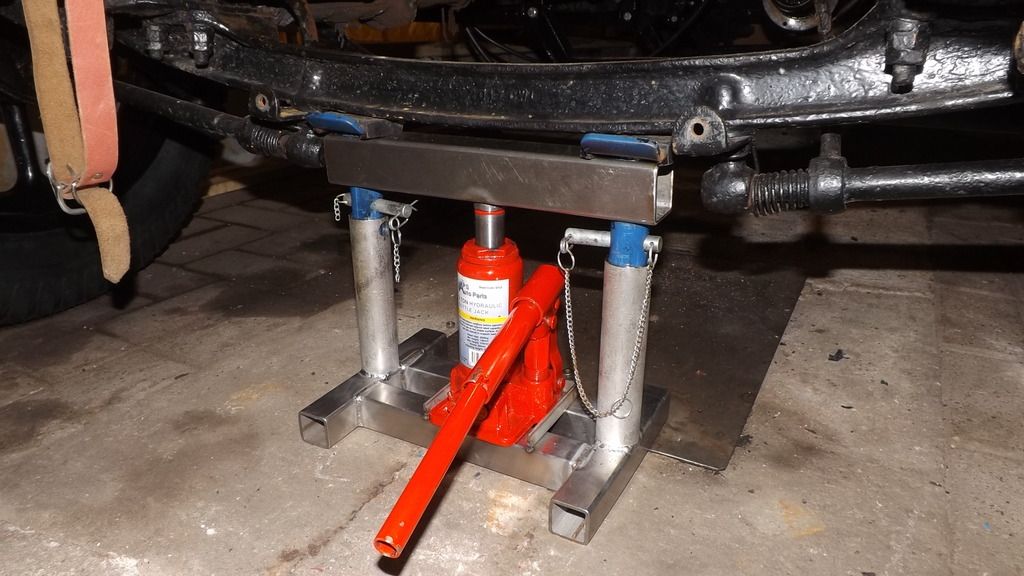
When raising the front of the car, Morris recommend a jack in the centre of the axle with a pile of wood blocks or bricks either side.
Ive been using this trolley jack with a couple of axle stands either side which is a bit of a faff trying to locate and wiggle all three items into place, they only just fit.
I also have to dismount the front number plate first because it gets in the way.

So ive made this device from 4mm wall thickness, box section tube.
It combines and keeps all three elements together and utilises parts of the old axle stands
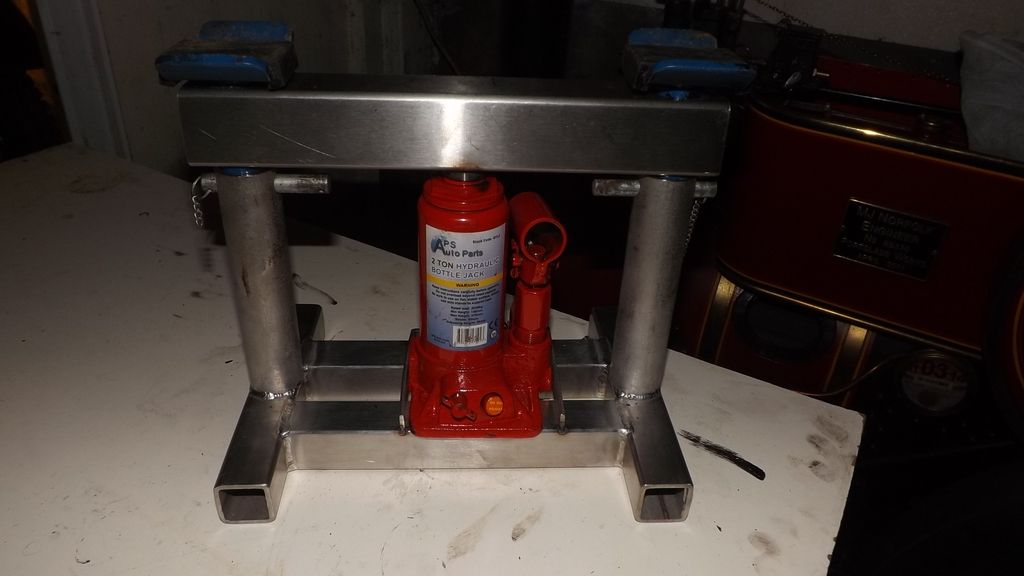
I haven't tried yet but hopefully I will be able to raise the car without first having to dismount the number plate (which is removed in these pics).
 |
|
| Back to top |
|
|
Bitumen Boy
Joined: 26 Jan 2012
Posts: 1735
Location: Above the snow line in old Monmouthshire
|
| Posted: Thu May 11, 2017 9:59 pm Post subject: |
|
|
| I know exactly where you're coming from making this gadget. Let us know how you get on with it |
|
| Back to top |
|
|
PAUL BEAUMONT
Joined: 27 Nov 2007
Posts: 1281
Location: Barnsley S. Yorks
|
| Posted: Fri May 12, 2017 12:59 pm Post subject: |
|
|
| Hi Miken, who did you use for the white-metalling? I have just had a job done by Formhalls. The turn-round time was under 2 weeks! Probably not the cheapest but they were knowledgeable and did a super job! |
|
| Back to top |
|
|
Miken
Joined: 24 Dec 2012
Posts: 544
|
| Posted: Fri May 12, 2017 8:46 pm Post subject: |
|
|
| PAUL BEAUMONT wrote: | | Hi Miken, who did you use for the white-metalling? I have just had a job done by Formhalls. The turn-round time was under 2 weeks! Probably not the cheapest but they were knowledgeable and did a super job! |
Hello Paul,
I went to Gosnays at Romford. They originally said it would be 10 weeks but I think it's been over 4 months now. I'm reluctant to keep chasing them up. I just want it done well. Apparently the big ends are all done . They are just waiting for the main bearings to be line bored. Which takes a bit of setting up.
A few years ago they did the white metalling on a 1933 Morris Minor I had and were much quicker. They did a good job though.
Mike |
|
| Back to top |
|
|
Miken
Joined: 24 Dec 2012
Posts: 544
|
| Posted: Sat Jun 03, 2017 9:48 pm Post subject: |
|
|
At last i have my engine parts back.
I would have loved to have started putting it straight back together, but first i wanted to do some alignment checks.
I turned up a test bar for the big end and found a length of ground silver steel for the small end.
First I checked for straightness (the test bars need to be parallel to each other):-
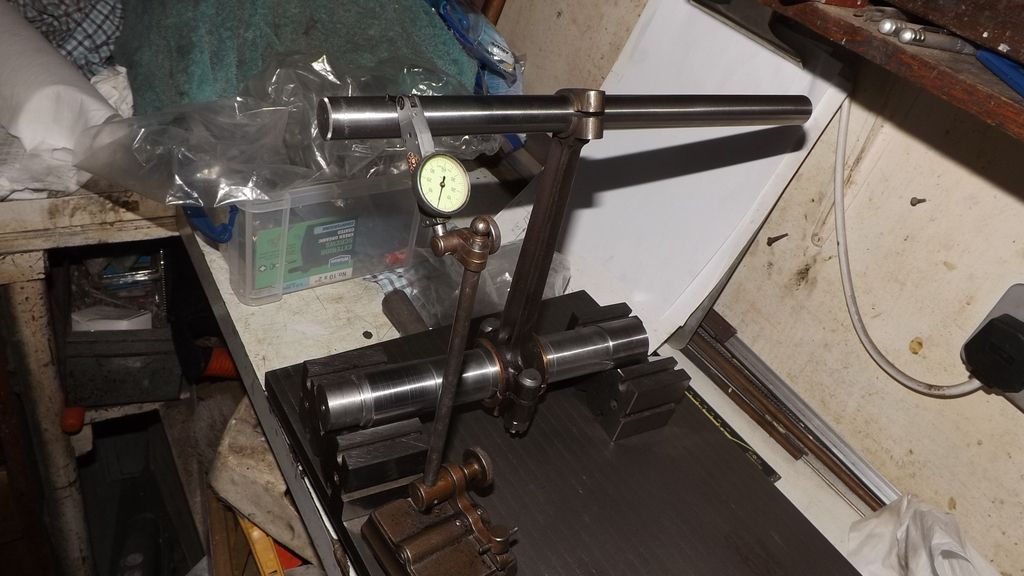
Next , for twist:-

I spent a bit of time re-setting them then fitted the pistons using buttons in the gudgeon pins so that they didn't get twisted again:-
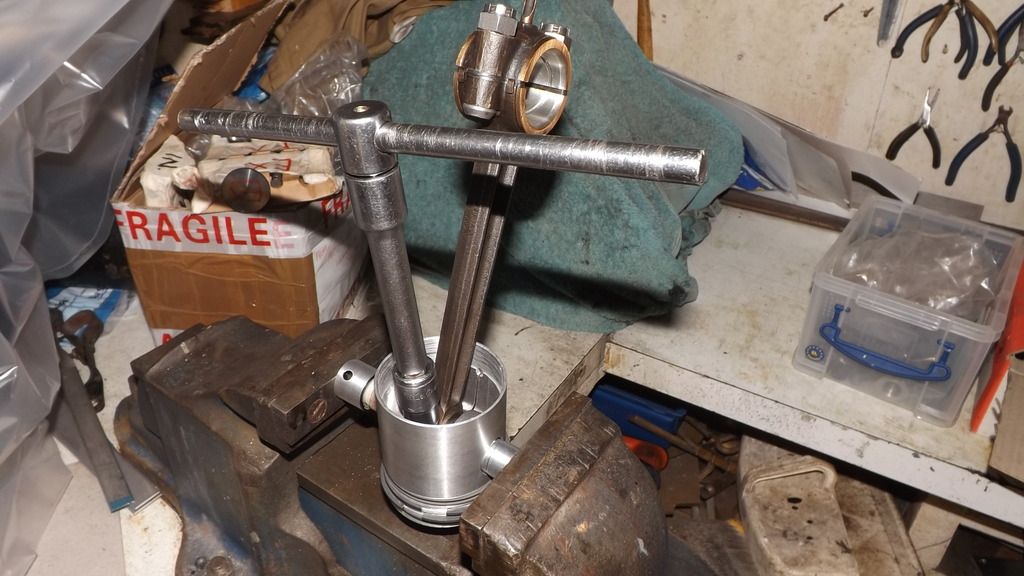
Im not all that experienced with rebuilding car engines but i have done quite a few old motorbikes.
Ive got a bit of a thing about rod alignment. Old bikes like Triumphs and BSA,s which have alloy rods always seem to be badly bent. I suspect where careless owners in the past have hammered out the pins, Steel rods not so often.
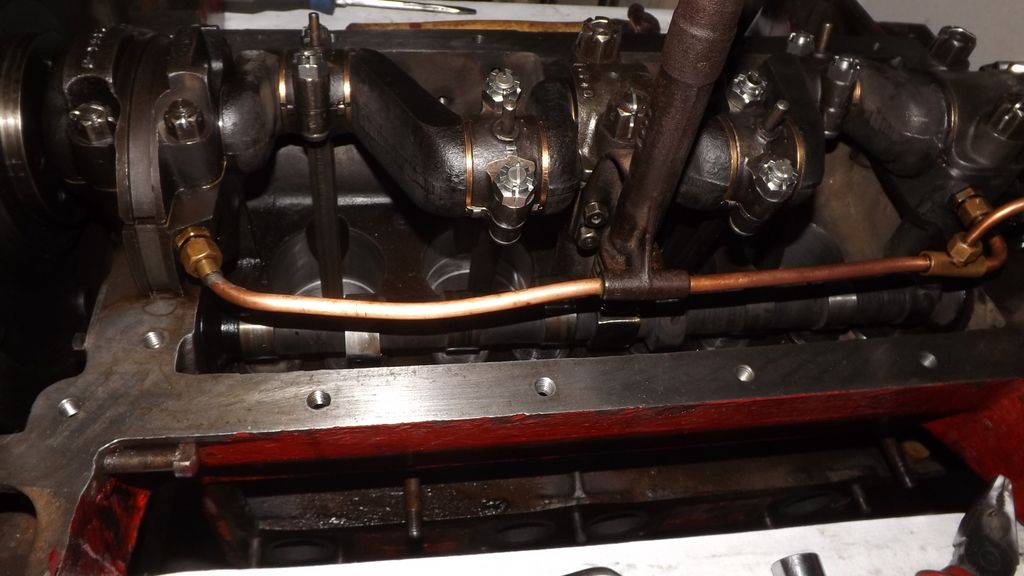
Next the crankshaft goes into the new line bored white metal bearings, Note the scollop on one side only of the cylinder bores. This is due to the off-set (desaxe) centreline of the crank shaft on these engines :-
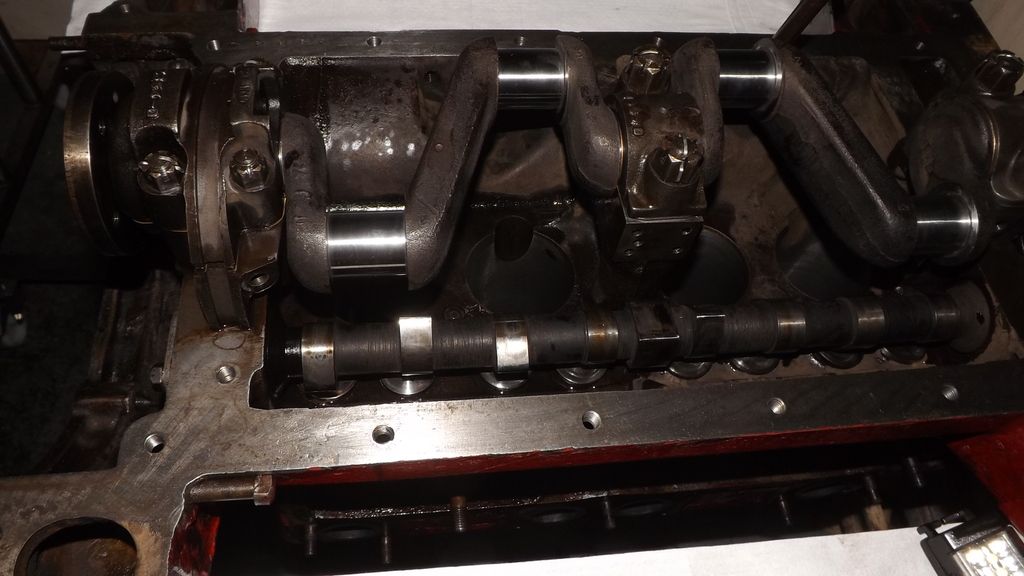
Next, the oil pump and internal plumbing. Annoyingly the flash picture makes it all look rusty and grubby. But everything is actually very nice and clean:-
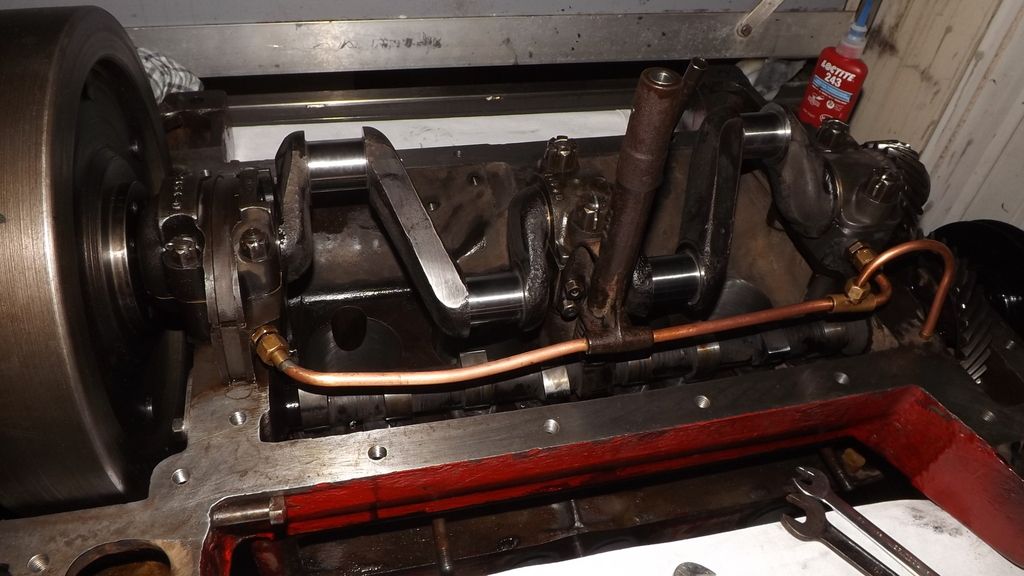
Here the rods and pistons fitted with new big end bolts and nuts:-
 |
|
| Back to top |
|
|
bjacko
Joined: 28 Oct 2013
Posts: 357
Location: Melbourne Australia
|
| Posted: Sun Jun 04, 2017 7:33 am Post subject: Re Oiling tool |
|
|
| In the old days they had Oil guns which were like grease guns only smaller. I presume they also had a smaller outlet. They fit on to grease nipples the same as a grease gun. I have one in my garage if you want more details. |
|
| Back to top |
|
|
Miken
Joined: 24 Dec 2012
Posts: 544
|
| Posted: Sun Jun 04, 2017 6:02 pm Post subject: Re: Re Oiling tool |
|
|
| bjacko wrote: | | In the old days they had Oil guns which were like grease guns only smaller. I presume they also had a smaller outlet. They fit on to grease nipples the same as a grease gun. I have one in my garage if you want more details. |
Thanks bjacko, But i'll stick with what ive got. |
|
| Back to top |
|
|
Miken
Joined: 24 Dec 2012
Posts: 544
|
| Posted: Sun Jun 04, 2017 9:28 pm Post subject: |
|
|
Today I assembled the gearbox to the engine.
When removing the gearbox on these units you have to pull out the clutch spring retaining pins and remove the springs which allows the gearbox to be drawn off.
I managed to do this with the aid of a couple of screwdrivers to compress the springs while my wife wielded a pair of long nosed pliers to pull the pins. This was fine for dismantling but a bit risky for reassembling. The service sheet says use Morris spring compressor tool xxxx but did not show a picture. I dont know what it looks like but improvised this from bits found in my garage and it worked well.
 |
|
| Back to top |
|
|
Miken
Joined: 24 Dec 2012
Posts: 544
|
| Posted: Thu Jun 08, 2017 9:20 pm Post subject: |
|
|
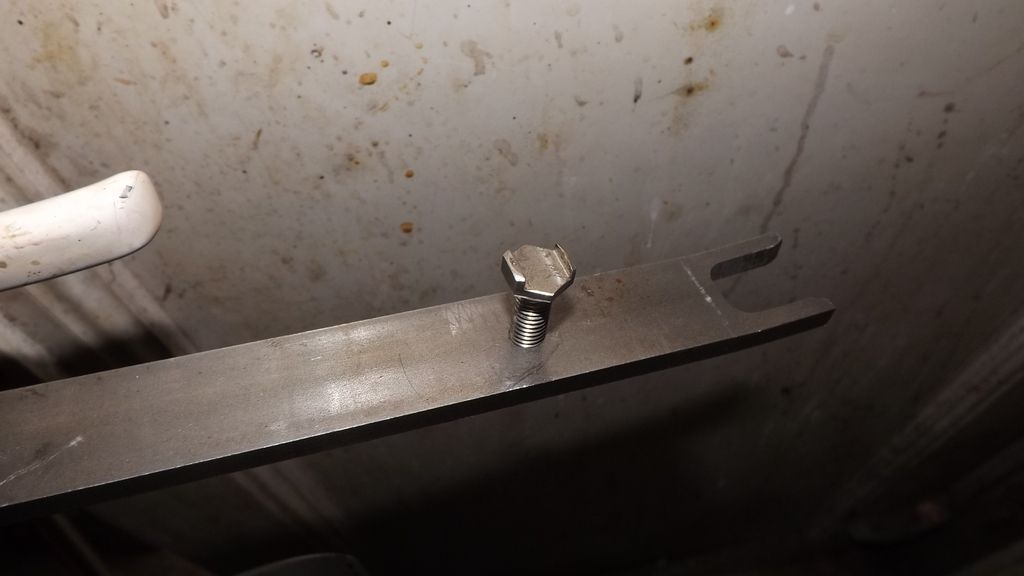
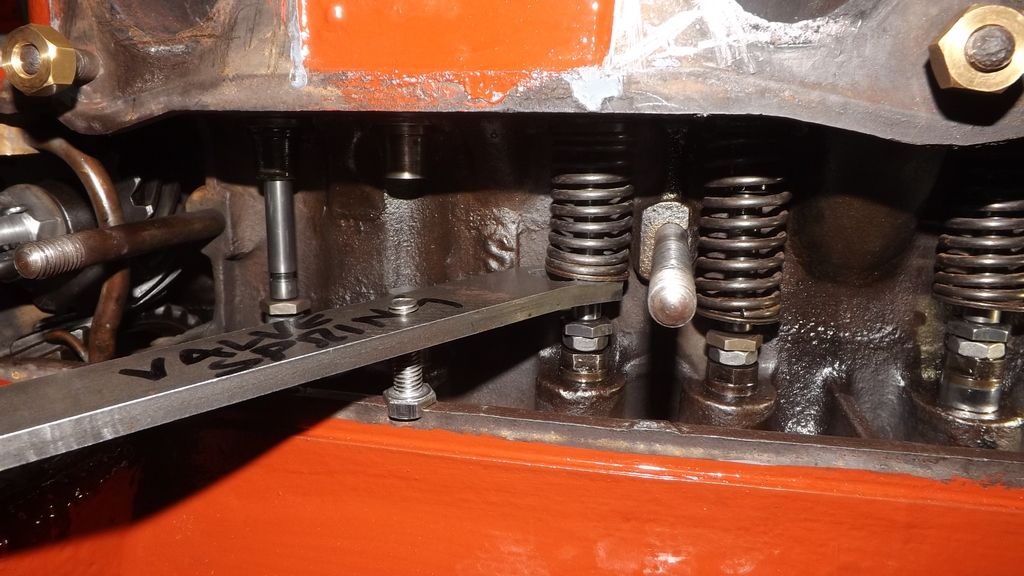
I have a selection of valve spring compressors but none of them were suitable for the Morris.
So I made this valve compressing lever from a bit of flat steel strip and an M8 screw.
Its very easy to use.
 |
|
| Back to top |
|
|
bjacko
Joined: 28 Oct 2013
Posts: 357
Location: Melbourne Australia
|
| Posted: Fri Jun 09, 2017 7:03 am Post subject: Early Morris |
|
|
| Morris special tools are shown in the Morris parts List and the Service information Sheets section G21 this includes the tools above. |
|
| Back to top |
|
|
Miken
Joined: 24 Dec 2012
Posts: 544
|
| Posted: Sat Jun 10, 2017 10:22 pm Post subject: Re: Early Morris |
|
|
| bjacko wrote: | | Morris special tools are shown in the Morris parts List and the Service information Sheets section G21 this includes the tools above. |
I don't have this service sheet but would be interested to see it if it shows illustrations. |
|
| Back to top |
|
|
bjacko
Joined: 28 Oct 2013
Posts: 357
Location: Melbourne Australia
|
| Posted: Mon Jun 12, 2017 7:45 am Post subject: 1927 Cowley |
|
|
| Yes the sheets have an illustration for each tool. If you are a Morris Register member they are available on their website. |
|
| Back to top |
|
|
|


