
Classic cars forum & vehicle restoration.
|
|
| Author |
Message |
Vulgalour
Joined: 08 May 2018
Posts: 474
Location: Kent
|
 Posted: Tue Nov 19, 2019 12:56 am Post subject: Posted: Tue Nov 19, 2019 12:56 am Post subject: |
 |
|
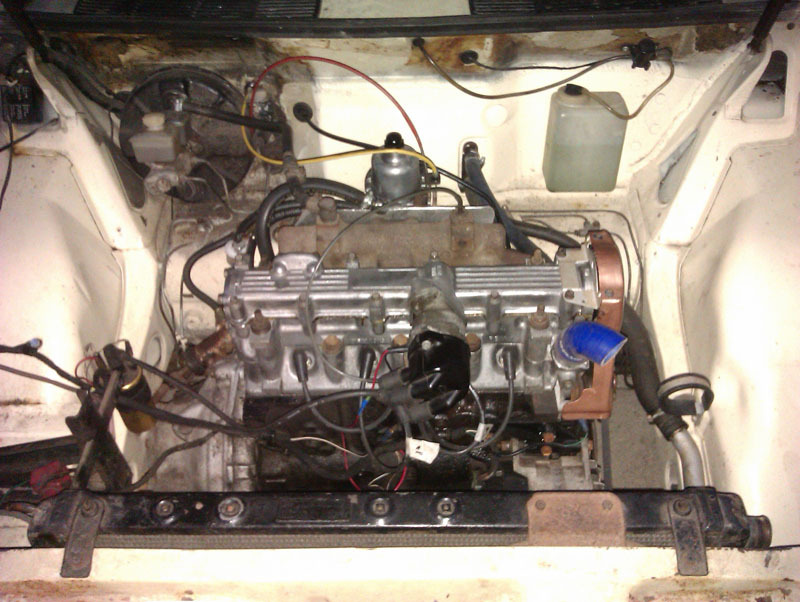
Almost there now. Just waiting on some coolant related parts to arrive before I can button everything up and test it.
 |
|
| Back to top |
|
 |
badhuis

Joined: 20 Aug 2008
Posts: 1390
Location: Netherlands
|
| Posted: Tue Nov 19, 2019 9:14 am Post subject: |
|
|
Good to see a nice, uncluttered engine room with room to spare. Surprised to see a Process did not have an electric windscreen washer.
_________________
a car stops being fun when it becomes an investment |
|
| Back to top |
|
|
Rick
Site Admin

Joined: 27 Apr 2005
Posts: 22446
Location: UK
|
|
| Back to top |
|
|
Da Tow'd

Joined: 16 Jun 2010
Posts: 349
Location: Bella Coma British Columbia Canada
|
| Posted: Tue Nov 19, 2019 6:15 pm Post subject: |
|
|
We took the for mentioned Volvo 245 out for a test drive- Heater works fine , wipers work, horn is loud but the clutch is slipping.
So I put it back in the shop and pulled the transmission out and found the pressure plate has a big groove cut into it and not much of the friction surface left on the disc.
waiting for parts
Hank |
|
| Back to top |
|
|
Vulgalour
Joined: 08 May 2018
Posts: 474
Location: Kent
|
| Posted: Tue Nov 19, 2019 6:53 pm Post subject: |
|
|
| Rick wrote: | | badhuis wrote: | | Good to see a nice, uncluttered engine room with room to spare. Surprised to see a Process did not have an electric windscreen washer. |
Is that a remote electric pump on the bulkhead?
RJ |
It is indeed. That's an earlier car's washer bottle, mine originally had an electric pump incorporated into the bottle and when it failed I switched to the earlier car part I had to hand and since it's always worked I've never gone back to the original set up.
As uncluttered as the engine bay looks, its not without its issues. Generally, whatever item you want to work on is packed into the space in such a way that it's just as annoying as a less spacious engine bay, things like the spark plug that's directly underneath the distributor. |
|
| Back to top |
|
|
Vulgalour
Joined: 08 May 2018
Posts: 474
Location: Kent
|
| Posted: Thu Nov 21, 2019 7:14 pm Post subject: |
|
|
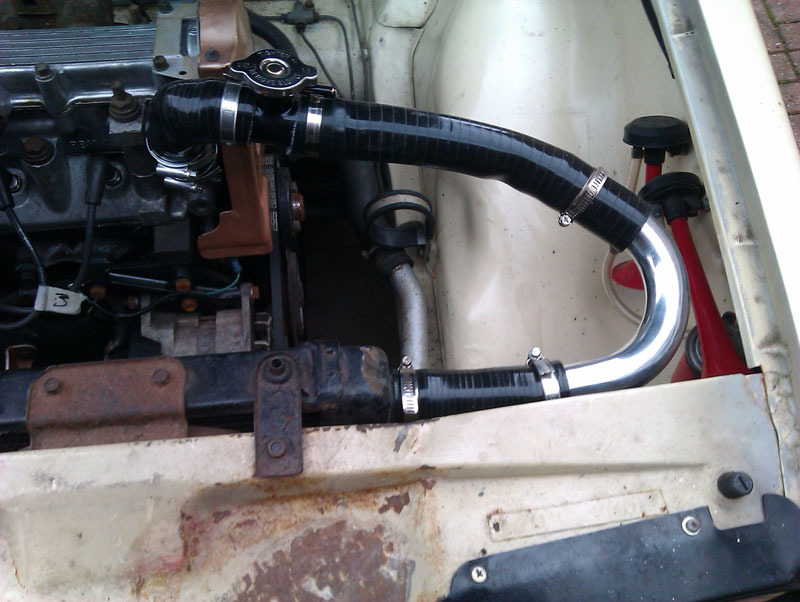
Coolant hoses arrived today which helped me get a bit further with the Princess. I'm only waiting on the new sump plug washers and temperature sender arriving, hopefully tomorrow, so that I can get the fluids in and see if everything is willing to work again.
 |
|
| Back to top |
|
|
Rick
Site Admin
Joined: 27 Apr 2005
Posts: 22446
Location: UK
|
|
| Back to top |
|
|
Rootes75
Joined: 30 Apr 2013
Posts: 3813
Location: The Somerset Levels
|
| Posted: Sun Nov 24, 2019 6:48 pm Post subject: |
|
|
After a lot of coaxing and booster on the charged up battery we got our Karrier engine up and running after 10 years of being parked up.
She has the Perkins 4203 engine and its always done us proud. I have 3 people coming down to view her, its was always our plan to move her to the front of the shed and get her started before anyone viewed her.
_________________
Various Rootes Vehicles. |
|
| Back to top |
|
|
Ray White

Joined: 02 Dec 2014
Posts: 6310
Location: Derby
|
| Posted: Sun Nov 24, 2019 7:28 pm Post subject: |
|
|
I made a start on fitting the new higher ratio crown wheel and pinion - and taper roller bearings to the pinion shaft. I had previously stripped down and cleaned the unit in readiness for the new parts.
First problem; the new pinion seemed to have a different thread as the old nut wouldn't quite fit. Enquiries with supplying engineer Roger Furneaux established that the threads are the same. It is a BSF form but not quite the same as usual. Someone has in the past forced a nut so it appears to fit. Roger is sending me a new nut. He makes them.
The c.w.p. and taper bearings came with some shims. To compensate for the off set of 1.25mm between the inner and outer races, shims are added to the spacer between the bearings. It materialised that I needed one more shim. In this case I was fortunately able to find one.!
The instructions for fitting the bearings say there should be no back lash; indeed, there should be a specific pre load of 5-7 ft.lb.ins.
I was able to establish the correct pre load by using my old pinion shaft. I needed to mount the shaft in the lathe and polish the bearing surfaces so that the inner races easily slid on and off. The outer rings were pressed into the housing. Of course, the new shaft will be a much tighter fit.
The only way to hold the pinion while tightening the 1 1/8" castellated nut) is to bolt a steel holding bar to two of the drive flange holes. Sufficient material must be then be removed from the bar to allow for a socket. In this case I also had to skim out the inner surface of the flange to enable a socket to fit. |
|
| Back to top |
|
|
Da Tow'd
Joined: 16 Jun 2010
Posts: 349
Location: Bella Coma British Columbia Canada
|
| Posted: Tue Nov 26, 2019 6:01 pm Post subject: |
|
|
After spending a day trying to re mount the transmission in the 245 Volvo after the clutch job I found out that I should have removed the engine and transmission as a unit. So I pulled the engine and mated them up
They went back in pretty smooth.
I've done at least a dozen North American vehicles clutch jobs by pulling the transmission.
Even old dogs can learn new tricks. |
|
| Back to top |
|
|
Ray White
Joined: 02 Dec 2014
Posts: 6310
Location: Derby
|
| Posted: Tue Nov 26, 2019 6:16 pm Post subject: |
|
|
I took a trip over to Leicester from Derby to collect my TC shock absorbers. They had been refurbished ...or at least three of them had.
The fourth, an o/s rear, was different from the others. An historic replacement from the distant past when an accident had caused the supporting bracket to break. The bracket had been welded but the original damper had been replaced by an odd one.
The cost of a correct pattern ready to fit Luvax lever arm damper from a specialist supplier was £325 + V.A.T. + postage. ...
Total: £ 408.00. ...take it or leave it.
I could do it but I simply don't have the time to strip and rebuild shock absorbers. I need to get on with the build if it is to be finished by this time next year.! |
|
| Back to top |
|
|
Vulgalour
Joined: 08 May 2018
Posts: 474
Location: Kent
|
| Posted: Fri Nov 29, 2019 1:36 am Post subject: |
|
|
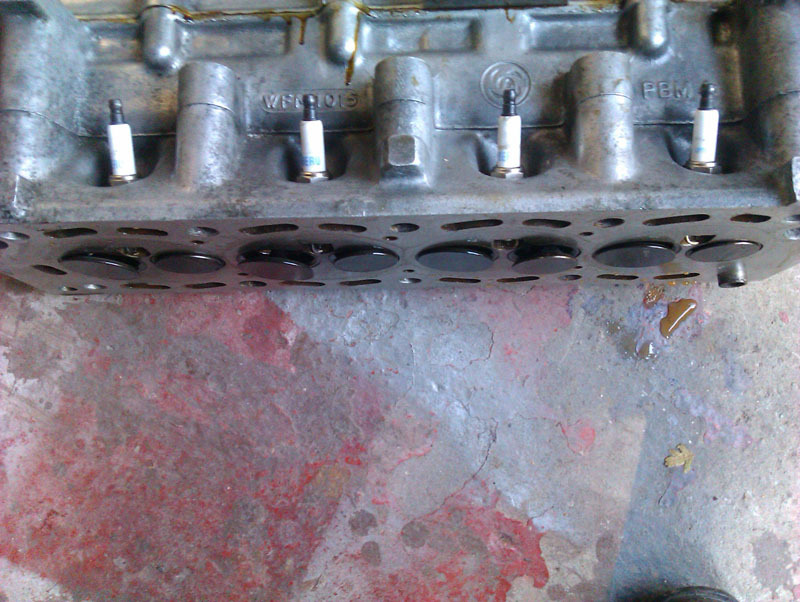
Got the Princess running, hoorah! Before I could set the timing, I did a check for any leaks and found one, at the top of the end cover plate on the head. An odd place for a leak, but should just need the bolt tightening a tiny bit.
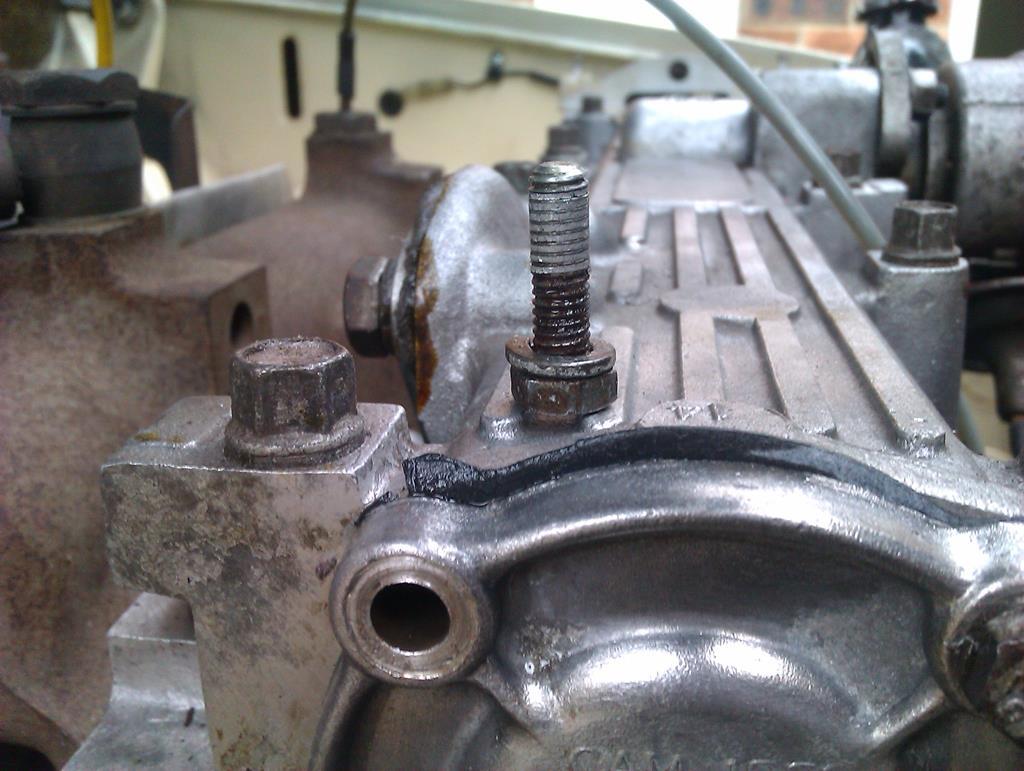
The bolt pulling the thread out of the top half of the head was not the desired result. Happily, a helicoil kit is on the way to fix this issue, then I can try again. We were a little concerned that the valve train might be noisy given the work done, happily this has not been the case. Filling and bleeding the coolant system went much smoother thanks to the improved pipework.
May have also fixed the cold starting issue on the BX by simply replacing two rubber hoses with clear hoses, something that was done to check for air bubbles in the fuel (it's a diesel). This seems to have resolved the reluctance the car had about starting when cold, a problem it developed when temperatures started to fall, and having already ruled out glowplugs, glowplug relay, and battery if it hadn't been the hoses my next port of call would have been a spill test on the injectors.

I don't actually like working on engines at all, I find it all incredibly frustrating, I'd far rather be doing bodywork or upholstery. |
|
| Back to top |
|
|
Ray White
Joined: 02 Dec 2014
Posts: 6310
Location: Derby
|
| Posted: Fri Nov 29, 2019 2:22 am Post subject: |
|
|
The original pinion end plate has a brass oil scroll that while being effective at retaining oil has the unfortunate effect of drawing in dust and grit which can cause scoring of the drive flange boss. A number of different modified end plates are now available; however MG Guru Roger Furneaux in Devon will convert your original end plate (or exchange) to a double lip seal at a reasonable price.
The modified end plate arrived so today I trued up the pinion drive flange face on the lathe then made up a mandrel to hold it the opposite way round and polished the flange boss with emery cloth. The rubber lip seal cleverly runs on an unused (therefore undamaged) part of the flange boss.
Having already determined the required amount of pre load and pressed the bearing cones into the housing (making sure that the tapers face each other) I set about pressing the new bearings - complete with spacer and shims - onto the new pinion. Using a suitable length of 1"diameter steel tubing I first pressed on the smaller of the two bearings. You have to be careful that the rather unwieldy assembly is absolutely square in the press.
With the first bearing on and the distance piece and shims in place the housing can then be put on. (It must go on the right way round!) The larger bearing can then be pressed on and the modified end plate and splined flange can go on. |
|
| Back to top |
|
|
consul 57
Joined: 09 Nov 2017
Posts: 487
Location: somerset
|
| Posted: Fri Nov 29, 2019 2:14 pm Post subject: |
|
|
finaly sealed up my consul exhaust manifold.
after plenty of sealant and 7-8 attempts i took it off and found it was bent, from new! it was an after market stainless one.
took it to my local do it all engineering shop who said lets have a go.
after 2 small welds on the out side fo the manifold the heat straightened it up a treat, now fitted and sounds far quieter in the engine bay, most of the noise is now out of the tail pipe?
who would have thought 2 welds could do so much. |
|
| Back to top |
|
|
Vulgalour
Joined: 08 May 2018
Posts: 474
Location: Kent
|
| Posted: Sat Nov 30, 2019 4:51 pm Post subject: |
|
|
Fell at the last hurdle.
When I started the car, there was an oil leak on the end plate of the head. In trying to cure that, the bolt where the leak was present stripped the thread out of the head. That was an easy fix with a helicoil kit, however the paper gasket was torn in the process of removing the end plate. Rather than risking a damaged gasket, I used some sealant I had since I didn't have a spare gasket or paper to hand and it seemed a reasonable alternative.
Unfortunately, the paper gasket also serves as a vital shim, without it the camshaft binds against the end plate, this in turn caused the cambelt to skip several teeth and, since the O series is an interference engine, all the of the valves met all of the pistons. It appears this coming together only happened the once, so it is repairable, and I may even have relevant parts to fix it in my spare head.
It has been a frustrating quarter with this car, mostly through no fault of the car. I shall persist, naturally, since that's the order of things. |
|
| Back to top |
|
|
|
|
You cannot post new topics in this forum
You cannot reply to topics in this forum
You cannot edit your posts in this forum
You cannot delete your posts in this forum
You cannot vote in polls in this forum
|
php BB powered © php BB Grp.
|


