
Classic cars forum & vehicle restoration.
|
|
| Author |
Message |
roverdriver

Joined: 18 Oct 2008
Posts: 1210
Location: 100 miles from Melbourne, Victoria, Australia
|
 Posted: Tue Feb 24, 2015 6:48 am Post subject: Repair a Smith's Heater. Posted: Tue Feb 24, 2015 6:48 am Post subject: Repair a Smith's Heater. |
 |
|
While this repair is for a heater as fitted to a 1950 Rover 75, the style of Smith's heater is common to all Rover P4's and, I imagine, used in other cars of the same era as the P4.
Heater Recommissioning.
When acquired, our 1950 Rover 75 had the heater by-passed by a long length of hose. I had many more pressing tasks on the car, so it was only recently that I tackled the heater problem.
It was with some trepidation that I started to examine the unit and try to work out what might be wrong with it, and why it was disconnected. One thing was apparent, the diecast tube, part of the tap, that accepts the hose, was badly corroded, so much so that connecting a hose would be difficult. The tap is held by two cheese-head screws, and they resisted any attempt to undo them with the heater in situ. It became obvious that the whole heater assembly would have to be removed. Mainly following the WSM, I achieved that, and with the unit on the bench set to work.
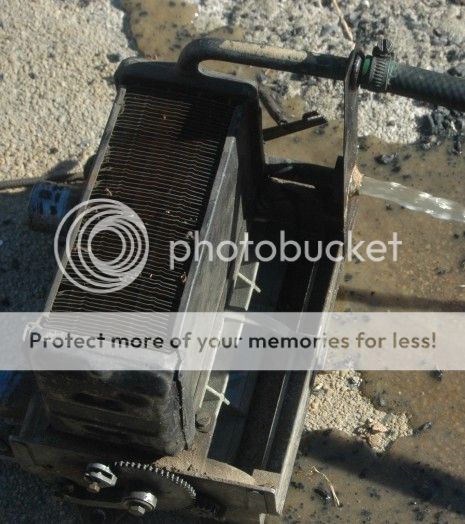
There are two spring clips to hold the outer box in place and some small Phillips head self tapping screws securing the box and a narrow panel above the tap. On the 75 there is another panel on the side held with similar screws, and with those undone, an internal moving baffle can be withdrawn and the outer box lifted off.
Here is the tap-

As you can see there is not much of the hos-connecting 'snout' left. Using some lock-jaw pliers, I managed to start the two cheese head screws, then undid them with a screwdriver. I could then separate the tap from the heater matrix.

Both tap and heater matrix were blocked. I managed to loosed the gunge that was in the matrix tube, so then coupled it, via a hose, to the garden tap and flush the whole matrix through. I was pleased that there were no leak to be seen.
Now to tackle the tap proper. It is held together with four set screws with nuts, and after undoing those, I was able to prise the two halves apart. Apart from all of the gunge, there was a strangely distorted piece of rubber inside.
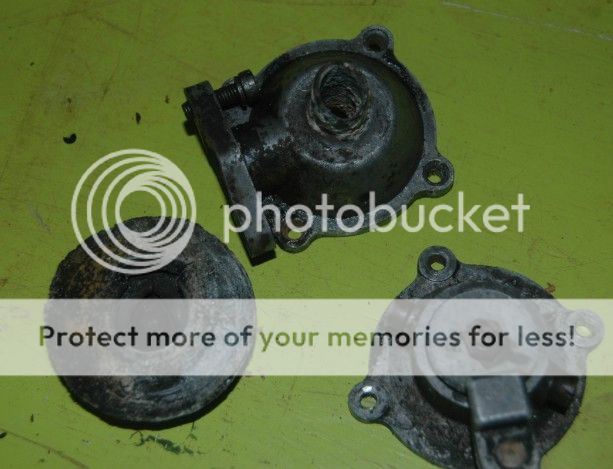
The question now arose, what did that rubber look like originally and where can I find another one?

After cleaning the cavities inside the tap it became apparent that the screw and nut on the outside was an adjustment for the rubber diaphragm, and that a washer on the inside end of the screw should be embedded into that diaphragm. Now things started to become clear. The tap operates on a simple cam principle. As the outside lever moves the cam causes the diaphragm to be pressed over the tap inlet to stop the flow, or alternatively to be withdrawn from it to allow the flow.
Perhaps that distorted old diaphragm was originally quite a simple shape. Now I needed some sheet rubber and suitable punches.
A car inner tube provided the rubber, but the large punch was less easy until I found a suitable sized piece of pipe- the internal diameter was the required one and seven eights inches. Having sawed of a few inches of the pipe, I ground a cutting edge at one end, and proceeded to cut two rubber discs from the inner tube.

One of the discs had a small hole punched in the middle to allow the screw to pass through, but still retain the washer. The other disc was left whole.

Then with the screw and washer in place, the two discs were glued together. Now I needed two smaller discs of about one and a quarter inches. These were cut and glued onto the assembly.
With that, the new diaphragm was test fitted into the tap half.

After some testing and adjustment the two halves were reunited, and by blowing into the tap and moving the control rod I was fairly confident that the tap would work as intended.
Now to make a suitable connection for the hose to tap joint. Much wire brushing and scraping ensued to get rid of the corrosion on the tap's snout. Next I took a very short piece of 3/4" ordinary household copper pipe, and belled the end to give more surface area for the eventual joint. Next came a 3/4 to 1/2 inch reducer, and finally a short length of 1/2" copper pipe.
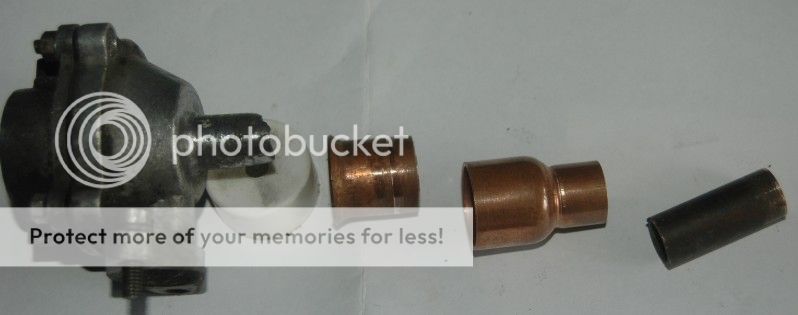
After cleaning the copper inside and out, I sweated them together with ordinary solder.

Next I used an American product that restorers there swear by. It is called J.B. weld and is an extremely strong, epoxy type material. This I used to coat the 'snout' and interior of the 3/4 end of the pip[e assembly. J.B. Weld is a slow-curing formula so it was left for 24 hours.
In the mean time, I worked on the main matrix assembly, cleaning the gears and freeing all moving parts. Now was the time to put the outer box case into place and test the whole thing for leaks and water flow.
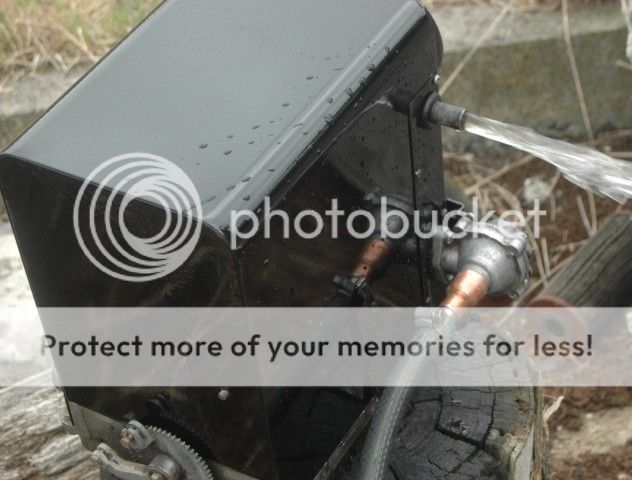
After that I wrestled the heater back into place on the car feeling rather pleased with the result.
I took the opportunity to drain and flush the radiator, and check the thermostat. Then I could fit the hoses to the heater and re-fill with water and corrosion inhibitor.
Before I started the job, I investigated buying a whole new tap. They are available in the U.K. for about 28 pounds (plus postage to Australia). The 75 tap, although built mostly the same way is slightly different from the other Rover P4 taps. The 75 tap has three positions- on, off, on, whereas the other heaters are simply 2 position- on, off.
The job took a little time, but cost virtually nothing as I utilised items from my special 'spare parts department' otherwise known as my junk pile. I not only saved myself the purchase of a new tap, but have one that is a slightly modified 'original', whereas the new taps are quite different in appearance.
If you have problems with this style of heater, my advice is to take it out of the car and refurbish it as I have done. I was somewhat worried about the job, but in fact it turned out to be a fairly easy one. Should you choose to do so, and need some advice, I am happy to help.
_________________
Dane- roverdriver but not a Viking.
Last edited by roverdriver on Tue Feb 24, 2015 10:27 am; edited 1 time in total |
|
| Back to top |
|
 |
Rick
Site Admin

Joined: 27 Apr 2005
Posts: 22439
Location: UK
|
|
| Back to top |
|
|
bob2
Joined: 06 Dec 2007
Posts: 1727
Location: Malta
|
| Posted: Tue Feb 24, 2015 9:39 am Post subject: |
|
|
Interesting read.
You managed to persuade me trying to solve something similar in my hunter's heater. Not that I need it much but its something to do on these rainy days and weekends at home!! |
|
| Back to top |
|
|
Rick
Site Admin
Joined: 27 Apr 2005
Posts: 22439
Location: UK
|
|
| Back to top |
|
|
roverdriver
Joined: 18 Oct 2008
Posts: 1210
Location: 100 miles from Melbourne, Victoria, Australia
|
| Posted: Tue Feb 24, 2015 10:36 am Post subject: |
|
|
I agree with you Rick. Perhaps a 'Hints and Tips' section, or maybe just a simple 'How to' one, and move all appropriate posting into it.
_________________
Dane- roverdriver but not a Viking. |
|
| Back to top |
|
|
baconsdozen

Joined: 03 Dec 2007
Posts: 1119
Location: Under the car.
|
| Posted: Tue Feb 24, 2015 12:51 pm Post subject: |
|
|
Excellent repair.Far more satisfying than simply throwing a cheque book at someone and hoping they can do it. I've got a 'spare parts' section just like that,all sorts of what others regard as junk can be reincarnated into something useful if you try hard enough.
_________________
Thirty years selling imperial hand tools for old machinery(Now happily retired). |
|
| Back to top |
|
|
|
|
You cannot post new topics in this forum
You cannot reply to topics in this forum
You cannot edit your posts in this forum
You cannot delete your posts in this forum
You cannot vote in polls in this forum
|
php BB powered © php BB Grp.
|


