
Classic cars forum & vehicle restoration.
|
|
| Author |
Message |
ukdave2002
Joined: 23 Nov 2007
Posts: 4104
Location: South Cheshire
|
 Posted: Tue Jun 30, 2015 7:27 am Post subject: Posted: Tue Jun 30, 2015 7:27 am Post subject: |
 |
|
No reason why the "Measles" is not a result of poor working practices in the factory? If the production line was not working 24 * 7 there will have bound to have been vehicles stood in primer, and 24 hours is all it needs for primer to absorb moisture.
Ford had a problem in the 70's after a strike, vehicles were left at all stages of production, many shells in primer, some allegedly left outside!! In the following years they were inundated with warranty claims for paint problems. 
Dave |
|
| Back to top |
|
 |
OuBallie
Joined: 02 Mar 2013
Posts: 225
Location: South Norfolk next to Suffolk
|
| Posted: Tue Jun 30, 2015 11:56 am Post subject: |
|
|
Interesting Dave.
Having been brought up in Jhb, where rust was virtually unheard off, out damp weather has been an eye opener.
Update:
Things have slowed down somewhat, what with domestic duties and my ongoing treatment.
BUT -
Having seen the extent to which a previous restorer went to, I've decided to play safe and remove the body.
I really need to make sure there are no hidden surprises chassis wise and floor pan wise.
As I will no doubt have to do this single handed, I've been thinking of ways to achieve the end result.
Now I intend making two two wheel trolleys, one to bolt onto the rear bumper iron body mount bolts, but stumped as to the front end.
Raising the rear of the body high enough is no problem, but the pointy end has me scratching my noggin.
Bracing the engine compartment as indicated is no problem either, BUT will that sheet metal take the strain?
Will also want to attach my car rotisserie to this as well.
Geoff - I just knew progress was going a tad too smoothly
_________________
Too many hobbies, not enough time!
1935 Austin Seven Ruby ARQ
1957 Austin A35 2-door
1967 Morris Minor 2-door
2007 Fiat Doblò MultiJet (It carries the spares etc)
Model Engineering |
|
| Back to top |
|
|
Penman
Joined: 23 Nov 2007
Posts: 4756
Location: Swindon, Wilts.
|
| Posted: Tue Jun 30, 2015 2:57 pm Post subject: |
|
|
Hi
A single brace might twist the sheet metal sides.
What about a cruciform brace bolted to both the top and bottom of the very front of the sides?
_________________
Bristols should always come in pairs.
Any 2 from:-
Straight 6
V8 V10 |
|
| Back to top |
|
|
mikeC

Joined: 31 Jul 2009
Posts: 1775
Location: Market Warsop, Nottinghamshire
|
| Posted: Tue Jun 30, 2015 7:36 pm Post subject: |
|
|
Those engine side panels are not really structural, and I doubt they will be strong enough to be used as major supports. You need to support the body on a trolley on the front of the floor pan.
Admittedly I was much younger then (40+ years ago), but I managed to slide a Ruby body single-handed backwards off the chassis onto a wheeled trolley; if you can enlist the help of a couple of mates, three of you should be able to carry it around onto suitable supports.
The body is pretty flimsy anyway, so I would suggest rolling it onto a mattress, rather than trying to use a rotisserie. |
|
| Back to top |
|
|
colwyn500
Joined: 21 Oct 2012
Posts: 1745
Location: Nairn, Scotland
|
| Posted: Tue Jun 30, 2015 8:43 pm Post subject: |
|
|
Geoff, I assume the body has simple, "U" section sills that bolt to the chassis and to which the "A" and "B" posts are rivetted or welded. This was the case on my '35 Ten. Before doing anything, if I were you I would get any rotten bases sorted and re-connected to the sills which will probably also be needing repair.
I my case, once I had done this I removed all the body to chassis bolts and managed to use a trolley jack and packing timbers to lift the body in increments at one end and then the other untill I could just get two long and stout pieces of timber, say 3 x 2's between the body and chassis extending from one side to the other and allowing at least a couple of feet each side to give something to get hold of. In my case I continued this process in a very precarious way until I had the timbers on sufficiently high trestles which allowed me to push the rolling chassis from under the body.
I ought really to have enlisted three friends and moved it in one go but having moved house at the time I didn't have any.
Once removed, the body was heavier than I expected and a lot more rigid. If I hadn't done the bracing repairs first I think the body might have gone out of shape. |
|
| Back to top |
|
|
OuBallie
Joined: 02 Mar 2013
Posts: 225
Location: South Norfolk next to Suffolk
|
| Posted: Sat Jul 04, 2015 12:45 pm Post subject: |
|
|
Colwyn500,
Correct re the 'U' section sills.
Once the heat is more conducive, I will clean up the B-Post to see what needs doing before I put any strain on that area as you did.
Geoff - Carport a 'No Go' area right now.
_________________
Too many hobbies, not enough time!
1935 Austin Seven Ruby ARQ
1957 Austin A35 2-door
1967 Morris Minor 2-door
2007 Fiat Doblò MultiJet (It carries the spares etc)
Model Engineering |
|
| Back to top |
|
|
OuBallie
Joined: 02 Mar 2013
Posts: 225
Location: South Norfolk next to Suffolk
|
| Posted: Fri Jul 10, 2015 6:57 pm Post subject: |
|
|
Update.
I intend to use my CarTrolleys so that I can roll the outside, but cannot of course use the bumper irons as I first thought to, as they are attached to the chassis - duh.
Anyone have any ideas on fixing a suitable frame to the rear to fit onto the CarTrolly please?
The chassis will be rolled away on its wheels.
Things are just getting better, with that 'patch' at the bottom of the NS B-post just being pushed in then covered in filler.
Can anyone beat these?
Photo 14:
The following speak for themselves, and make me shake my head, with 'King of Bodge and Filler' springing to mind, and NOT in a complimentary way either.
NS rear inner wheel arch.
Time to investigate what those two bits of filler, on the outside, would reveal, and this is the horror that came to light, covered in places with 1/4" of filler.
This shows just how rust has a free for all under filler if the metal isn't protected!
Photo 15:
Time for the OS inner wheel arch:
Photo 16:
Photo 17:
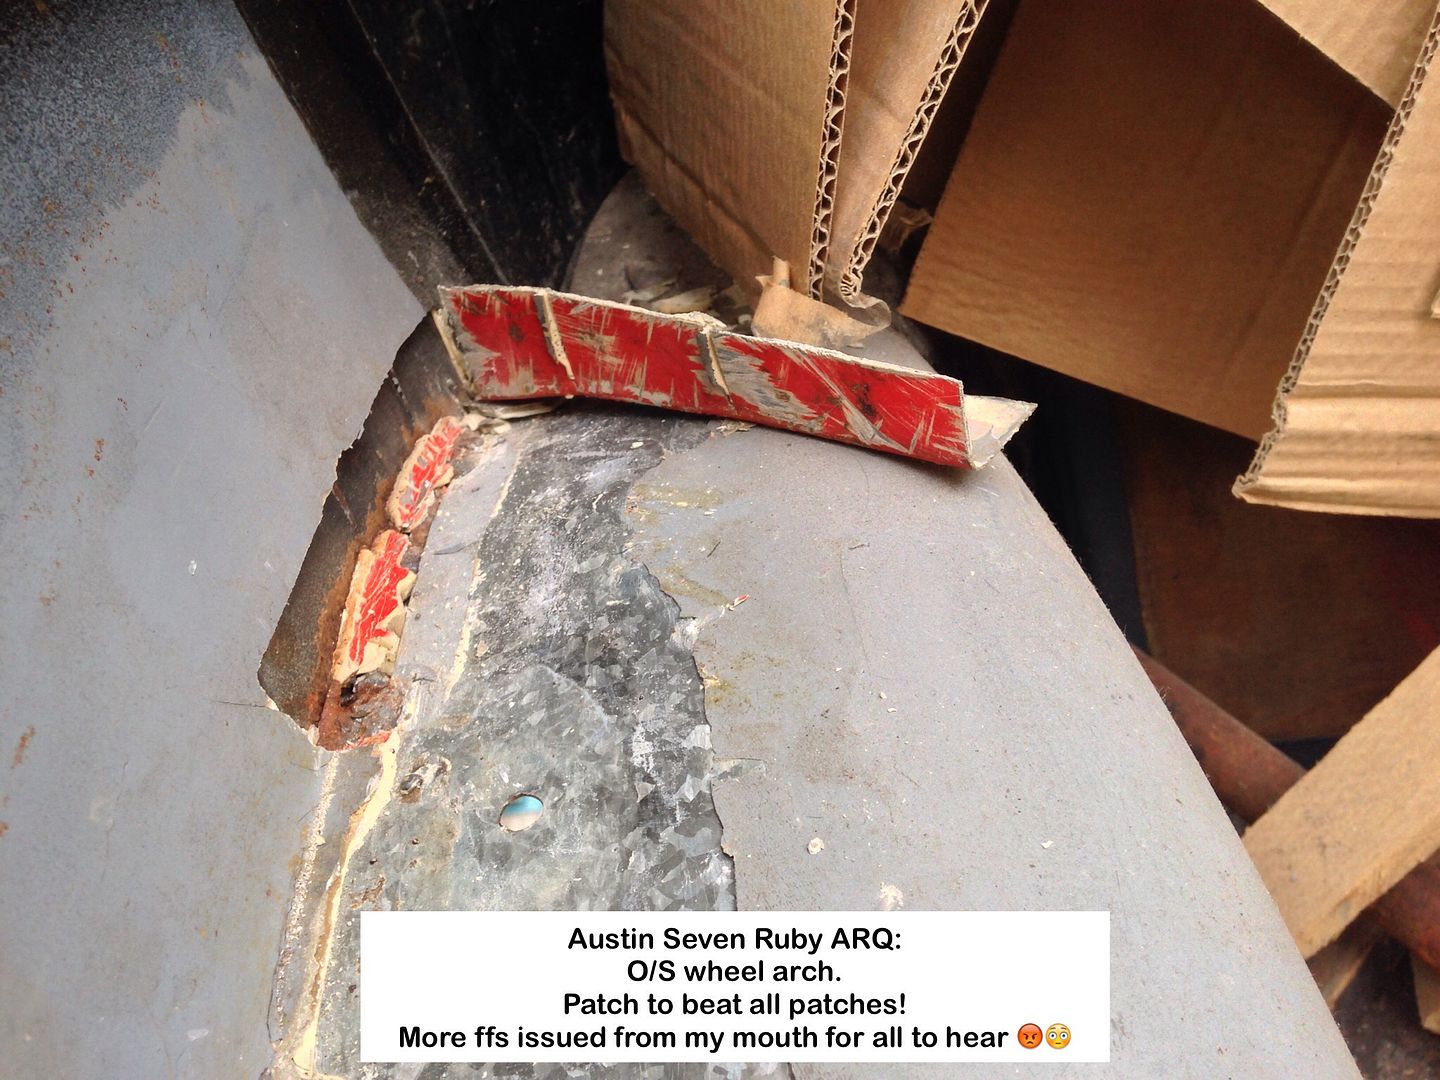
Photo 18:
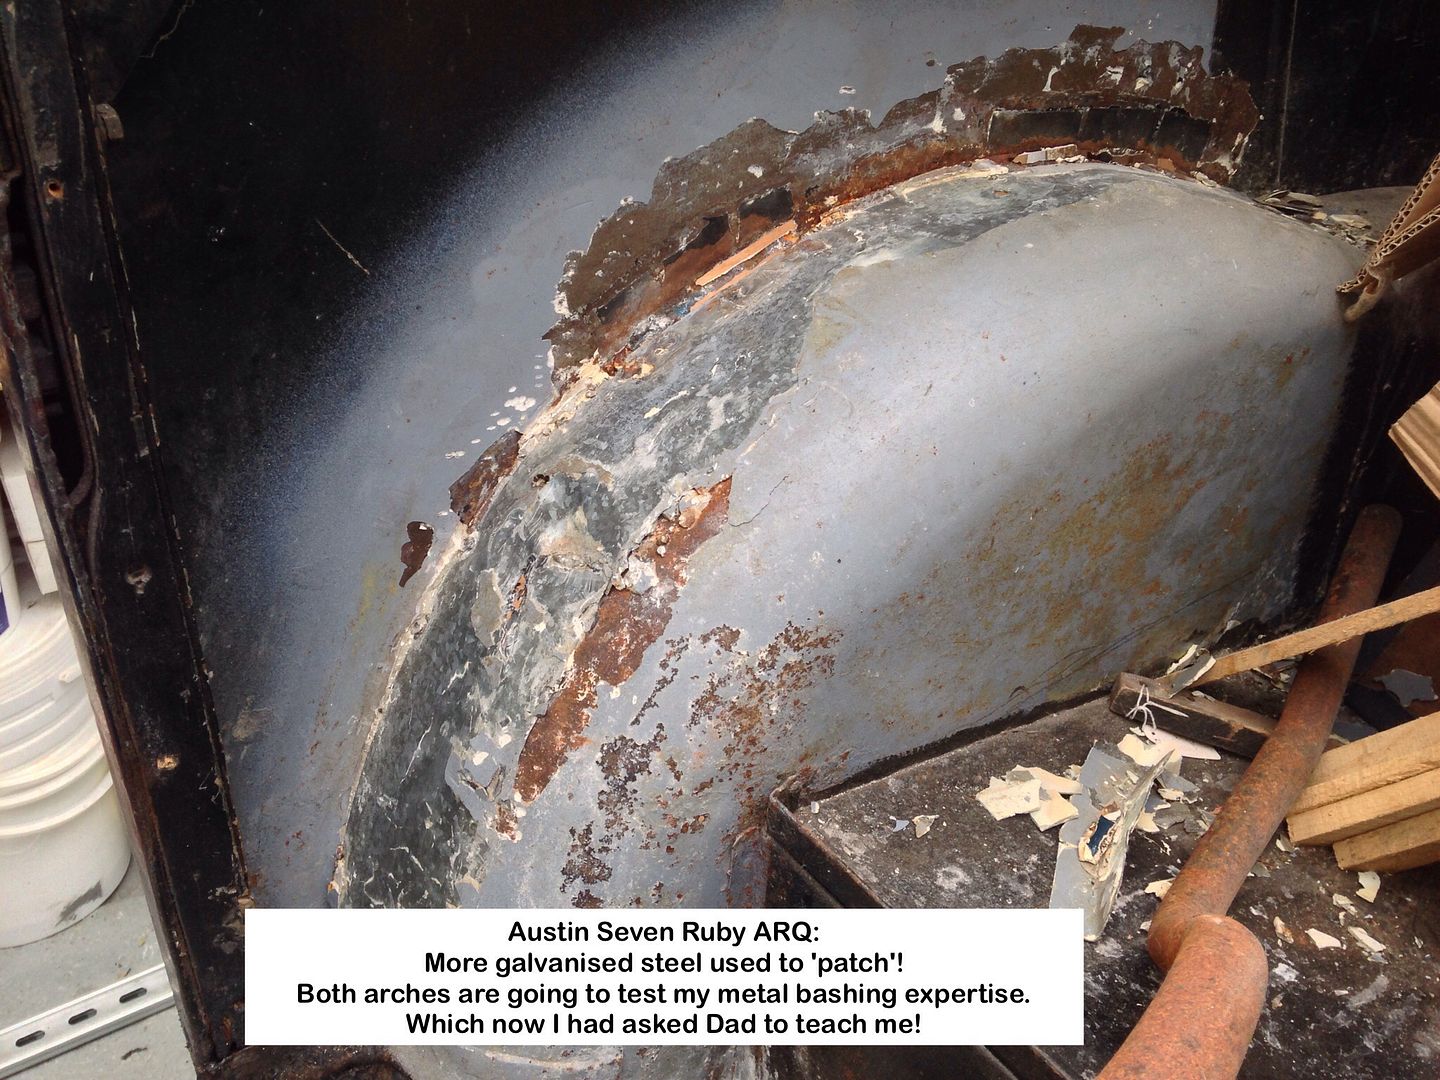
These are going to tax my ability at metal bashing, and I will be asking my dear departed Dad for help.
Geoff - Watching Dad, it looked so so easy
_________________
Too many hobbies, not enough time!
1935 Austin Seven Ruby ARQ
1957 Austin A35 2-door
1967 Morris Minor 2-door
2007 Fiat Doblò MultiJet (It carries the spares etc)
Model Engineering |
|
| Back to top |
|
|
OuBallie
Joined: 02 Mar 2013
Posts: 225
Location: South Norfolk next to Suffolk
|
| Posted: Tue Jul 14, 2015 10:54 am Post subject: |
|
|
More doings.
Last Saturday spent the day doing battle removing the 6 nuts and bolts that hold the Luggage Rack in place, with 4 shearing, so no great loss as they where all rusted to bu**ery.
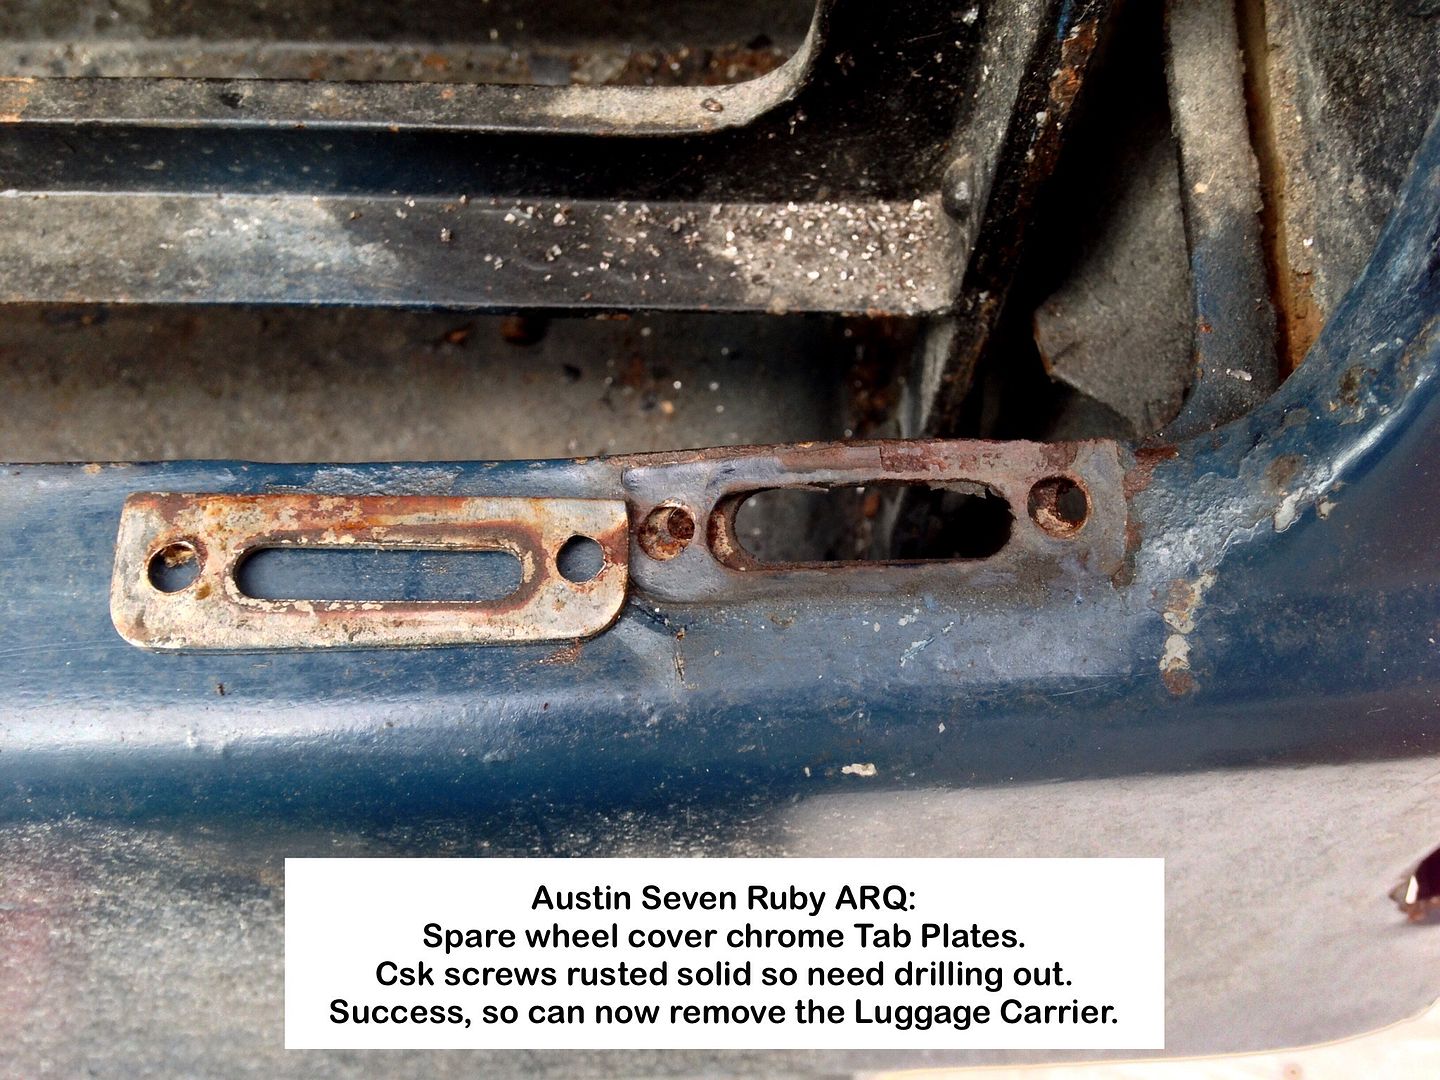
Then the two, one of each pair, that also held the 2 spare wheel cover chrome Tab Plates in place that needed drilling out as they where rusted solid.
Photo 19:
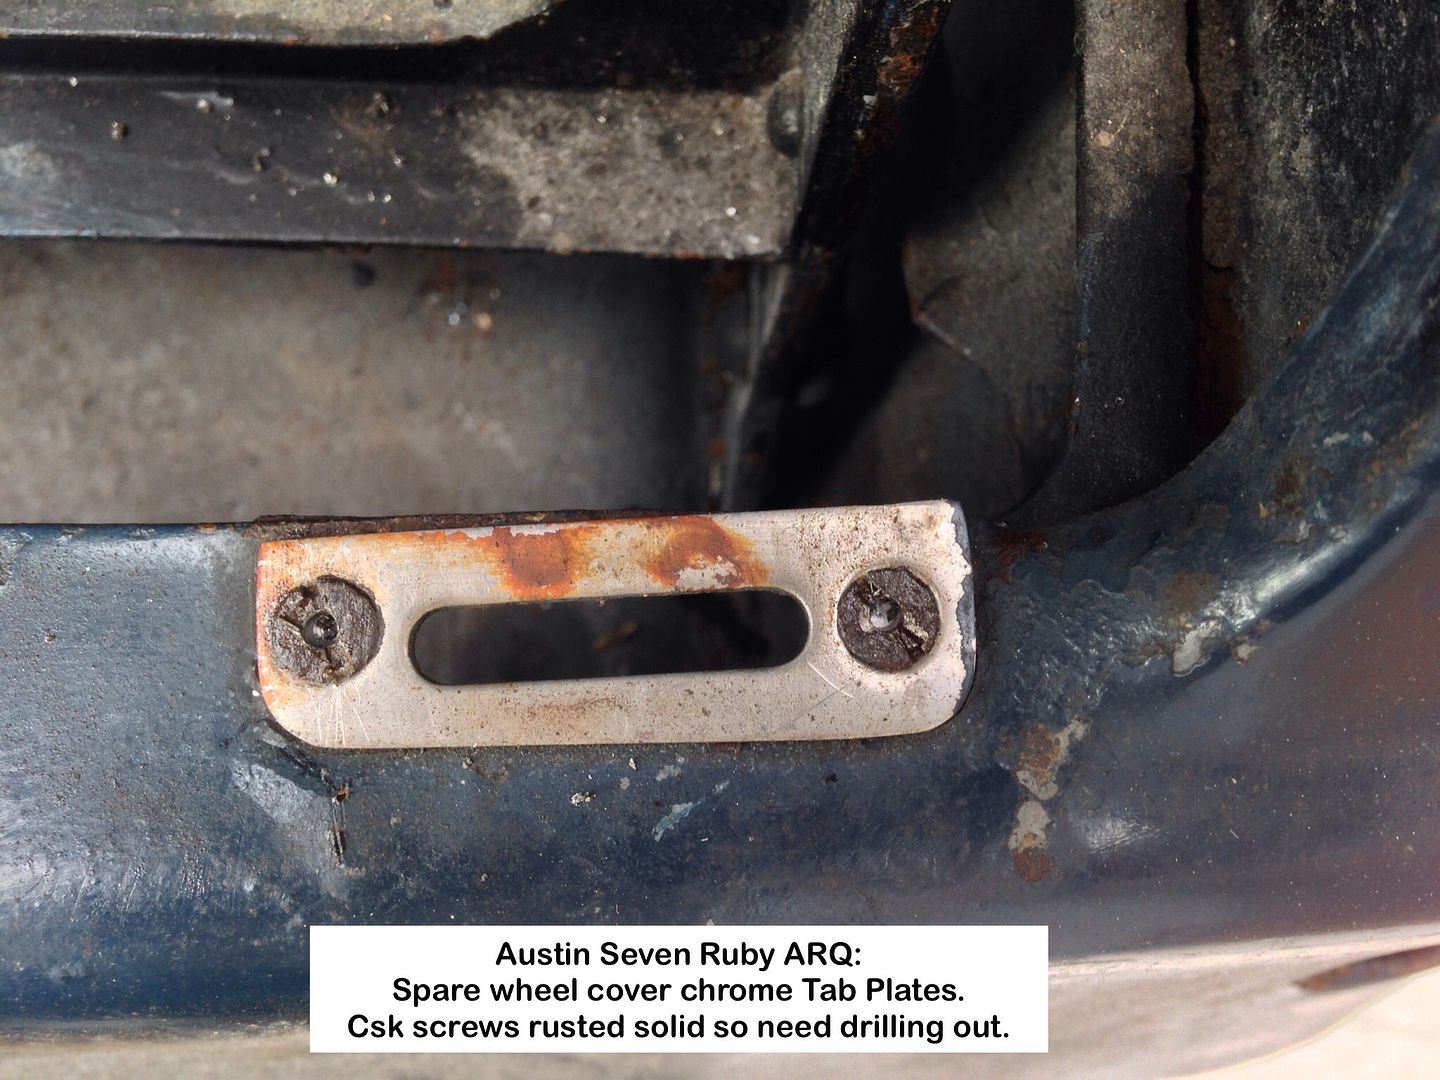
Soon had them drilled out and the Luggage Rack removed.
Photo 20:
Now time to start with the Body to Chassis bolts and this is when I really REALLY started calling the previous restorer all the [Censored] names I could think of and think up.
The previous restorer had used the same 2" long bolts and locknuts used for the engine mounts, and [Censored] impossible to get at.
How they thought that this was either [Censored] clever or useful beats me, as it would only take a couple of minutes to cut the bolts shorter and clean the ends up.
It just beggers [Censored] belief.
No apologies for my language, as it really riled me no end, and once again just confirmed that my decision to remove the body was the correct one, as who knows what other abortions lie in wait underneath, body and chassis wise.
Photo 21:
No choice but to drill them out, but I will try the L-grinder on the other 4, as it was hard work even with COBOL drill bits.
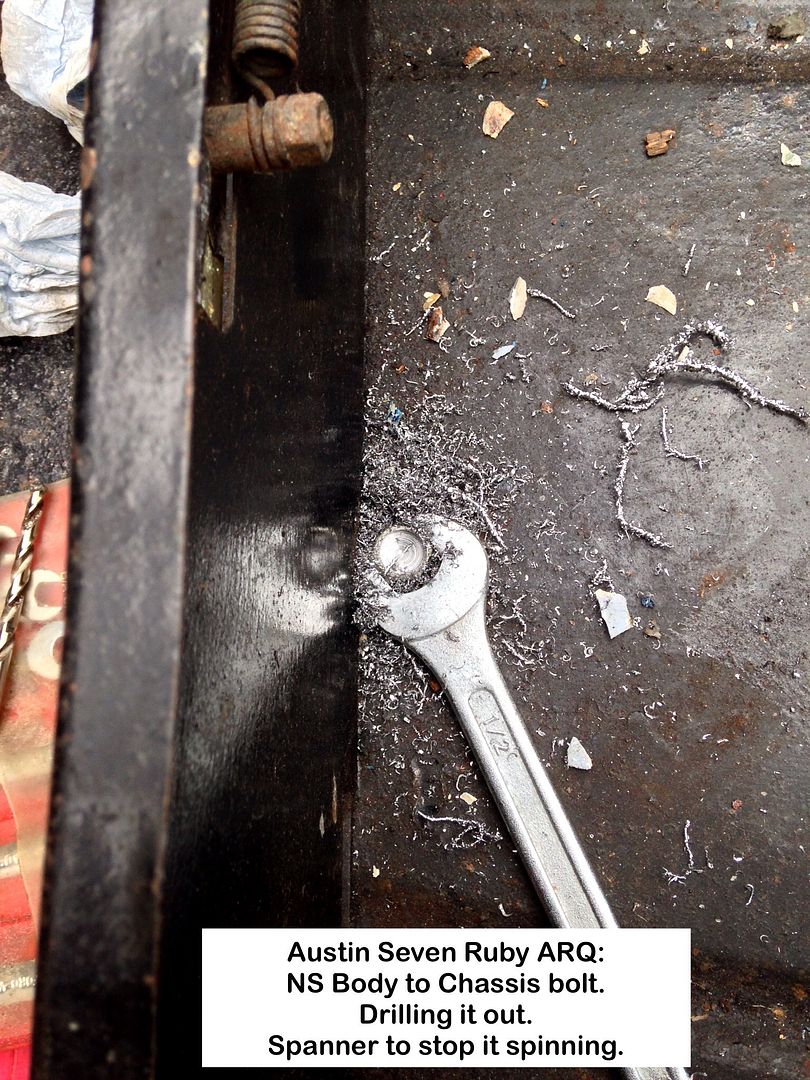
Photo 22:
This 2" long bolt really does take the cake/p1ss.
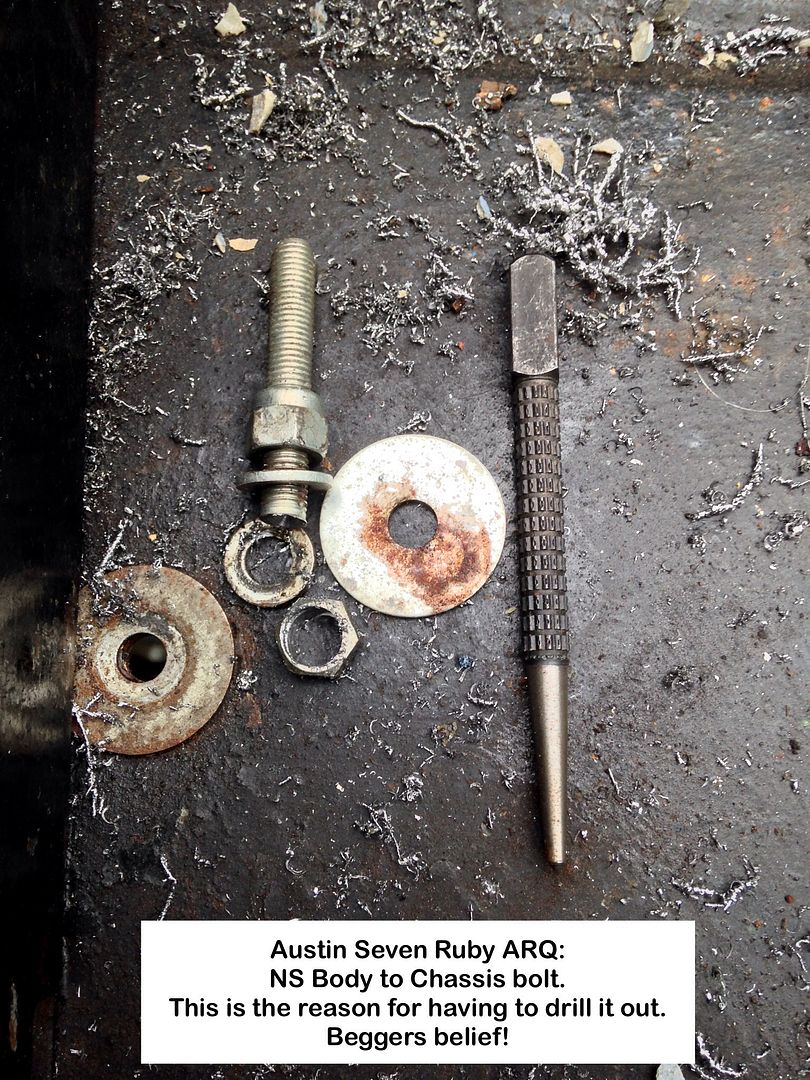
By the time I had drilled two of those bolts out, I had had enough for the day and packed up, and how some people can say they have restored a car is beyond my comprehension!
Geoff - Beginning to realise that they are king/s of bodge and filler.
PS:
Can you guess that I was rather worked up and spitting!
_________________
Too many hobbies, not enough time!
1935 Austin Seven Ruby ARQ
1957 Austin A35 2-door
1967 Morris Minor 2-door
2007 Fiat Doblò MultiJet (It carries the spares etc)
Model Engineering |
|
| Back to top |
|
|
Peter_L
Joined: 10 Apr 2008
Posts: 2680
Location: New Brunswick. Canada.
|
| Posted: Tue Jul 14, 2015 1:19 pm Post subject: |
|
|
I have drilled out quite a few bolt heads over the years. (some as large as 1" whitworth). The technique, taught to me, was to start with a small drill bit, approx. 1/8th. drill it deeper than the head and then progress with larger bits until the head comes off. The reasoning behind this was that the hole created by each drill reduced the surface area for the next larger bit so less pressure was needed.
For nuts we would drill down the side of the bolt, again slowly increasing the bit size. or same process and go through one of the flats at 90 deg to the bolt. |
|
| Back to top |
|
|
OuBallie
Joined: 02 Mar 2013
Posts: 225
Location: South Norfolk next to Suffolk
|
| Posted: Thu Jul 16, 2015 1:58 pm Post subject: |
|
|
Peter,
Thanks for jogging my memory as for some unknown reason I only drilled the first hole 3/16", to allow the 'chisel' edge of the bigger drill to clear, then 'forgetting' to do as you suggested.
What with the humidity, 30°+ in the Carport and family move, things have ground to a halt.
Geoff - My dislike of bodges is increasing in leaps and bounds!
_________________
Too many hobbies, not enough time!
1935 Austin Seven Ruby ARQ
1957 Austin A35 2-door
1967 Morris Minor 2-door
2007 Fiat Doblò MultiJet (It carries the spares etc)
Model Engineering |
|
| Back to top |
|
|
JP
Joined: 03 Jul 2015
Posts: 30
Location: Norfolk UK
|
| Posted: Thu Jul 16, 2015 5:08 pm Post subject: |
|
|
By the time I had drilled two of those bolts out, I had had enough for the day and packed up, and how some people can say they have restored a car is beyond my comprehension!
The R word is much overused I'm afraid Geoff It's amazing how often restoration consists of pudding and an aerosol 
Drilling bolts out is ruddy hard work and is always a last resort for me. If I can possibly get the grinder in to split a nut or take the head off I'll always do that first. 
Anyway keep up the good work on your lovely old Austin. 
_________________
John '53 MG TD |
|
| Back to top |
|
|
petermeachem
Joined: 23 Sep 2013
Posts: 358
Location: Chichester Sussex
|
| Posted: Thu Jul 16, 2015 7:04 pm Post subject: |
|
|
There was a guy on here who had, I think, and mgb he was very proud of, showing off the 'restoration'. As far as I could see that consisted of blasting a coat of paint over the outside. There was a picture showing the engine bay, rust everywhere. Even in the channel the bonnet closes into.
A car shouldn't be perfect, it should look its age but look as though it has been looked after.
Rusted nuts are a pain. I've got a nut splitter that works sometimes. Rusted studs are worse. I used a stud extractor once that broke inside the stud. I had to get it cut out by a guy with a plasma cutter with the block immersed in water? That was the side water manifold, best to leave it well alone if it doesn't leak. |
|
| Back to top |
|
|
JP
Joined: 03 Jul 2015
Posts: 30
Location: Norfolk UK
|
| Posted: Thu Jul 16, 2015 9:16 pm Post subject: |
|
|
| petermeachem wrote: |
A car shouldn't be perfect, it should look its age but look as though it has been looked after.
|
I agree, but then it's a well cared for, well maintained car. I like patina but I think cars reach a point where full restoration is the only sensible approach.
The R word should only be used to describe a car which has been dismantled and renovated to the point where it's approaching as good as when it left the factory. I've only done one full restoration and it was damned hard work and took many hours of toil (not the MG). To be honest I don't think I've got another one in me now, unless it was on an indefinite time scale.
I've seen some horrible sights described as restored.
_________________
John '53 MG TD |
|
| Back to top |
|
|
OuBallie
Joined: 02 Mar 2013
Posts: 225
Location: South Norfolk next to Suffolk
|
| Posted: Sat Jul 18, 2015 5:19 pm Post subject: |
|
|
I cannot even try to explain why I didn't use the L-grinder
The other four will succumb to that instrument, and thinking back 40odd years to a time when I had to use a hacksaw, I just shake my head.
Been busy with family move, zo not much done until now.
Today attacked the rear seat and asked for advise on upholstery colours on the Friends Forum, copy below.
My interior is in two colours of blue, with only the rear seat being in dark leather the rest in a lighter vinyl as per photo.
Planning ahead, I need to make a decision on which of the two was supplied ex-factory, as recovering is something I can do in the evenings come winter. (So much for my 6 months Rick)
Suggestions please.
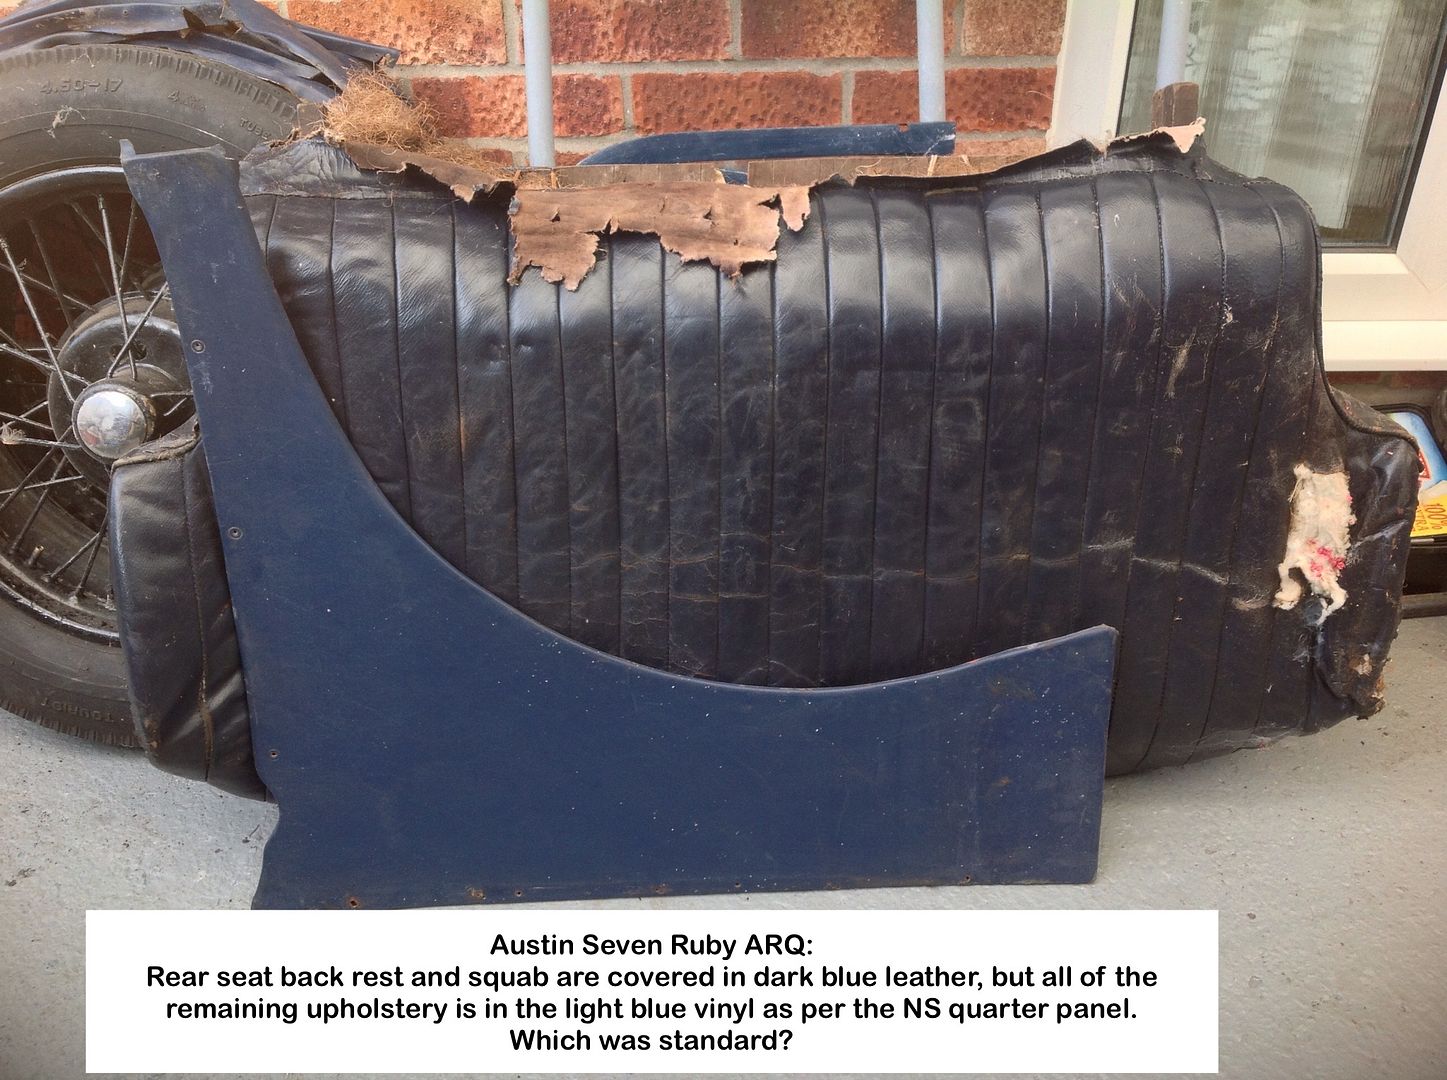
The rear squab was is in the same state with hard leather, but has cleaned up and becoming softer with regular feeding.
Geoff - I do like the smell of leather
Copy of 'Rejuvination' update: (I cringe every time I see the spelling)
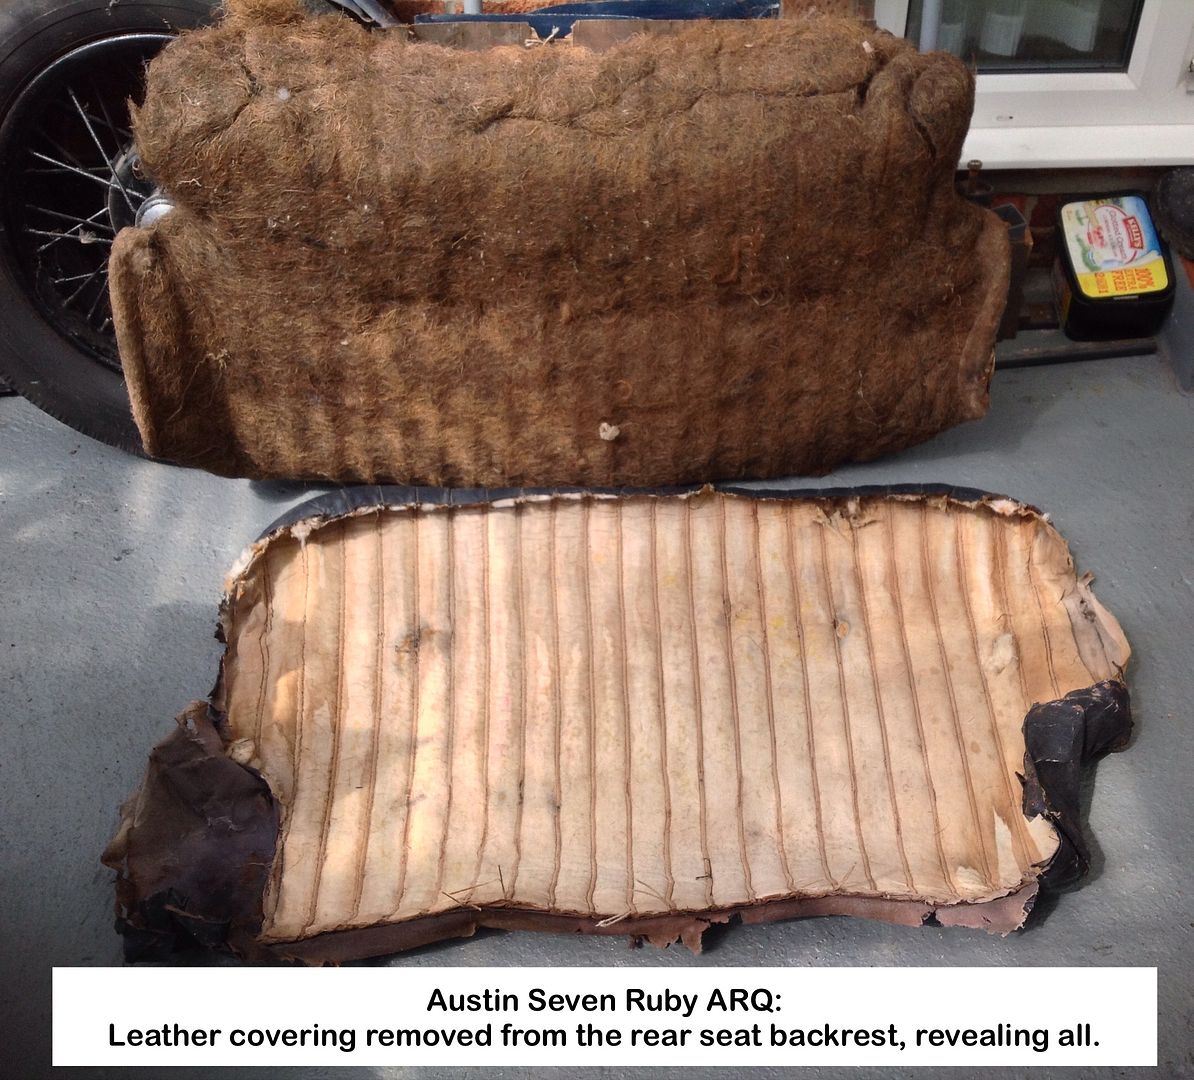
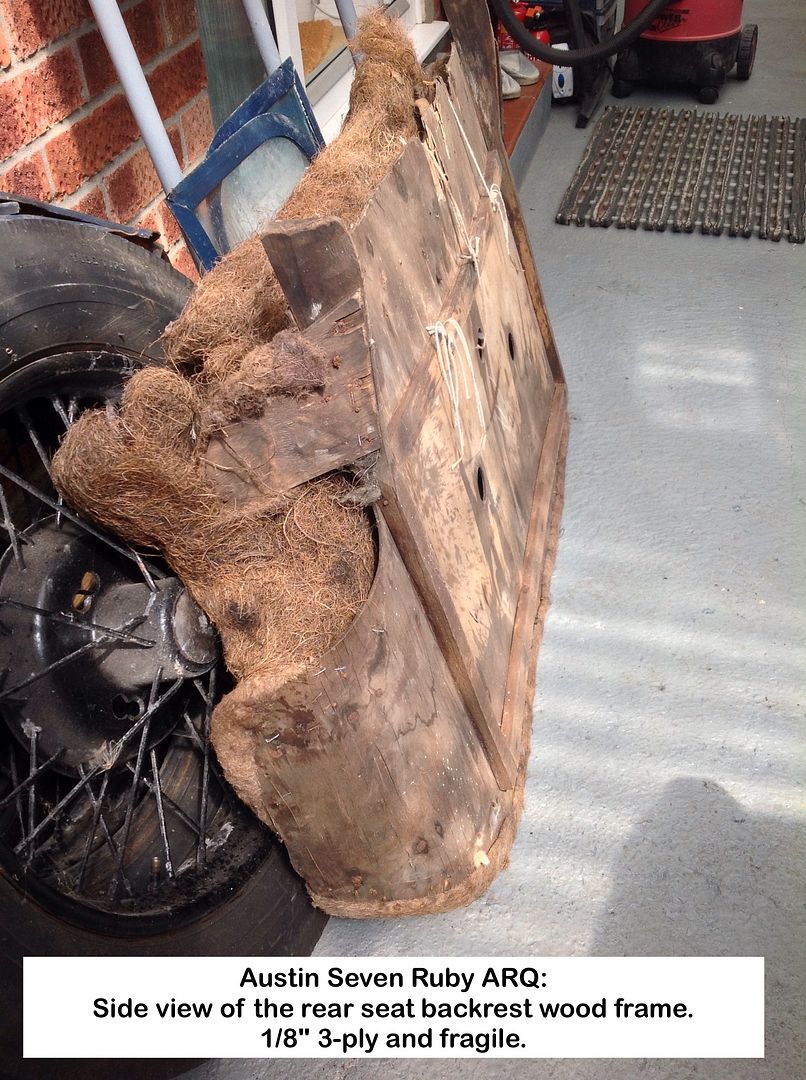
Further to my thread requesting help as to upholstery colours, here are three photos showing how the rear seat backrest is constructed.
The ply backing is bone dry and fragile, so a question of whether to replace or give it a good soaking of glue or varnish.
Photo 23:
PS:
The leathercloth side pieces are so fragile they just fall apart.
Photo24:
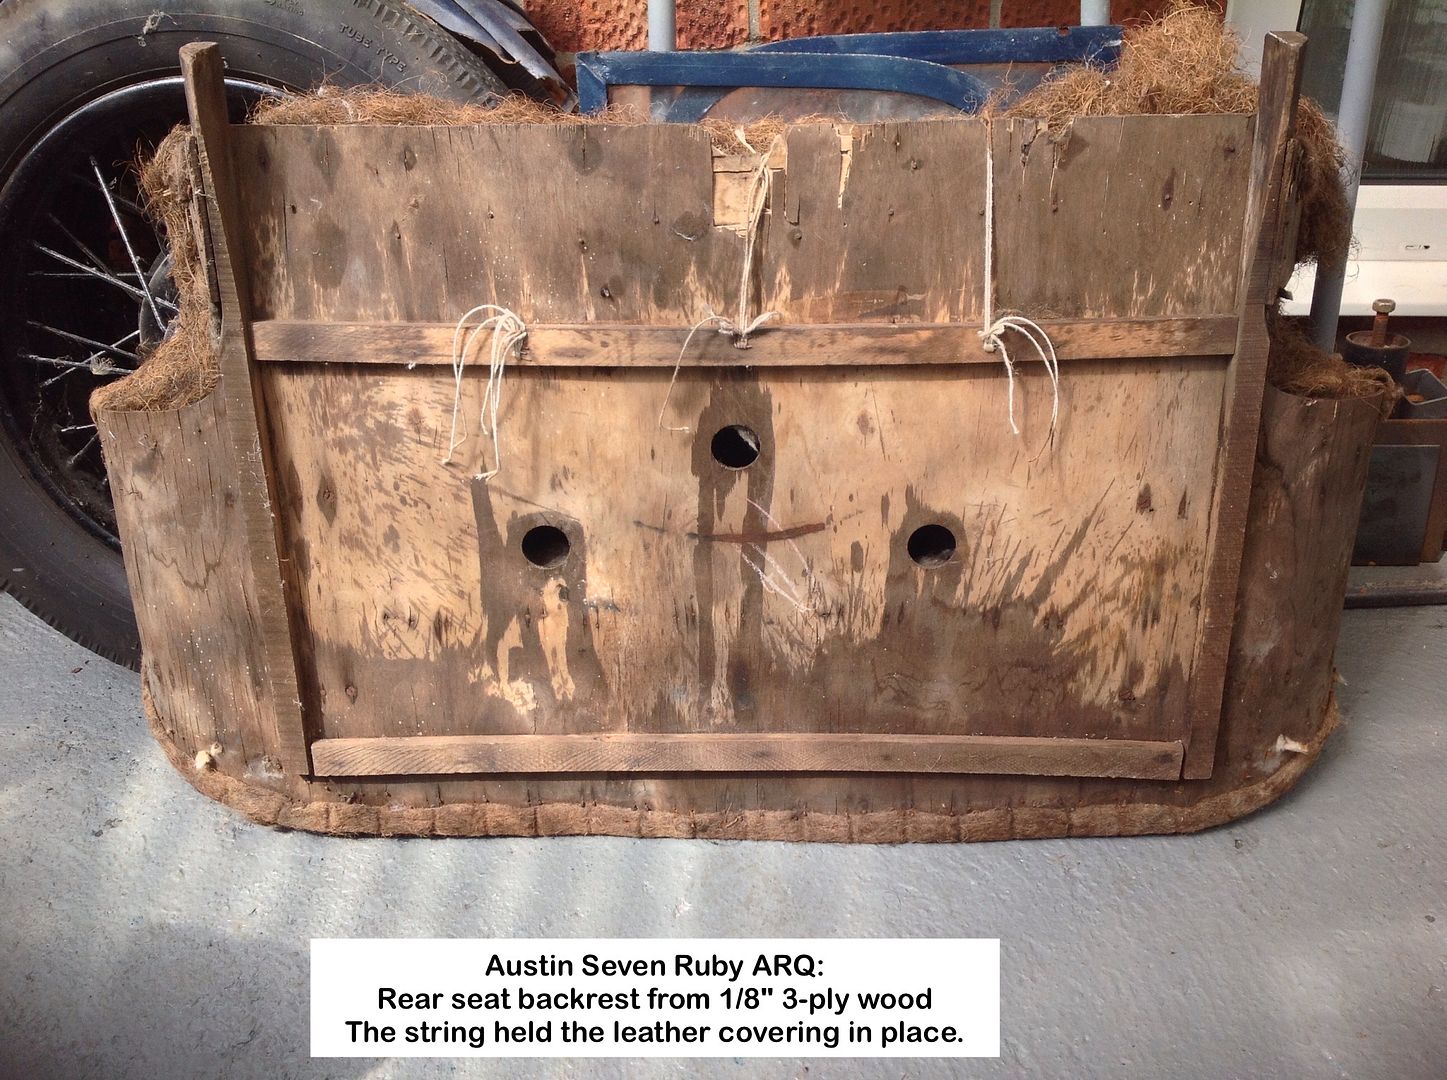
Photo 25:
Geoff - Hooray! Family house move done so I can get on with important stuff 
_________________
Too many hobbies, not enough time!
1935 Austin Seven Ruby ARQ
1957 Austin A35 2-door
1967 Morris Minor 2-door
2007 Fiat Doblò MultiJet (It carries the spares etc)
Model Engineering |
|
| Back to top |
|
|
colwyn500
Joined: 21 Oct 2012
Posts: 1745
Location: Nairn, Scotland
|
| Posted: Sat Jul 18, 2015 7:13 pm Post subject: |
|
|
Geoff, the seat coverings, door linings and any arm-rests will have been leather and the rear seat is most likely the original construction.
Linings in the footwells, the backs of the seats and any wooden supports for the seats will have been covered in "Rexine" , which will have gone very stiff and is not particularly responsive to restoration.
You can get really thin, antique-looking vinyl that makes a good substitute for the latter, but nothing beats leather for the seats and I dont even think they had vinyl in the 1930s.
It's a lucky car which seems to have found a saviour. |
|
| Back to top |
|
|
|
|
You cannot post new topics in this forum
You cannot reply to topics in this forum
You cannot edit your posts in this forum
You cannot delete your posts in this forum
You cannot vote in polls in this forum
|
php BB powered © php BB Grp.
|


