
Classic cars forum & vehicle restoration.
|
|
| Author |
Message |
MooiMeisie
Joined: 04 Jan 2010
Posts: 41
|
 Posted: Thu Nov 05, 2015 4:07 pm Post subject: Posted: Thu Nov 05, 2015 4:07 pm Post subject: |
 |
|
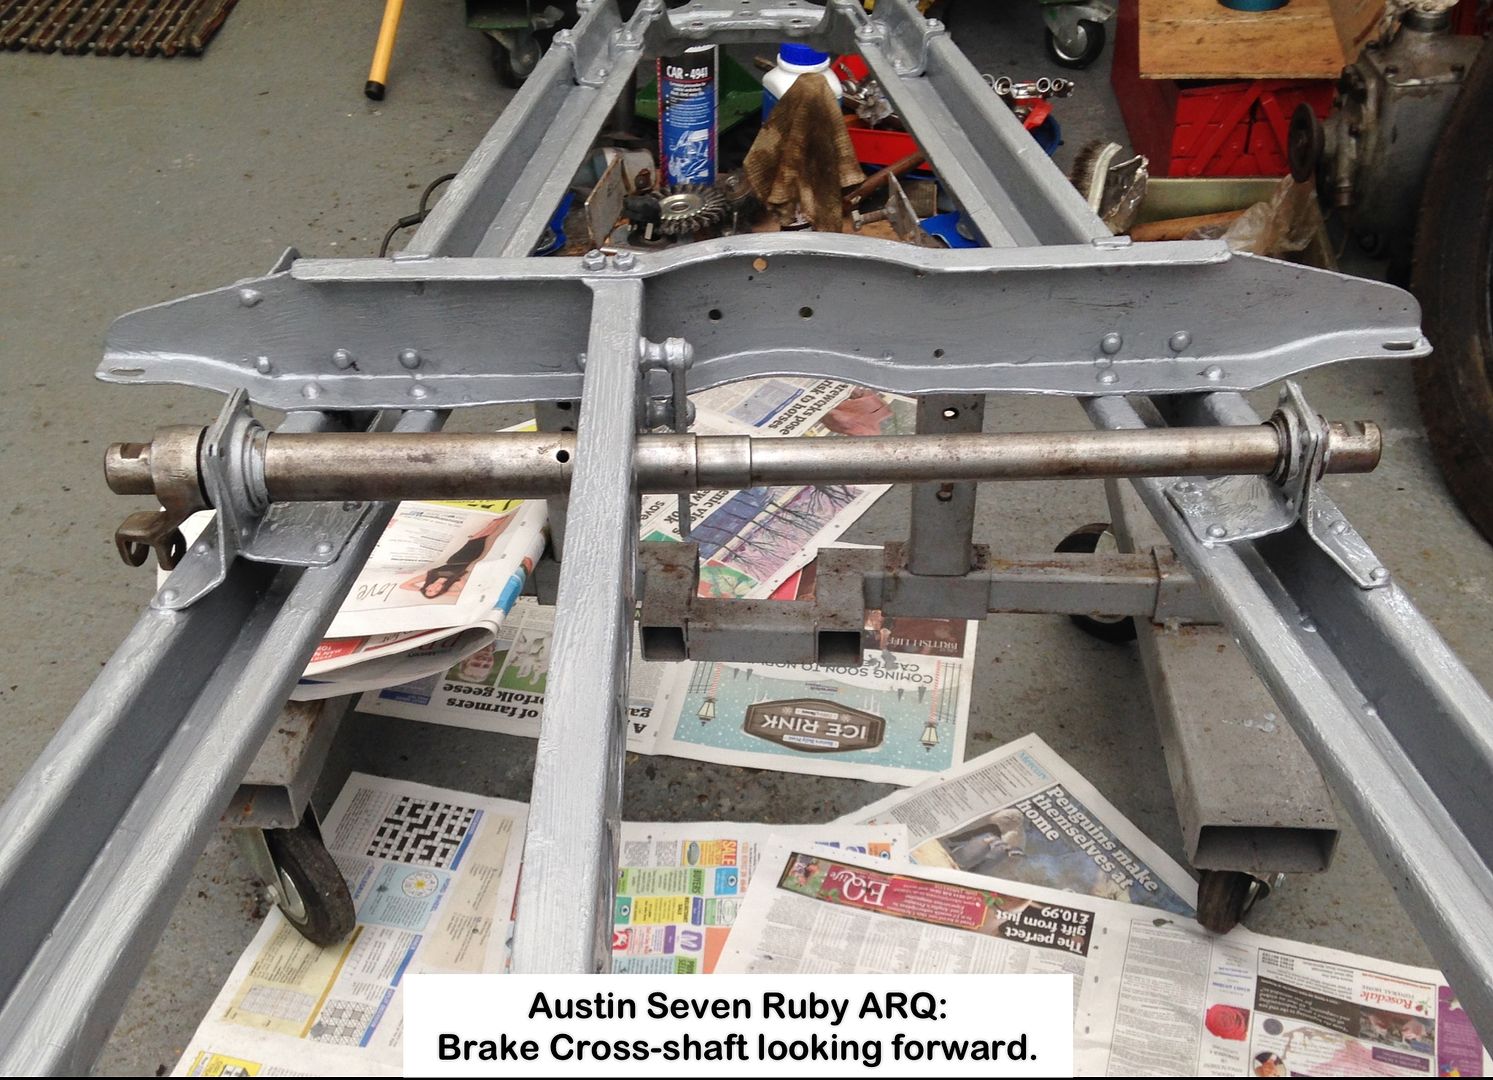
Here is a problem to tax the inventive amongst us on the Forum.
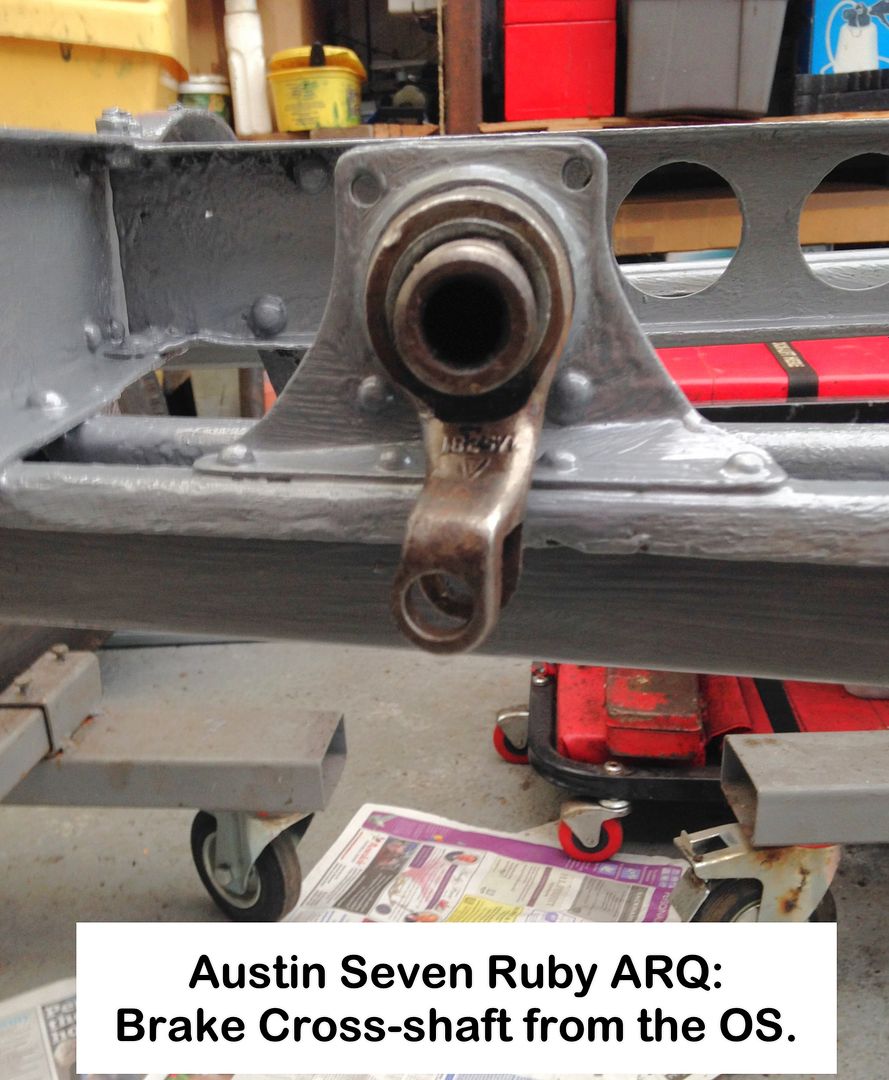
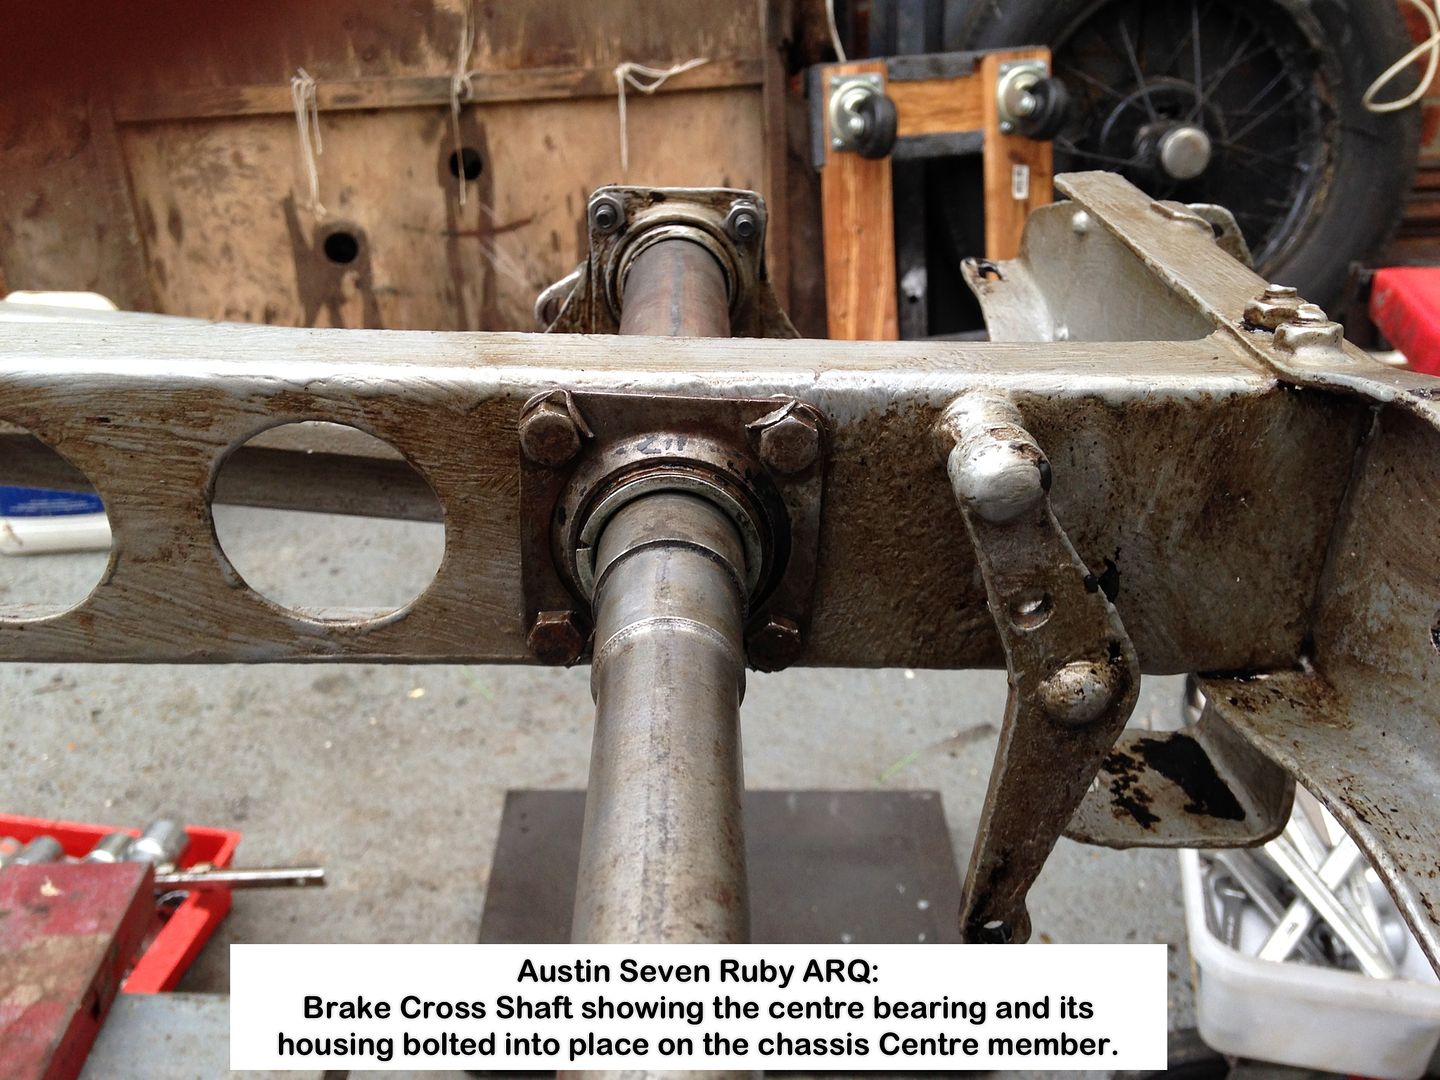
How to get lubrication to the three bearing that the Brake Cross-shaft runs in?
Being slung under the car, said bearings are open to the elements and road gunk.
All three double cone bearings where solid with gunk and rust, the NS one needing its housing to be split to clean, the 'bearing' material neing zinc and are pressed in.
The centre bearing is the same as the other two.
Also need to think of a way to protect said bearings by some sort of covering.
The chassis is upside down, just having had a coat of Jotamastic 87 Aluminium DTM epoxy applied, to be followed by a coat of bituminous black.
The shaft is hollow, being 24in long, thin end 1"Ø, thick end 1.1/4"Ø with the bearings at 1.1/4" centre height to the chassis, the body of the car being 4ft 4in wide, so not easy to get at.
Video of bearings.
Suggestions please.
Geoff - iOS9 is an effing disaster for me & Apple won't let me downgrade, the %^#*s![/url] |
|
| Back to top |
|
 |
MVPeters

Joined: 28 Aug 2008
Posts: 822
Location: Northern MA, USA
|
| Posted: Thu Nov 05, 2015 5:19 pm Post subject: |
|
|
I'm not sure if this really helps much, but...
50-odd years ago my first car was a 1936 Austin Ten with a similar set-up.
By way of explanation, the right side bearing on my car was "well-worn" because that's where the brake pedal is & presumably takes most of the strain.
The centre bearing was "somewhat worn" because that's where the handbrake & linkage is.
The left bearing was "hardly-worn-at-all"!
Balancing all four brakes was not easy, because if I did it the factory way by applying the hand brake a couple of notches to make the adjustments on the rods, the right side front brake adjustment would be off due to the slop between the bearings. An extra 1/2 turn or so sort of made up the difference.
It passed the then-new MoT test OK but I'm not sure if it would now.
I didn't do anything to fix it, other than oil, so I can't go any further than that.
I'd only suggest maybe getting that left side bearing spinning with an electric drill somehow &/or flushing the gunk out with brake cleaner. Then perhaps some (aerosol) grease?
I hope something here helps! Good luck.
_________________
Mike - MVPeters at comcast.net
2002 MINI Cooper 'S' |
|
| Back to top |
|
|
MooiMeisie
Joined: 04 Jan 2010
Posts: 41
|
| Posted: Sat Nov 07, 2015 3:48 pm Post subject: |
|
|
Thanks Mike.
The Seven brakes need a specific set of steps in adjusting them, as your Ten.
With the Handbrake connected to the Cross-shaft, it can be applied in a last ditch afford to slow down 
High time for an update.
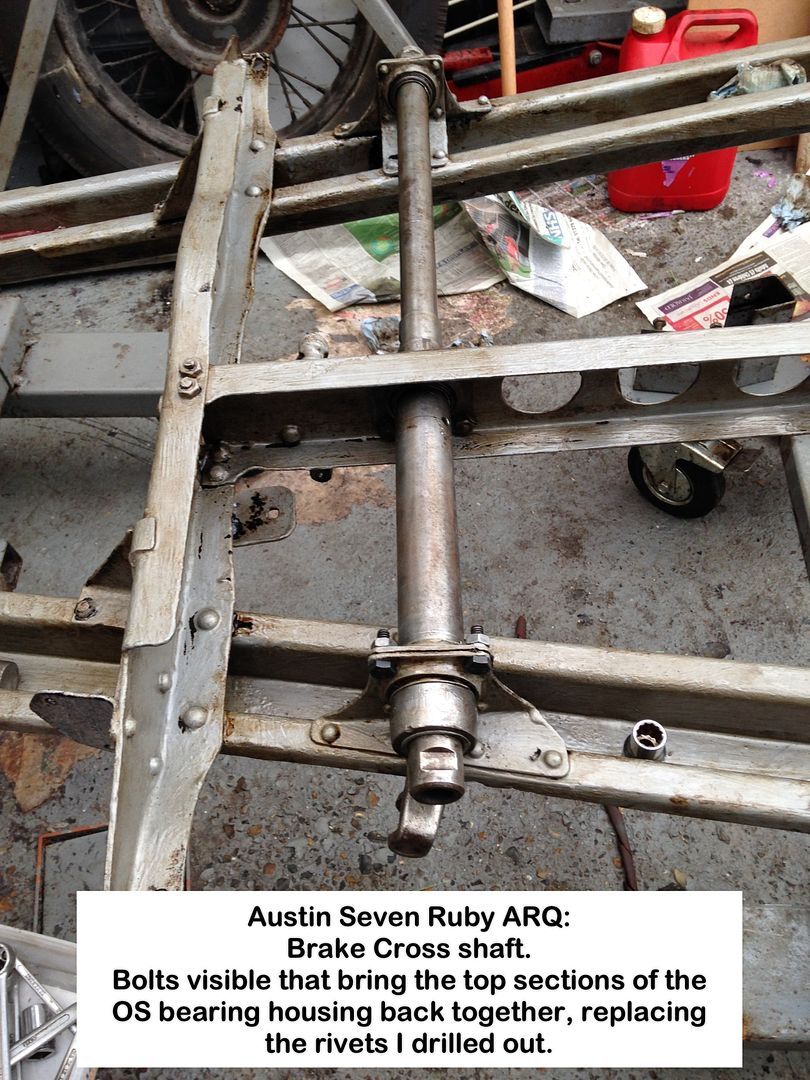
Just noticed that I forgot to ask whether the Brake Cross-shaft OS bearing should be capable of swivelling as the NS and centre ones do, or purposely 'locked' as mine is?
I can only free it as shown, after I drilled the rivets out and spreading the housing sides.
More progress.
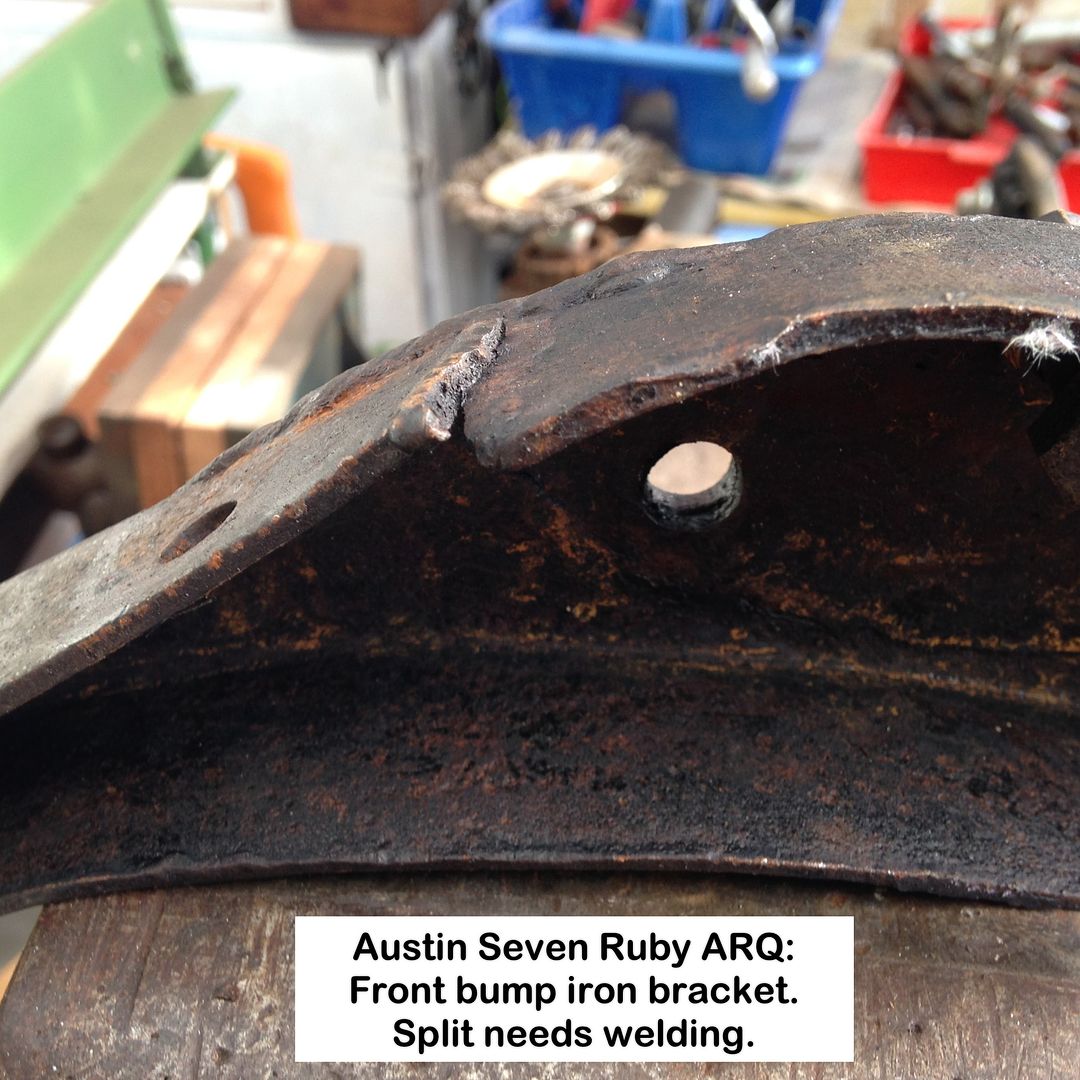
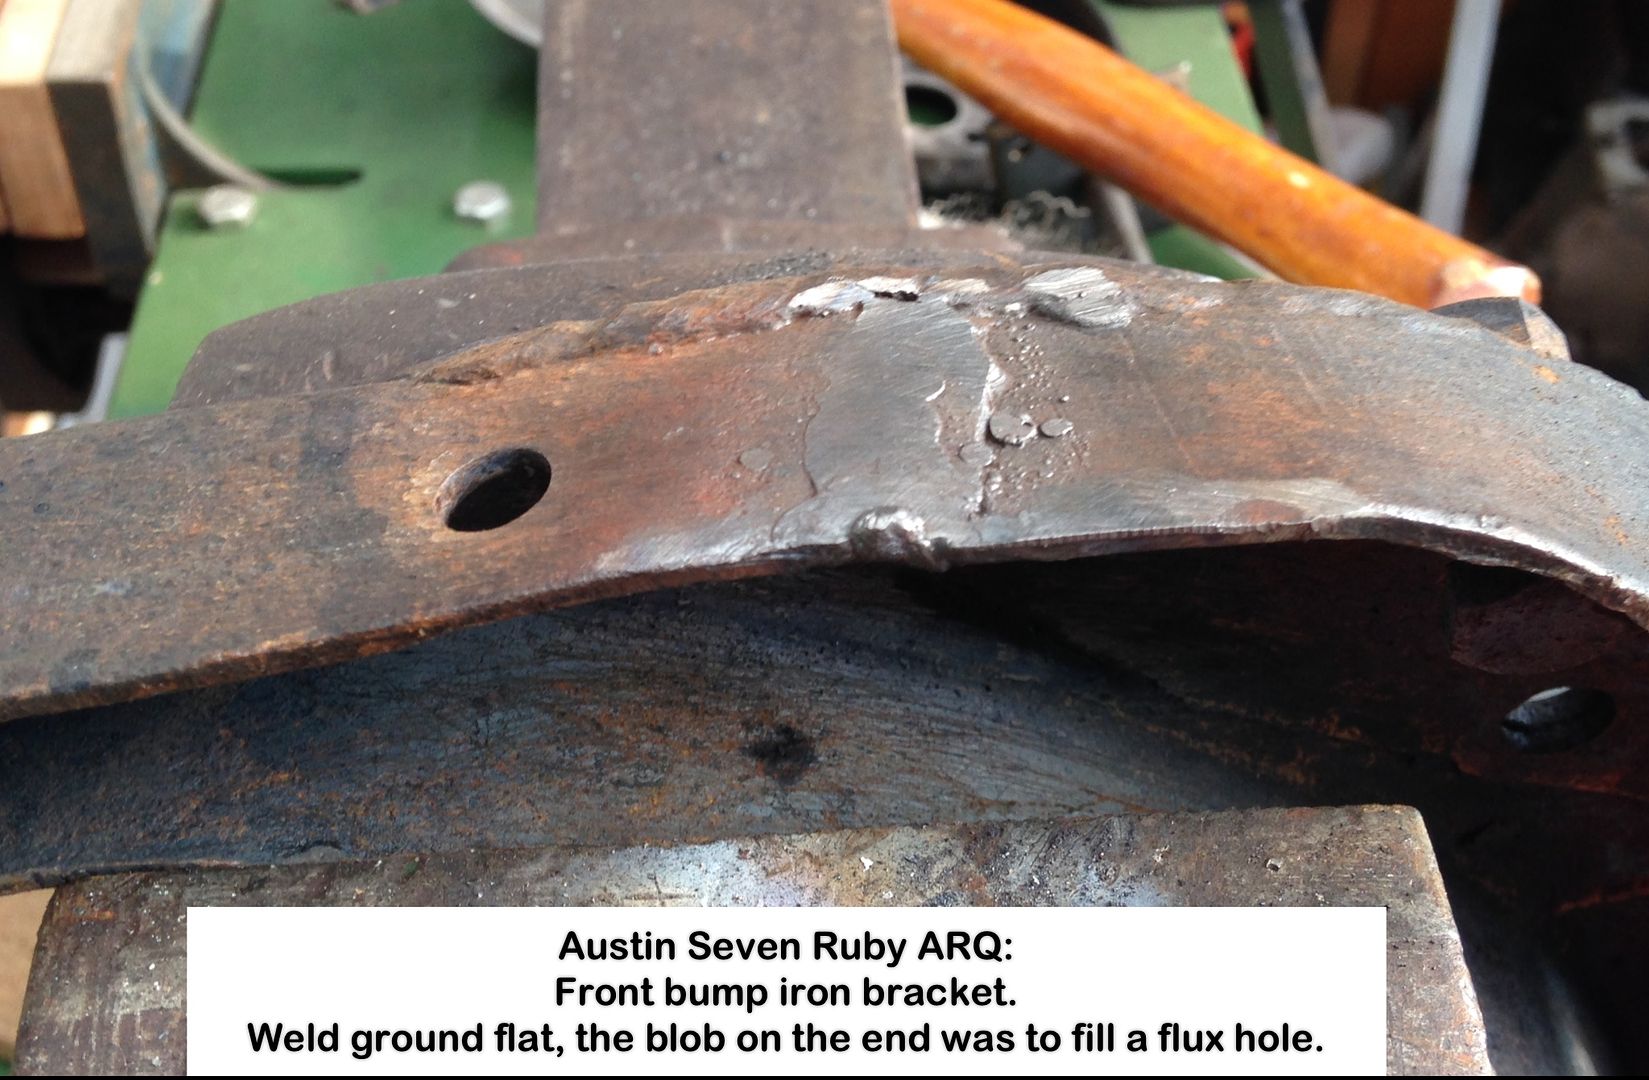
Front Bumper Irons Bracket that from appearance has been repaired in the past.
Split:
Groove cleaned:
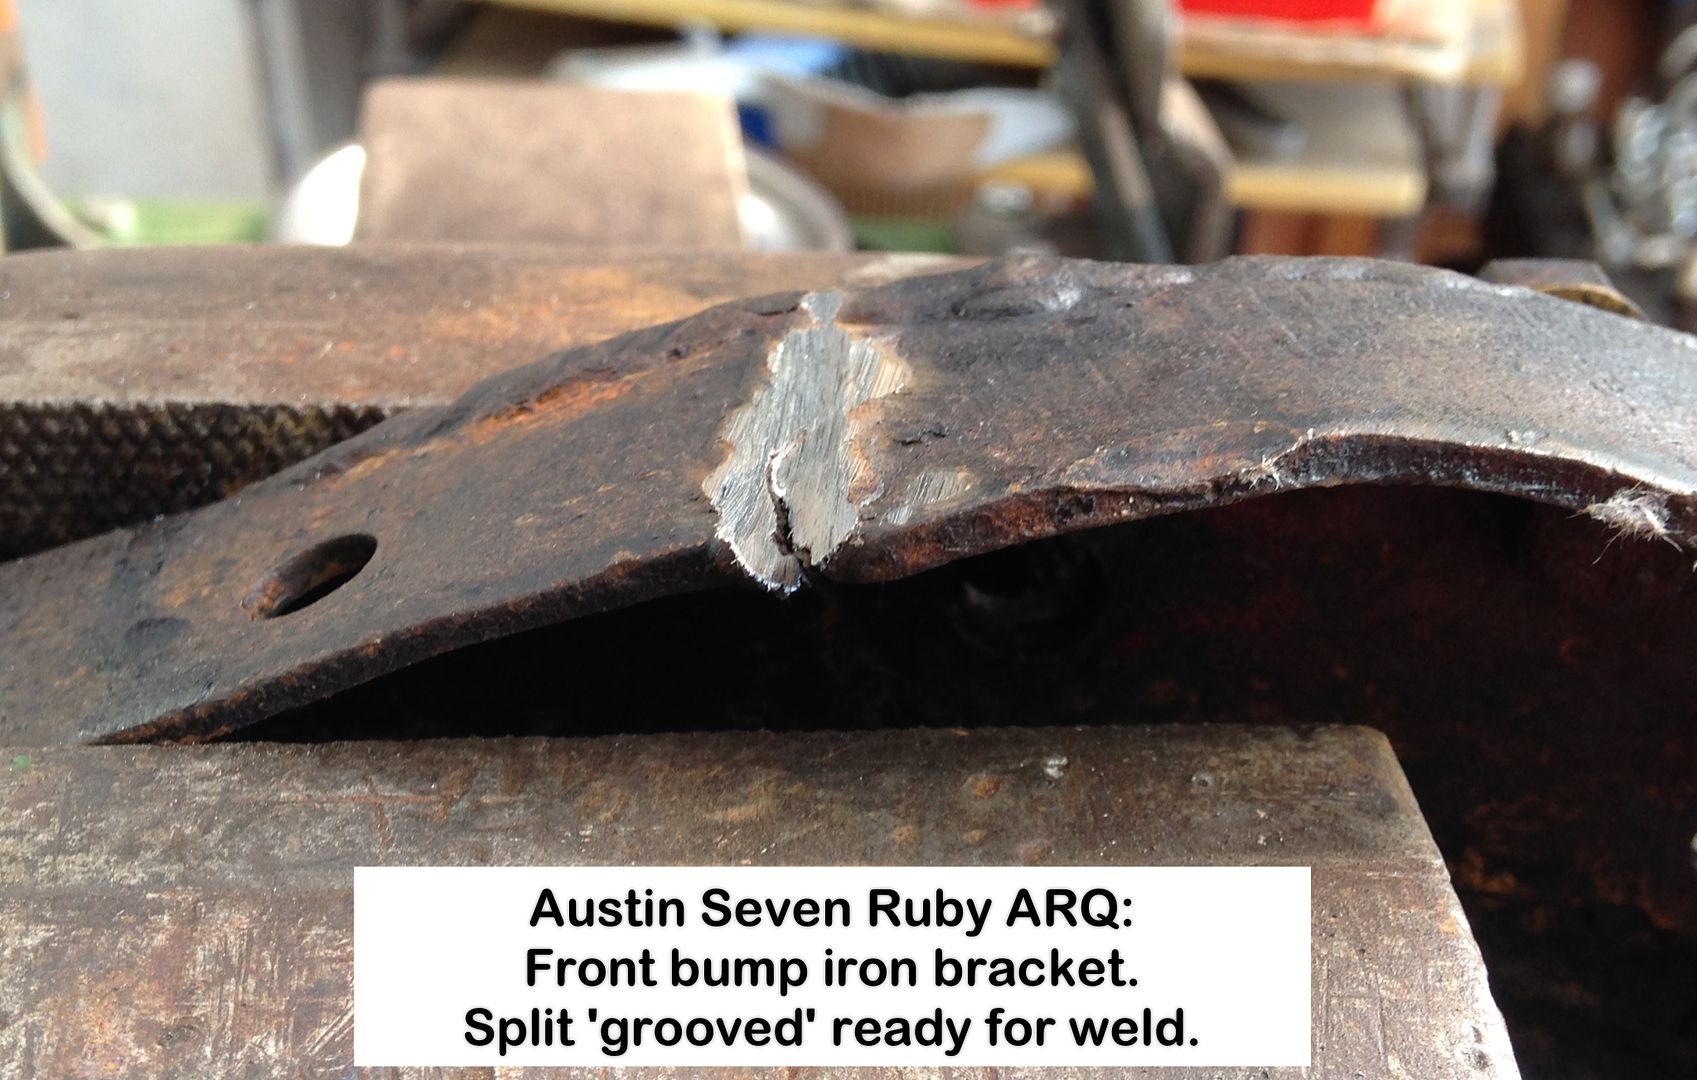
Split closed and welded:
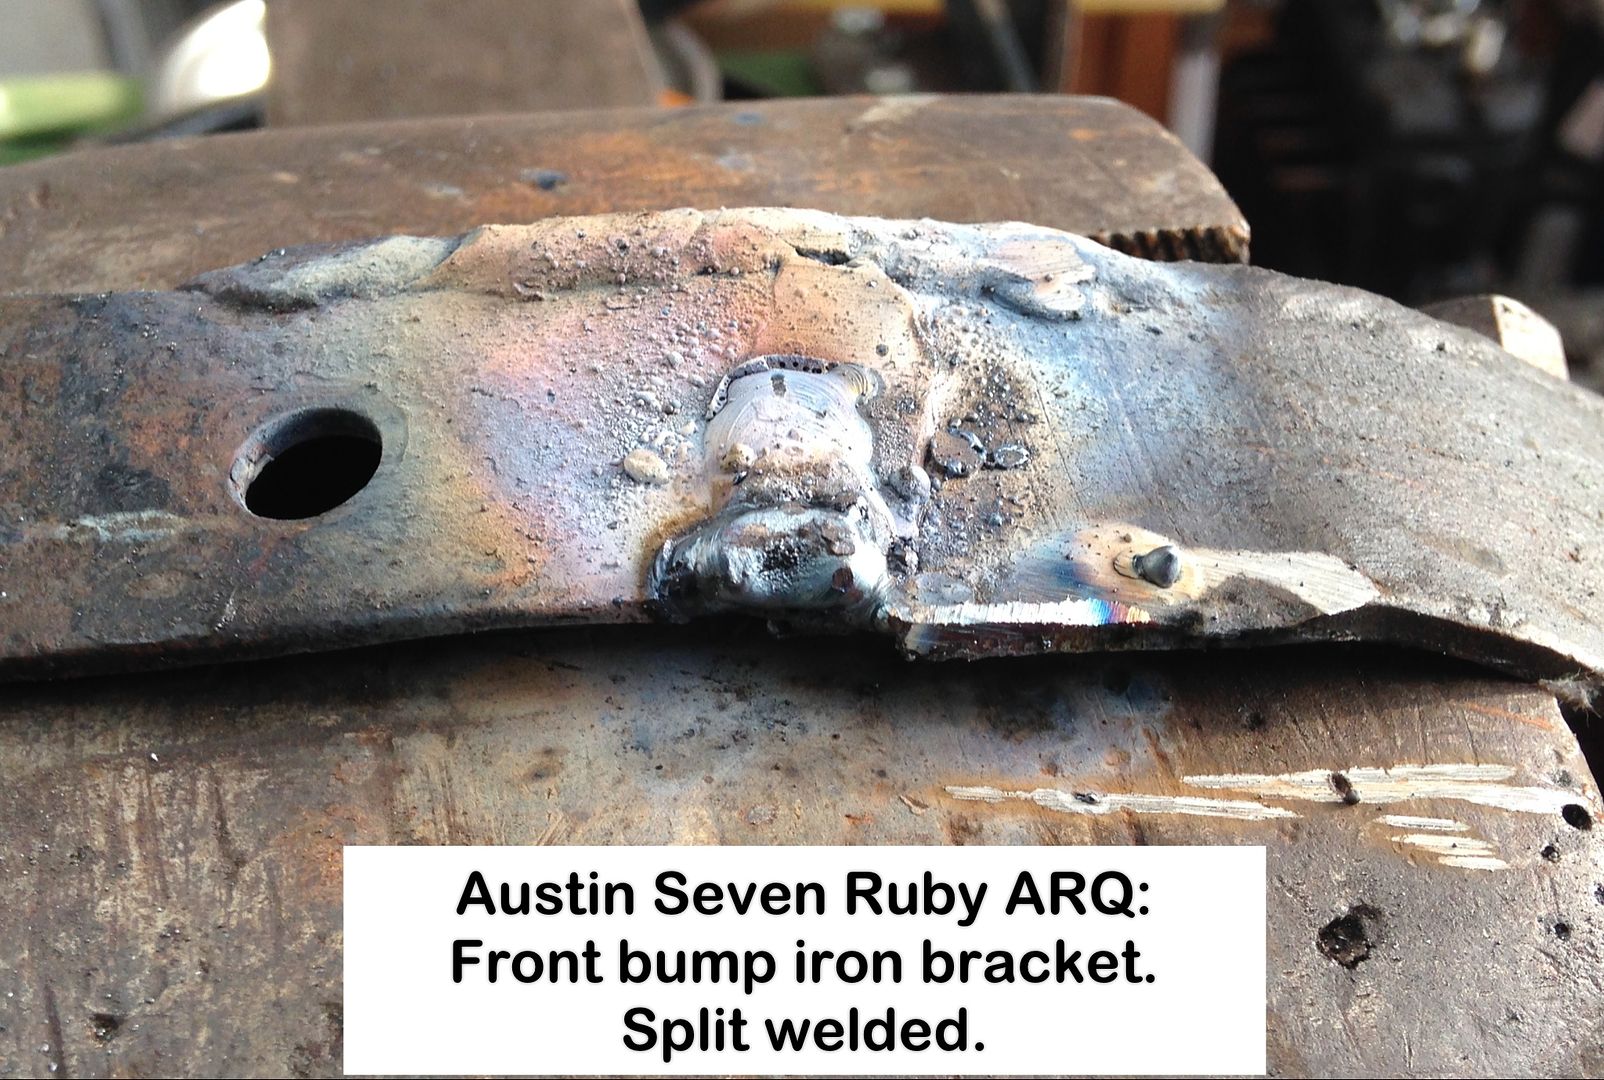
Inside welded as a precaution:
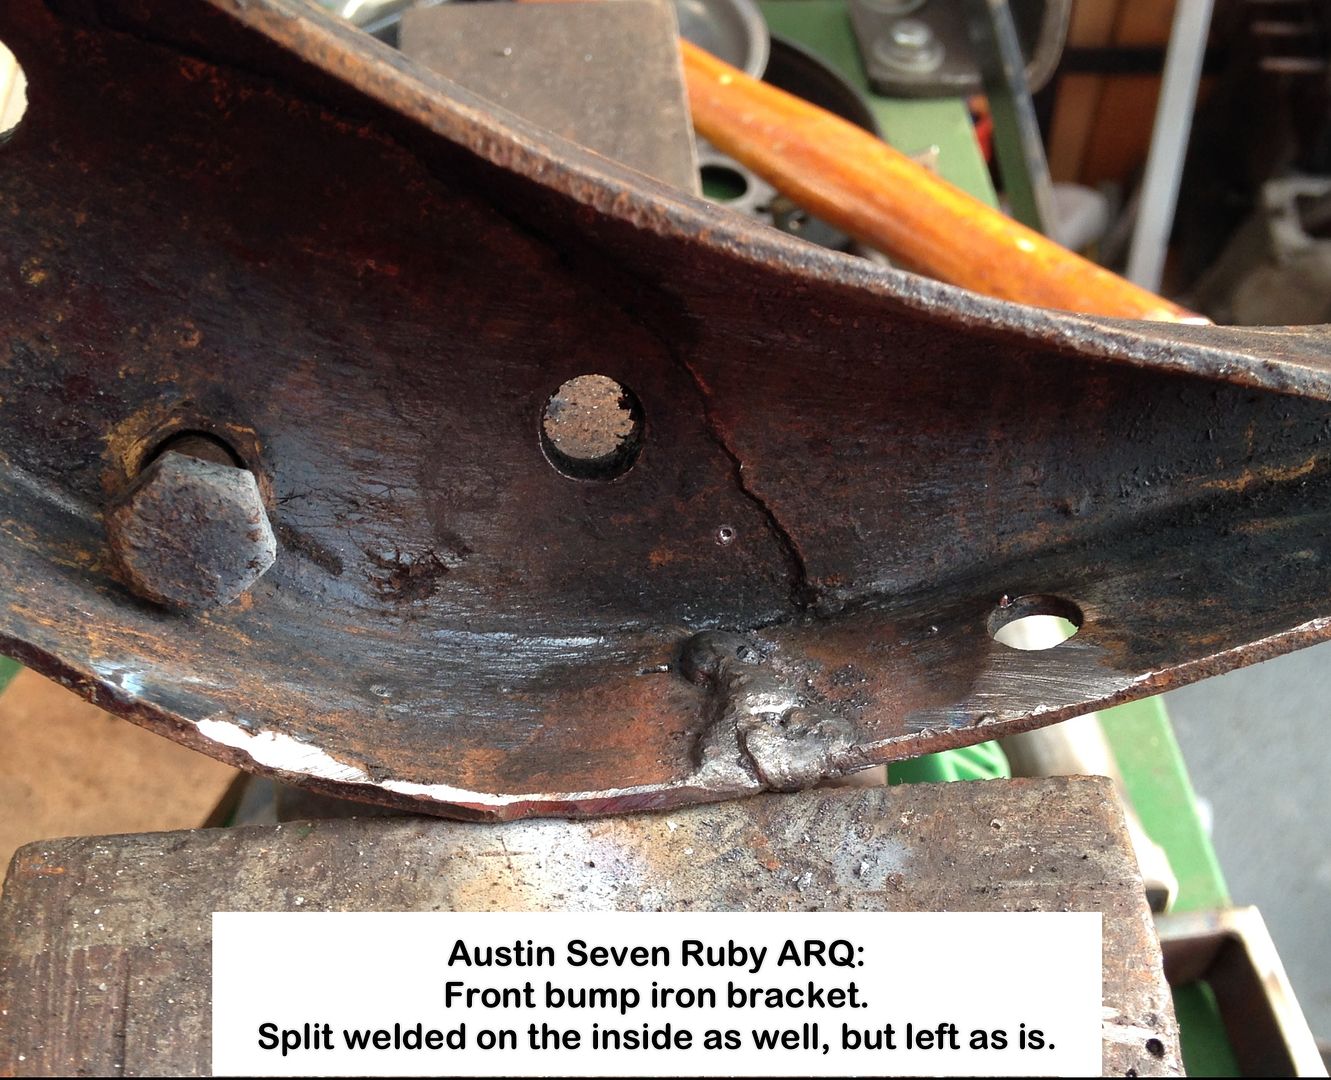
The gene, passed on by Mom & Dad, on doing it properly kicked in.
Weld ground:
Underside of Chassis receiving a coat of paint.
Jotamastic 87 Aluminium Epoxy paint:
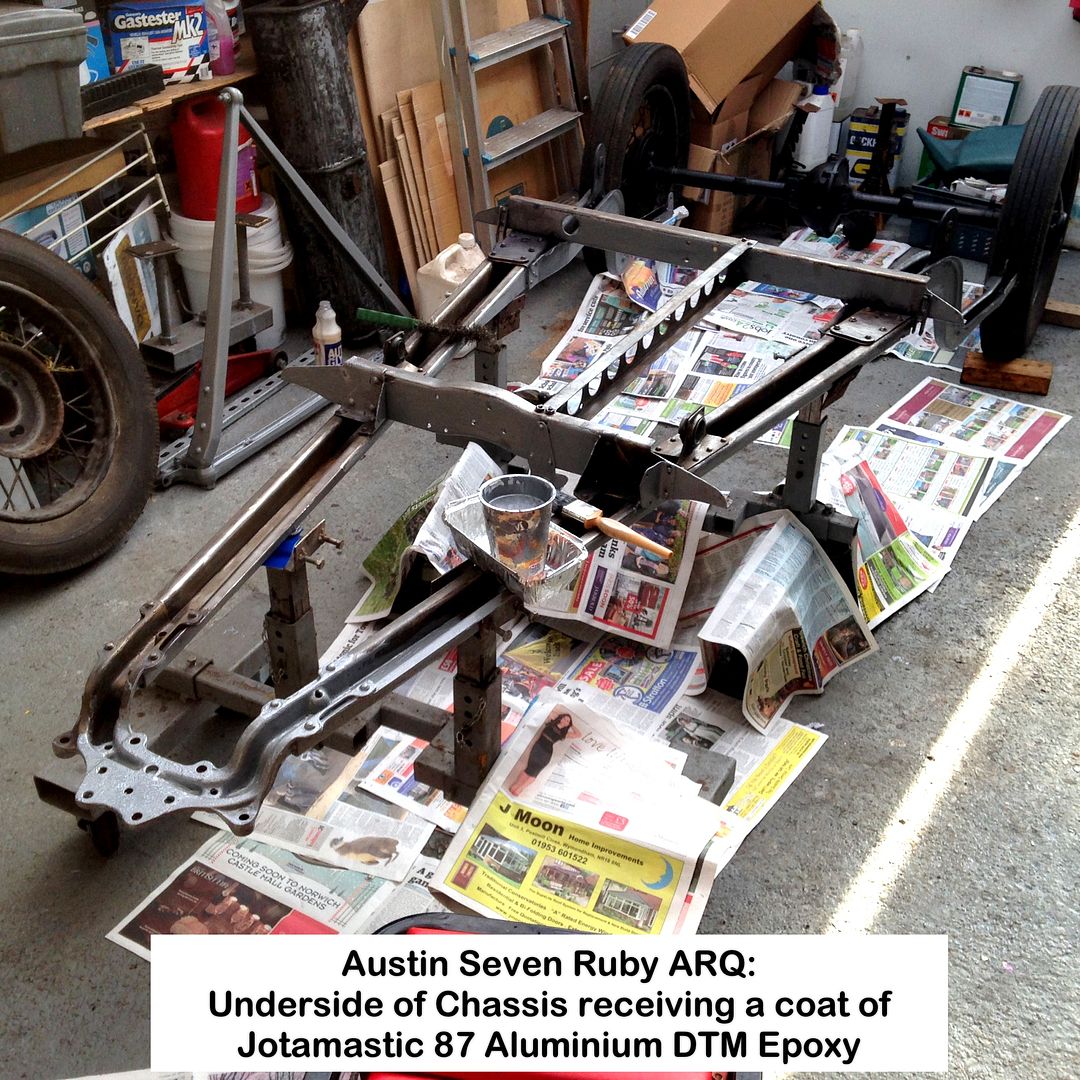
Done:
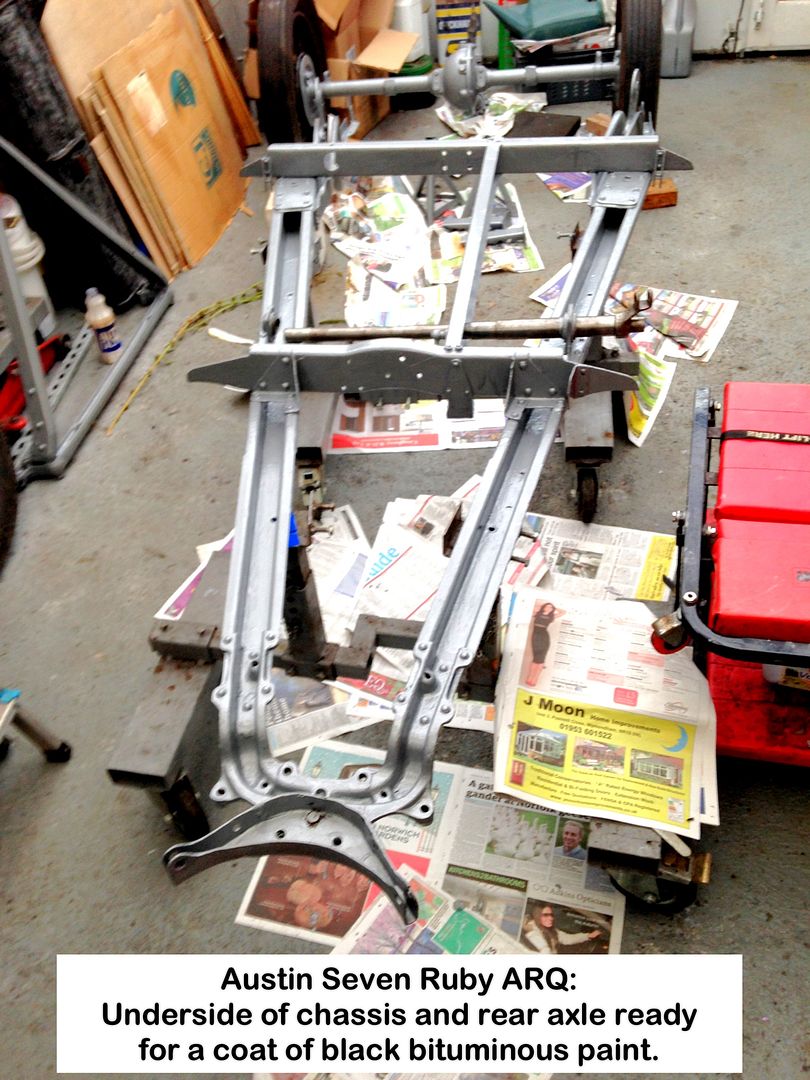
This stuff stick like you-know-what!
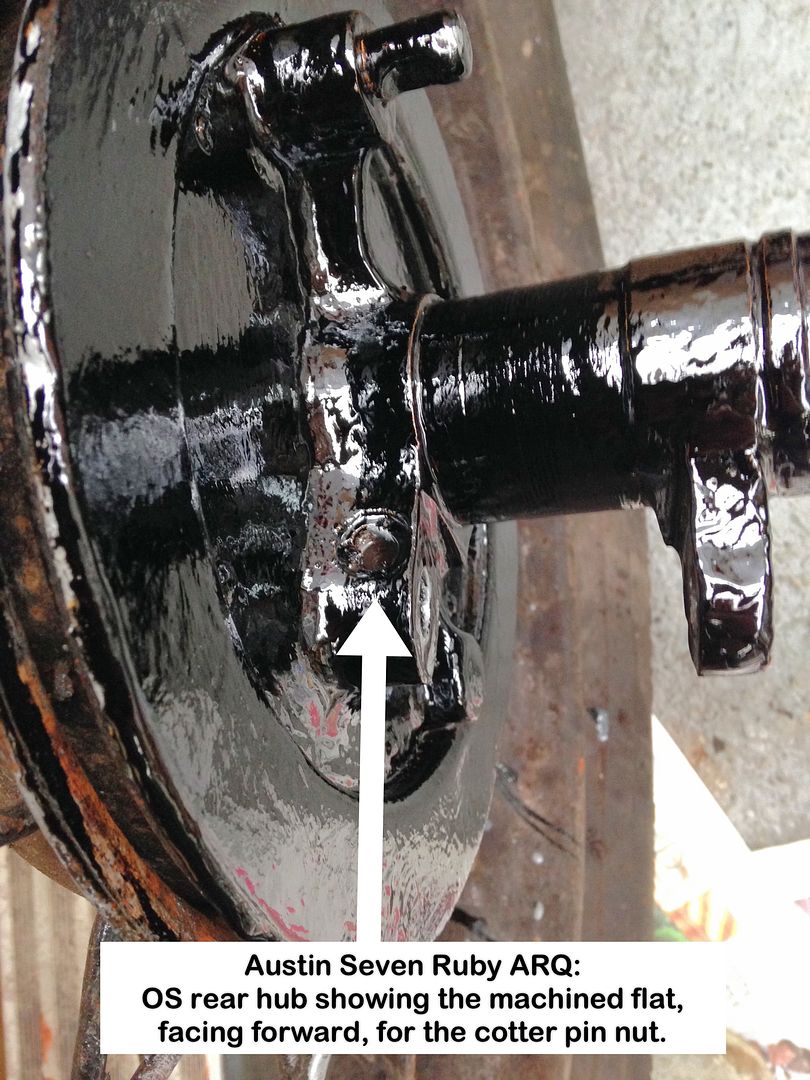
Now for something that had me shaking my head, NOT at some previous owner's 'delicate' touch this time, however, but at 'The Austin' itself.
Photos show why:
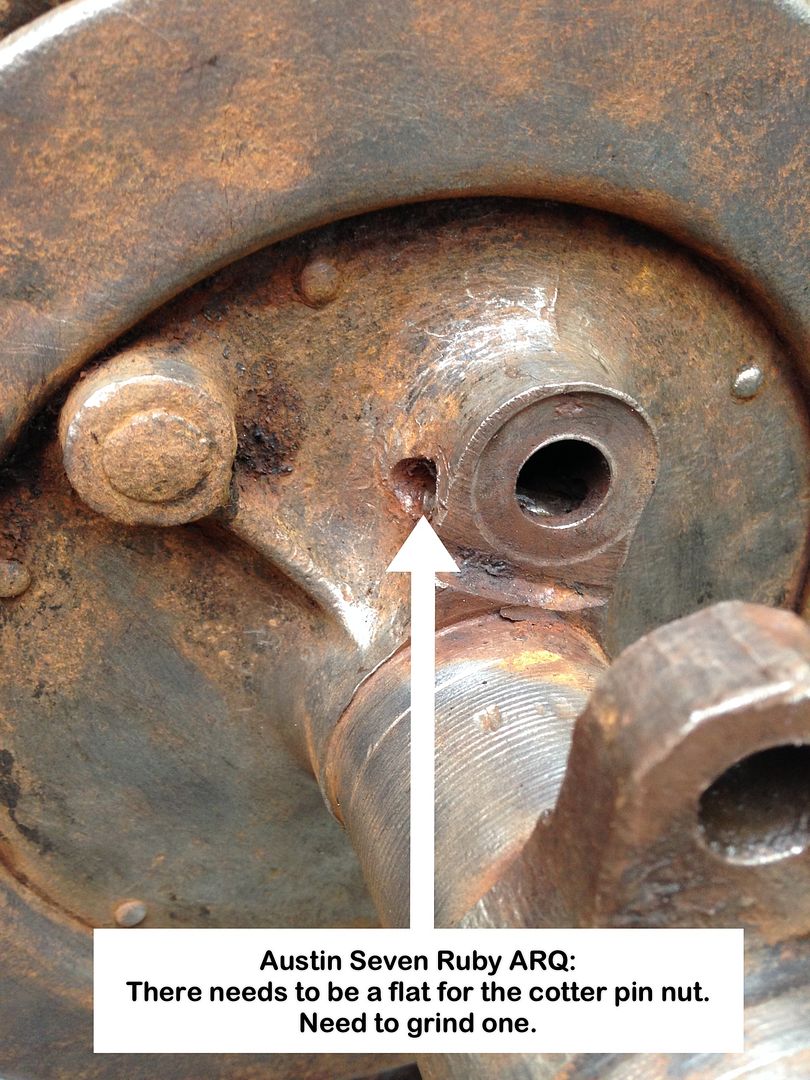
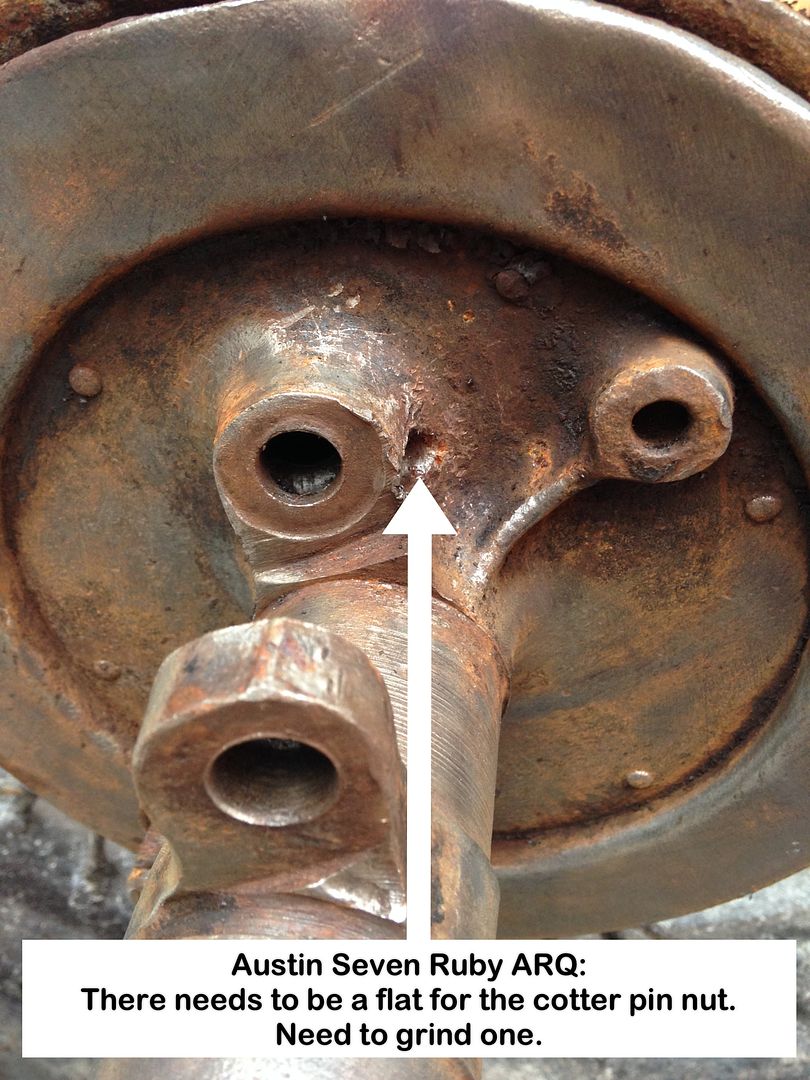
Definitely need to grind flats for the cotter pin nuts.
Wonder how many left the factory like this.
As an aside, I've started two new Threads on the Friends Forum:
Brake Cross-shafts
Brake Cross-shaft lubrication
Plus this one on the Model Engineers Forum:
Lubricating the Cross-shaft bearings
Some interesting responses posted
Geoff - Done a few posts waiting for paint to dry, so something achieved. |
|
| Back to top |
|
|
MooiMeisie
Joined: 04 Jan 2010
Posts: 41
|
| Posted: Tue Nov 10, 2015 4:36 pm Post subject: It pays to be sure! |
|
|
something I forgot about (nothing new then) and then totally failed to 'see', and one reason the car will go for an MOT when done.
The cotters pins where inserted from the front with the threaded ends hammered sideways to lock them in place, instead of from the rear forward.
More head shaking aimed at whoever did this, plus at myself this time [Blush]
Machined flats very much in evidence:
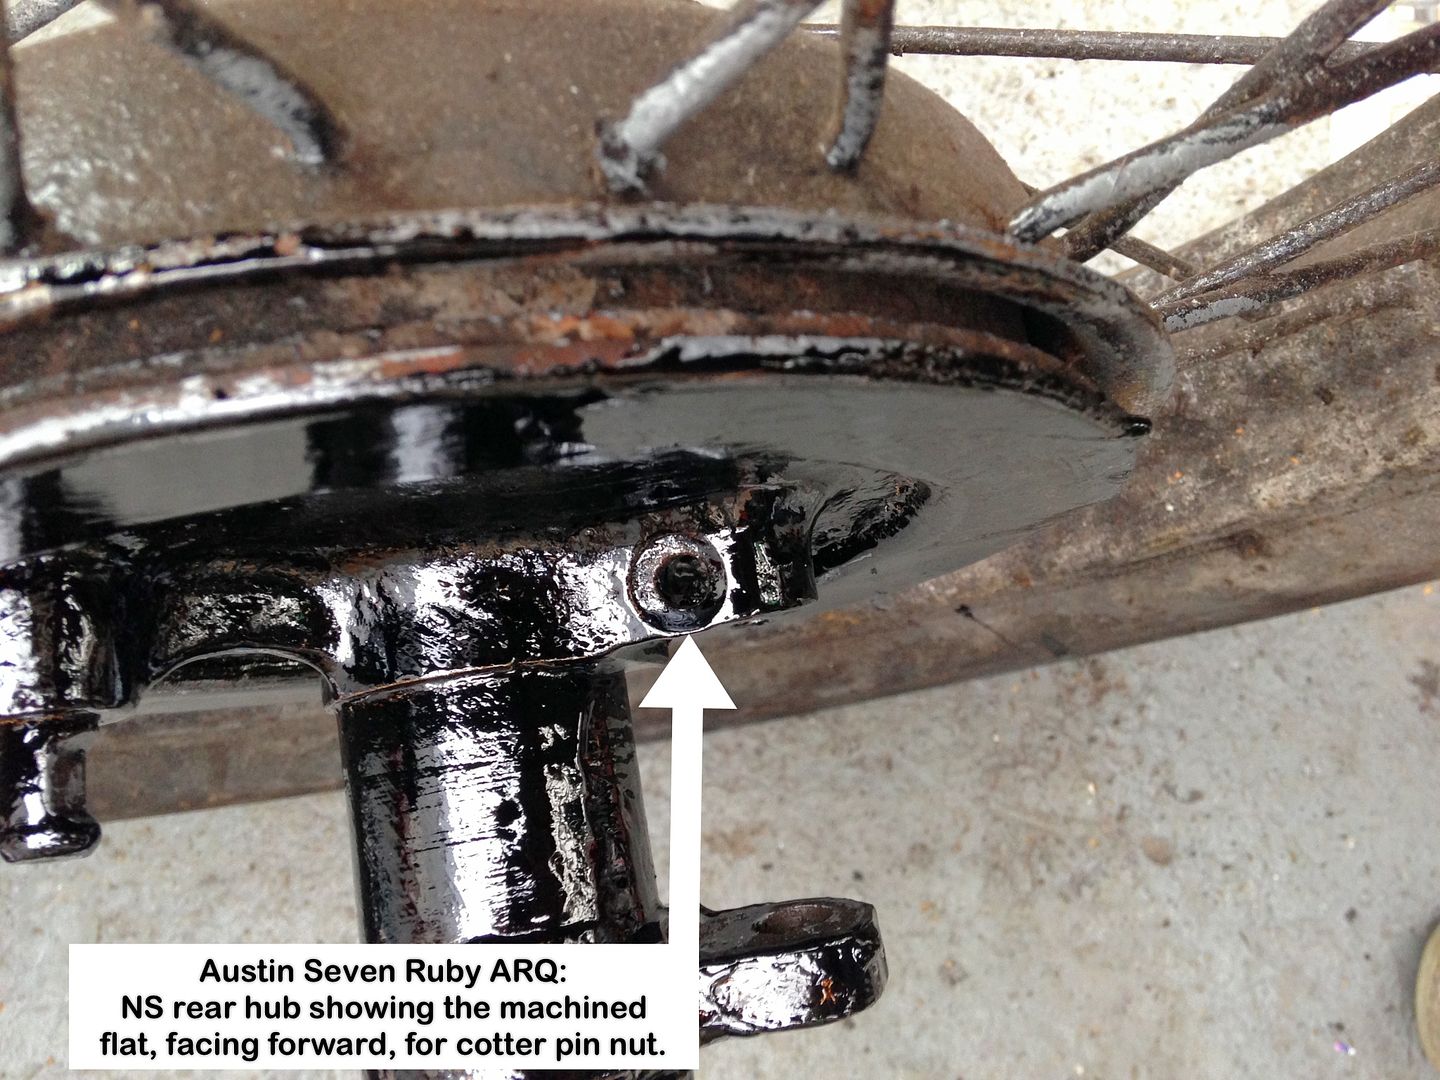
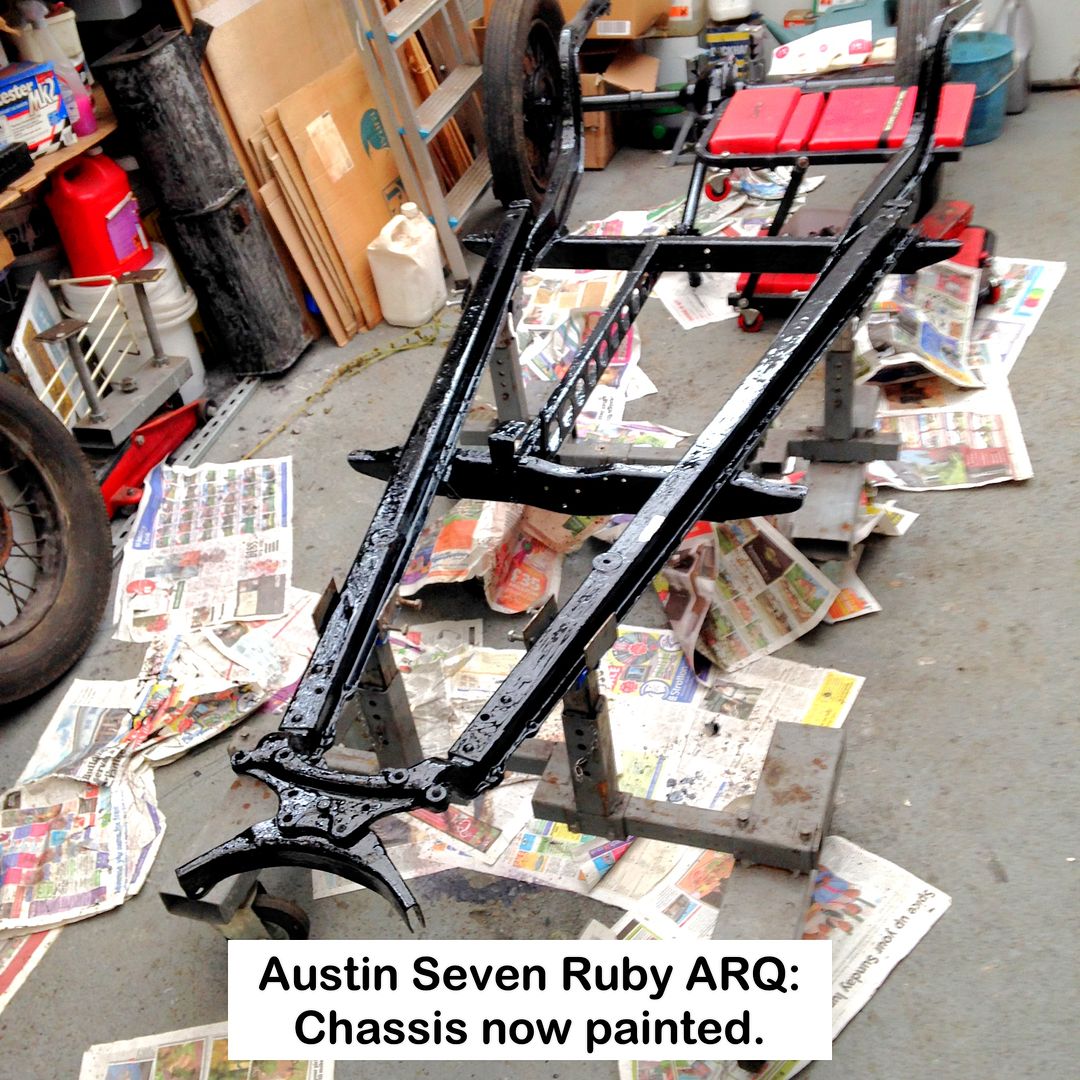
Chassis now painted:
Geoff - If I'm not careful my head will unscrew from all the sideways shaking it's getting [sigh] |
|
| Back to top |
|
|
OuBallie
Joined: 02 Mar 2013
Posts: 225
Location: South Norfolk next to Suffolk
|
| Posted: Sun Dec 06, 2015 1:52 pm Post subject: SpiggyTopes, hope you are not suffering withdrawal symptoms! |
|
|
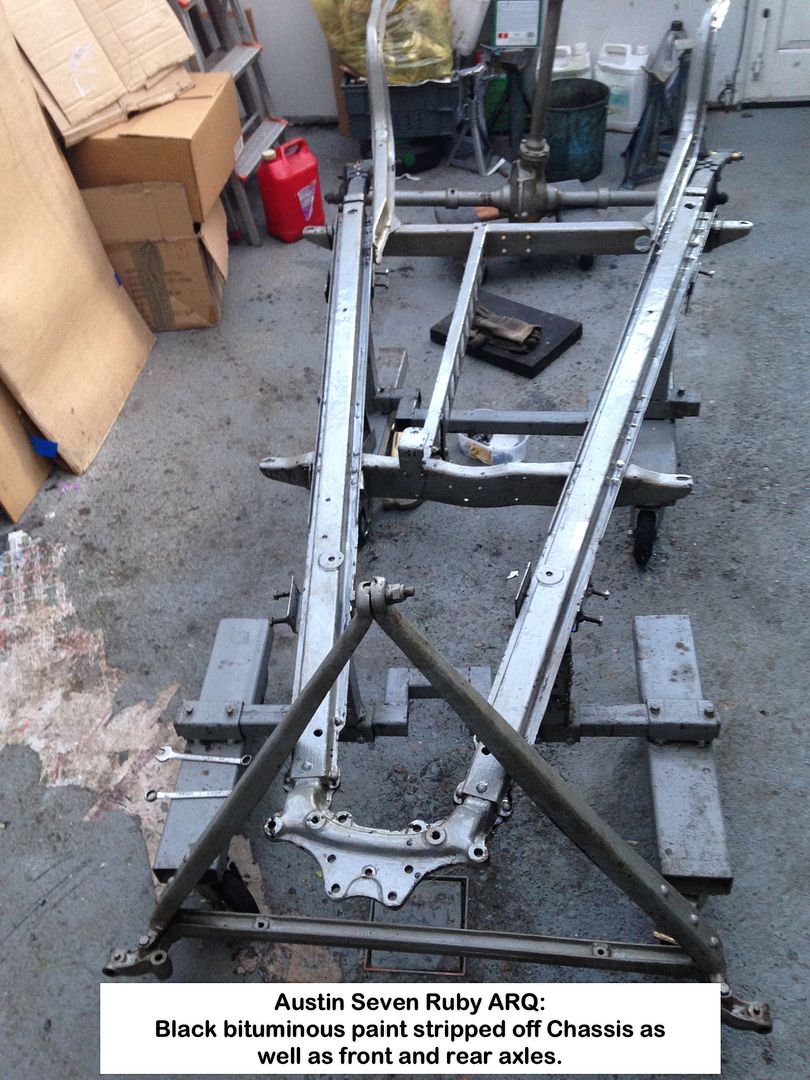
Where has the time gone?
A lot of it has been spent in removing the black paint from the chassis plus front and rear axles!
Anyone like to guess why I did this?
Back to square one on painting the chassis and axles:
What a messy job, resulting in the floor now looking decidedly worse off, even after covering it in layers of newspaper, regularly replaced.
Will apply another coat of floor paint BUT only once the body is stripped and DTM undercoat applied.
Brake Cross-shaft in place temporarily:
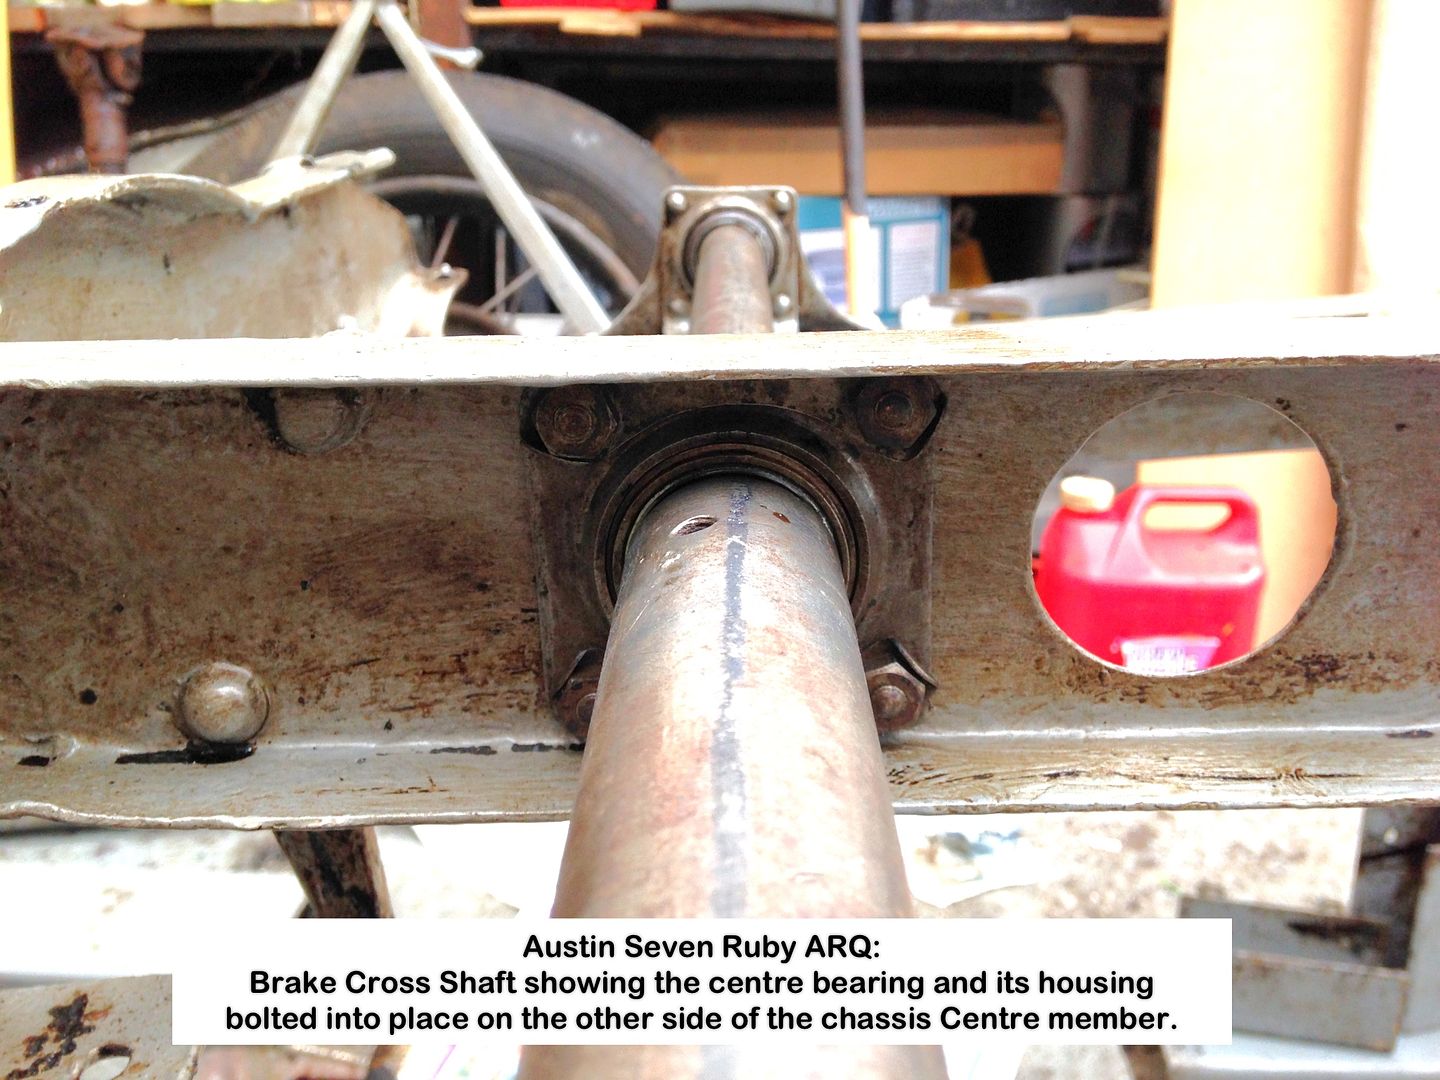
Cannot see any movement between the two cross tubes whilst attempting to lever the two OS brake levers apart, so will continue applying penetrating oil and heat.
New rear springs courtesy of Dunford senior:
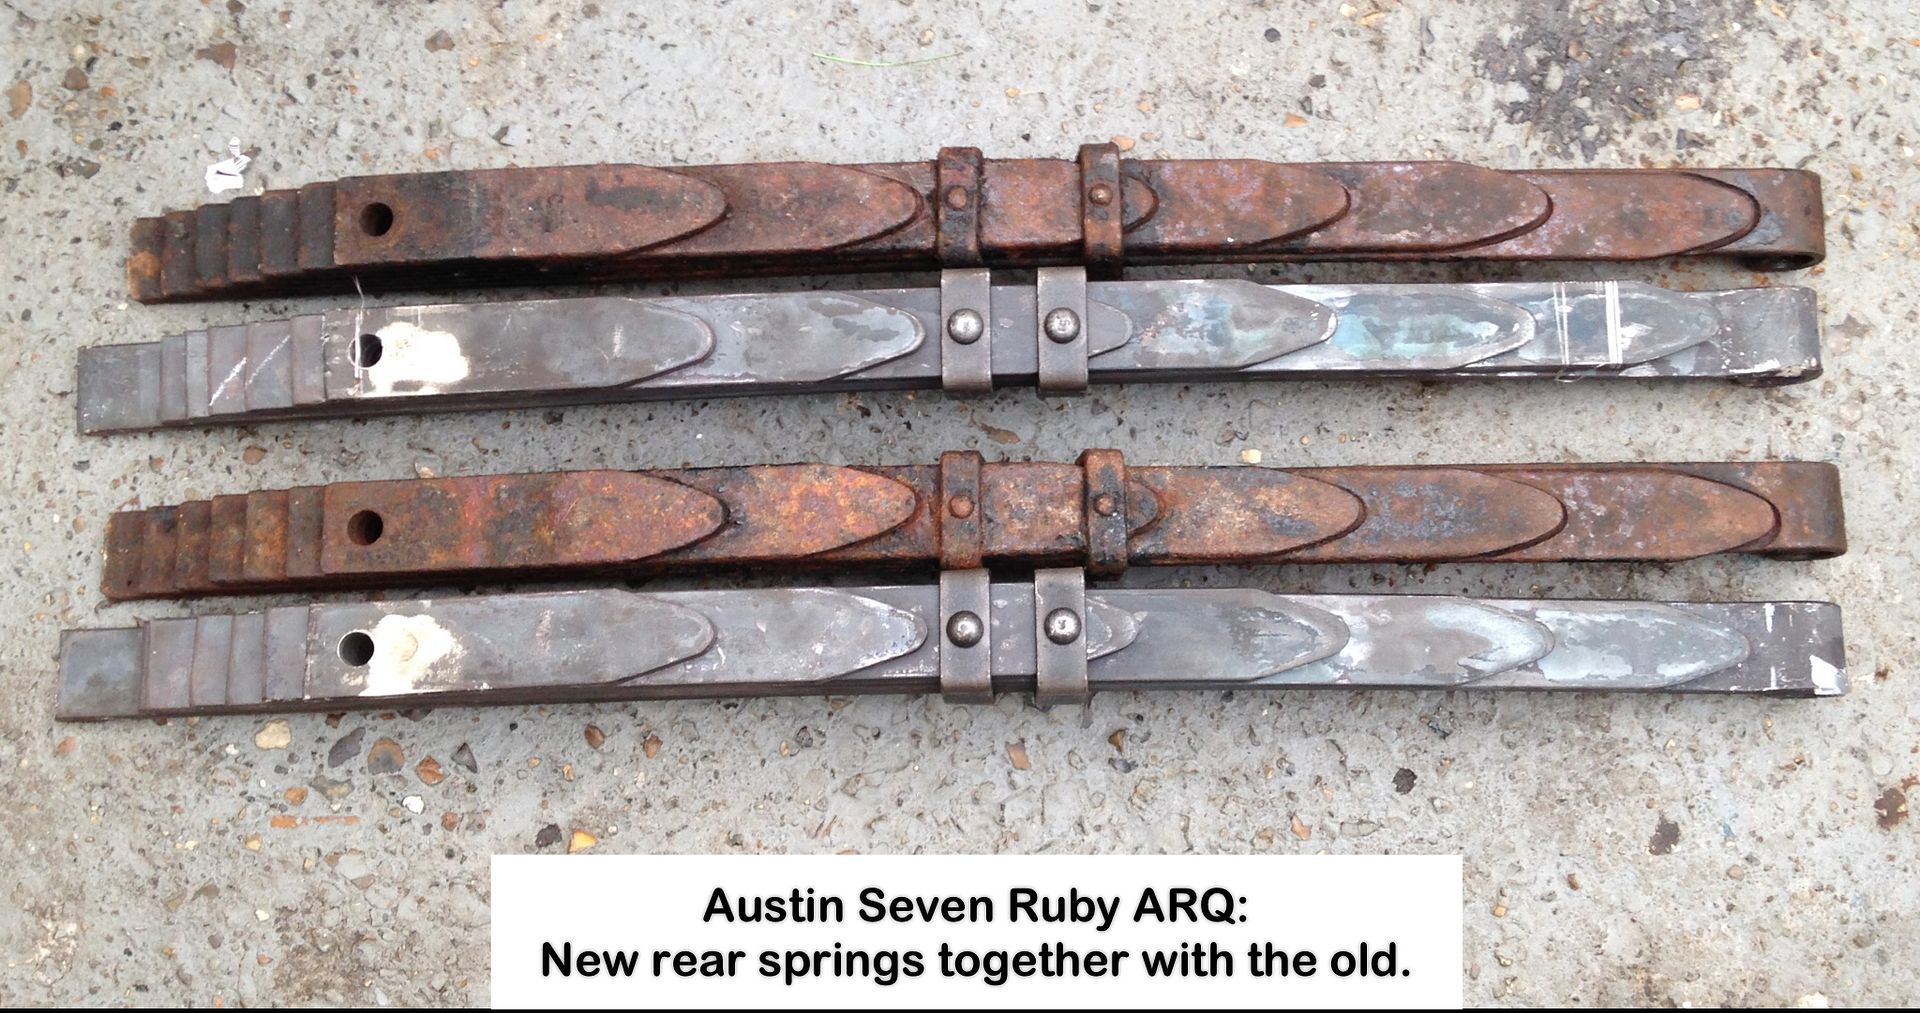
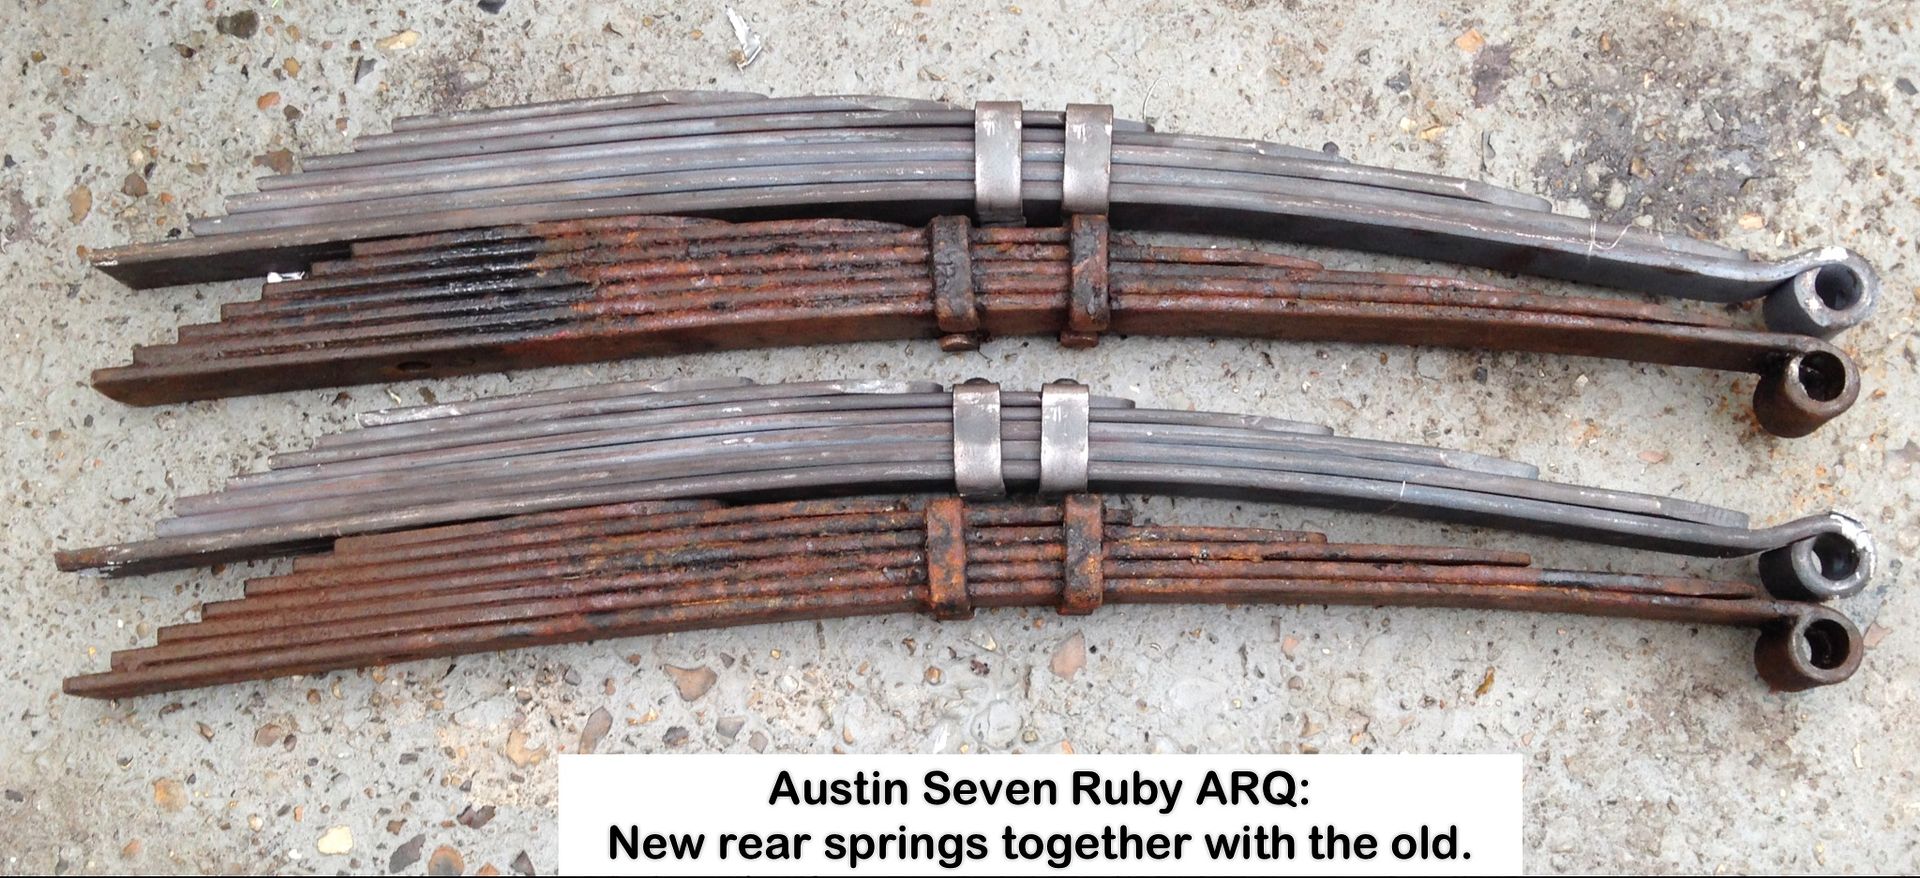
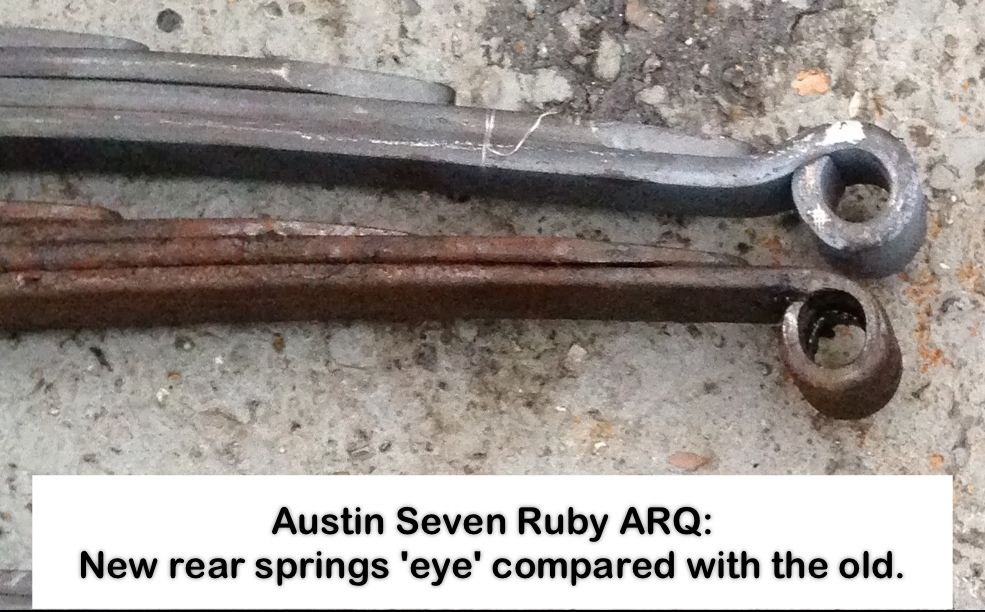
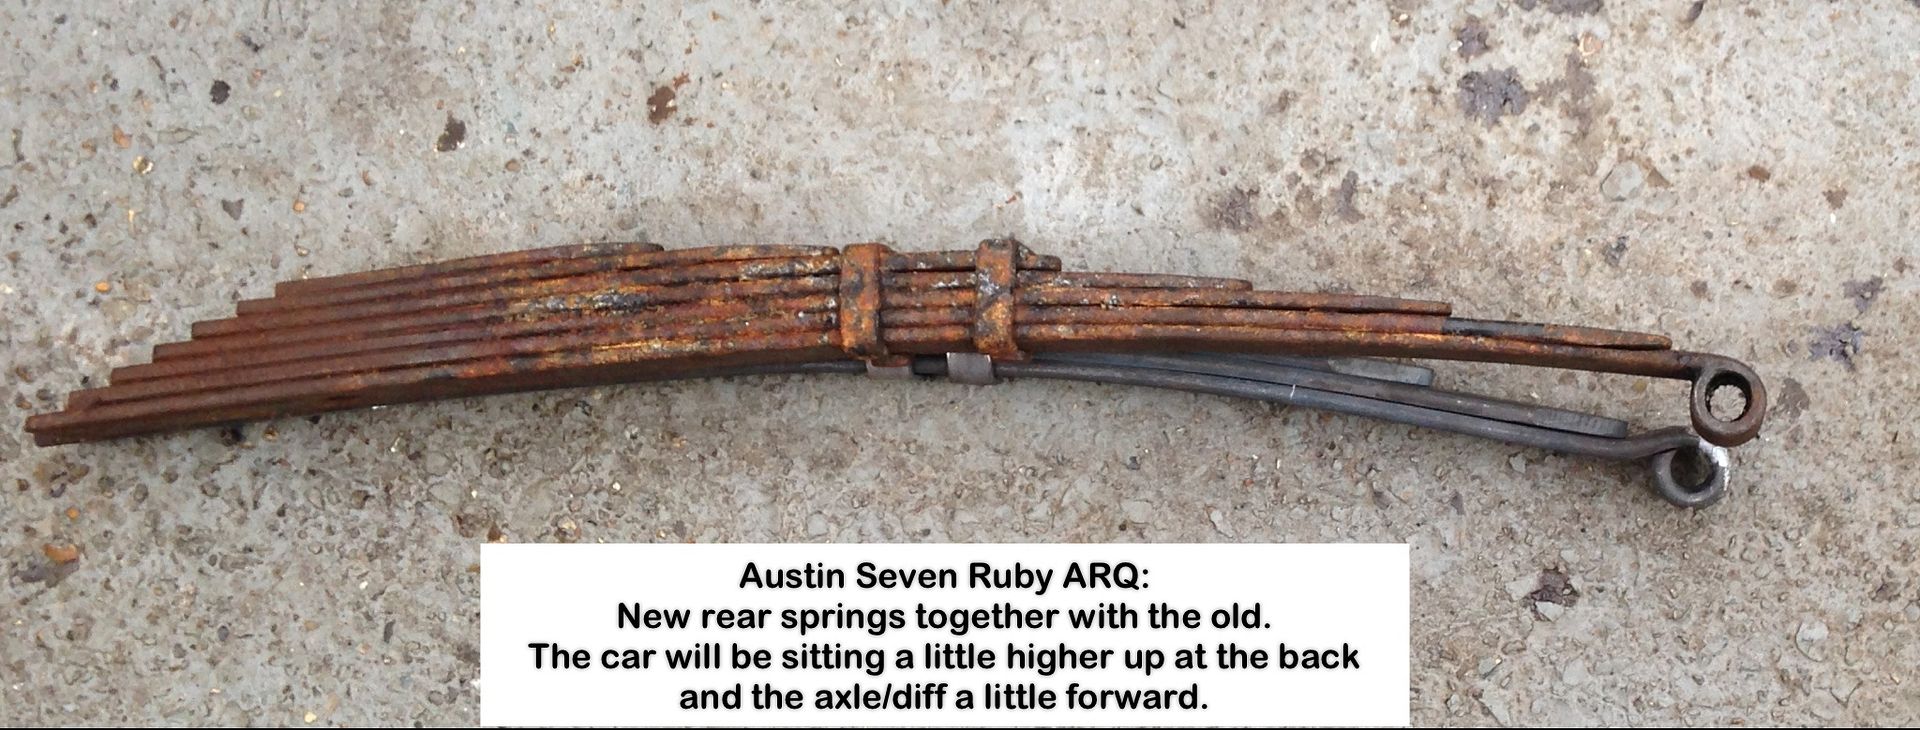
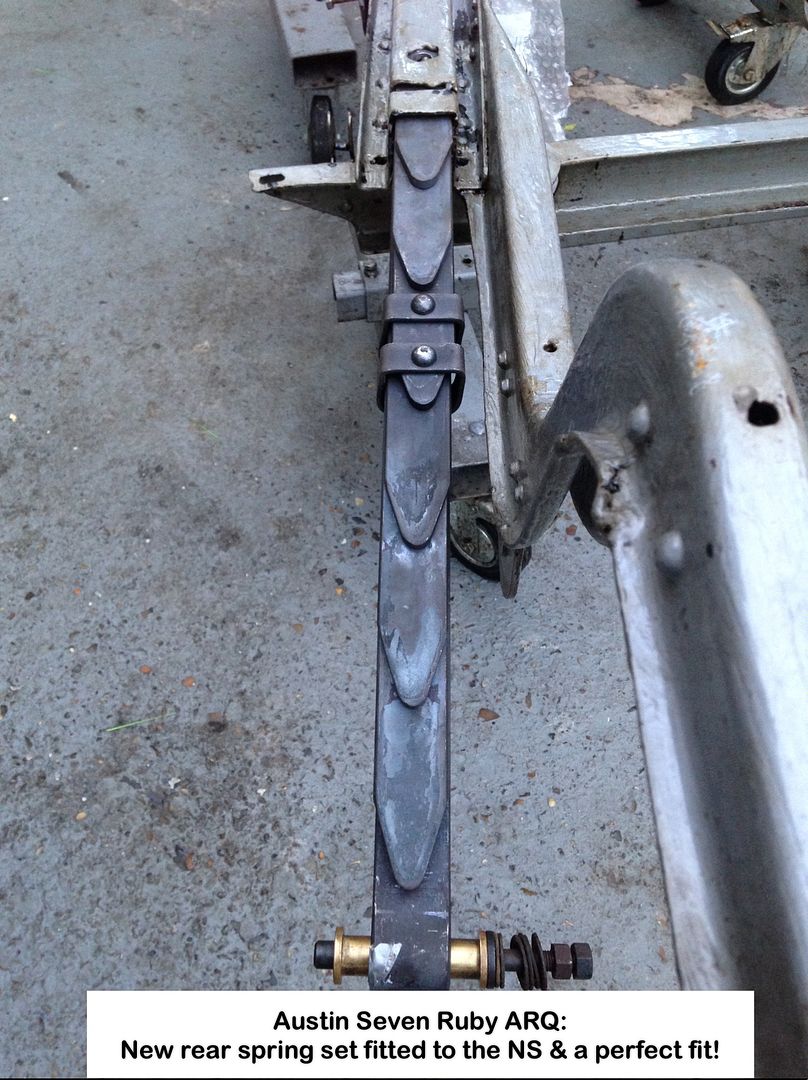
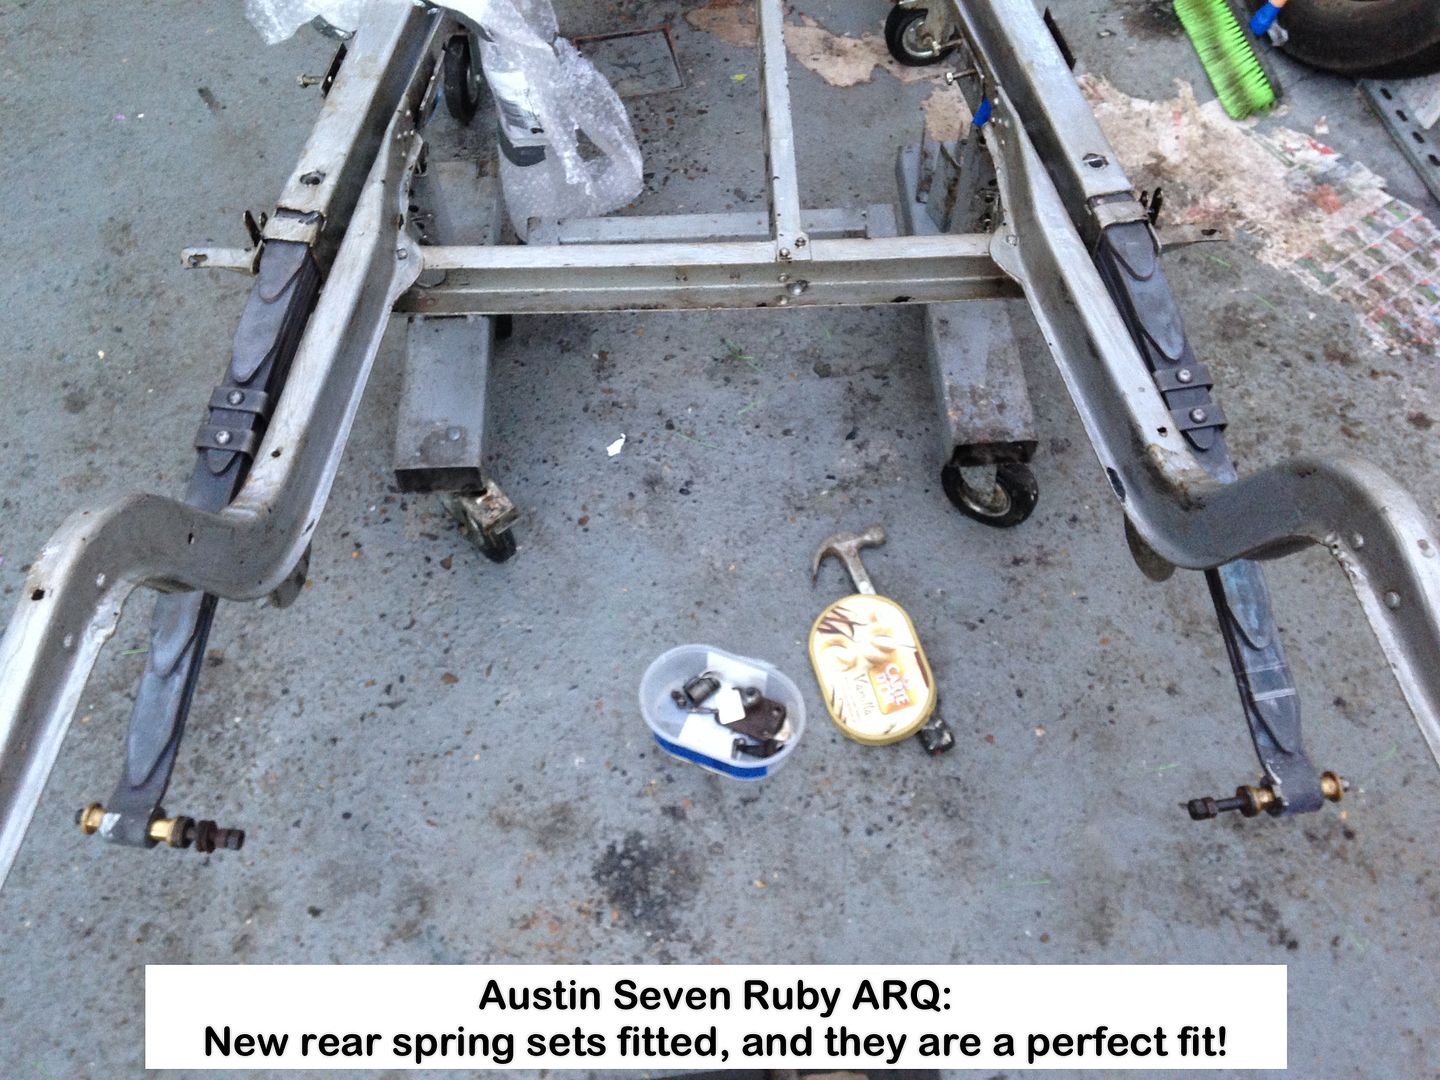
Annotations and photos say it all with regards quality and fit.
Thanks Ian!
Geoff - Next update will be second try with black paint.
_________________
Too many hobbies, not enough time!
1935 Austin Seven Ruby ARQ
1957 Austin A35 2-door
1967 Morris Minor 2-door
2007 Fiat Doblò MultiJet (It carries the spares etc)
Model Engineering |
|
| Back to top |
|
|
ka

Joined: 03 Dec 2007
Posts: 600
Location: Orkney.
|
| Posted: Mon Dec 07, 2015 8:25 am Post subject: |
|
|
Looking at the cracks in your chassis, and welding thereof, are you busy over the next week, can you pop up to the Forth Bridge?
_________________
KA
Better three than four. |
|
| Back to top |
|
|
OuBallie
Joined: 02 Mar 2013
Posts: 225
Location: South Norfolk next to Suffolk
|
| Posted: Fri Dec 11, 2015 11:15 am Post subject: My reply disappeared into the ether so once more. |
|
|
ka,
LOL.
I appreciate your confidence in my welding, but I doubt those who use the bridge would 
They couldn't afford me in any case 
Geoff - Dentist in an hour 
_________________
Too many hobbies, not enough time!
1935 Austin Seven Ruby ARQ
1957 Austin A35 2-door
1967 Morris Minor 2-door
2007 Fiat Doblò MultiJet (It carries the spares etc)
Model Engineering |
|
| Back to top |
|
|
OuBallie
Joined: 02 Mar 2013
Posts: 225
Location: South Norfolk next to Suffolk
|
| Posted: Sat Dec 12, 2015 3:06 pm Post subject: Dentist gave me the all clear :-) |
|
|
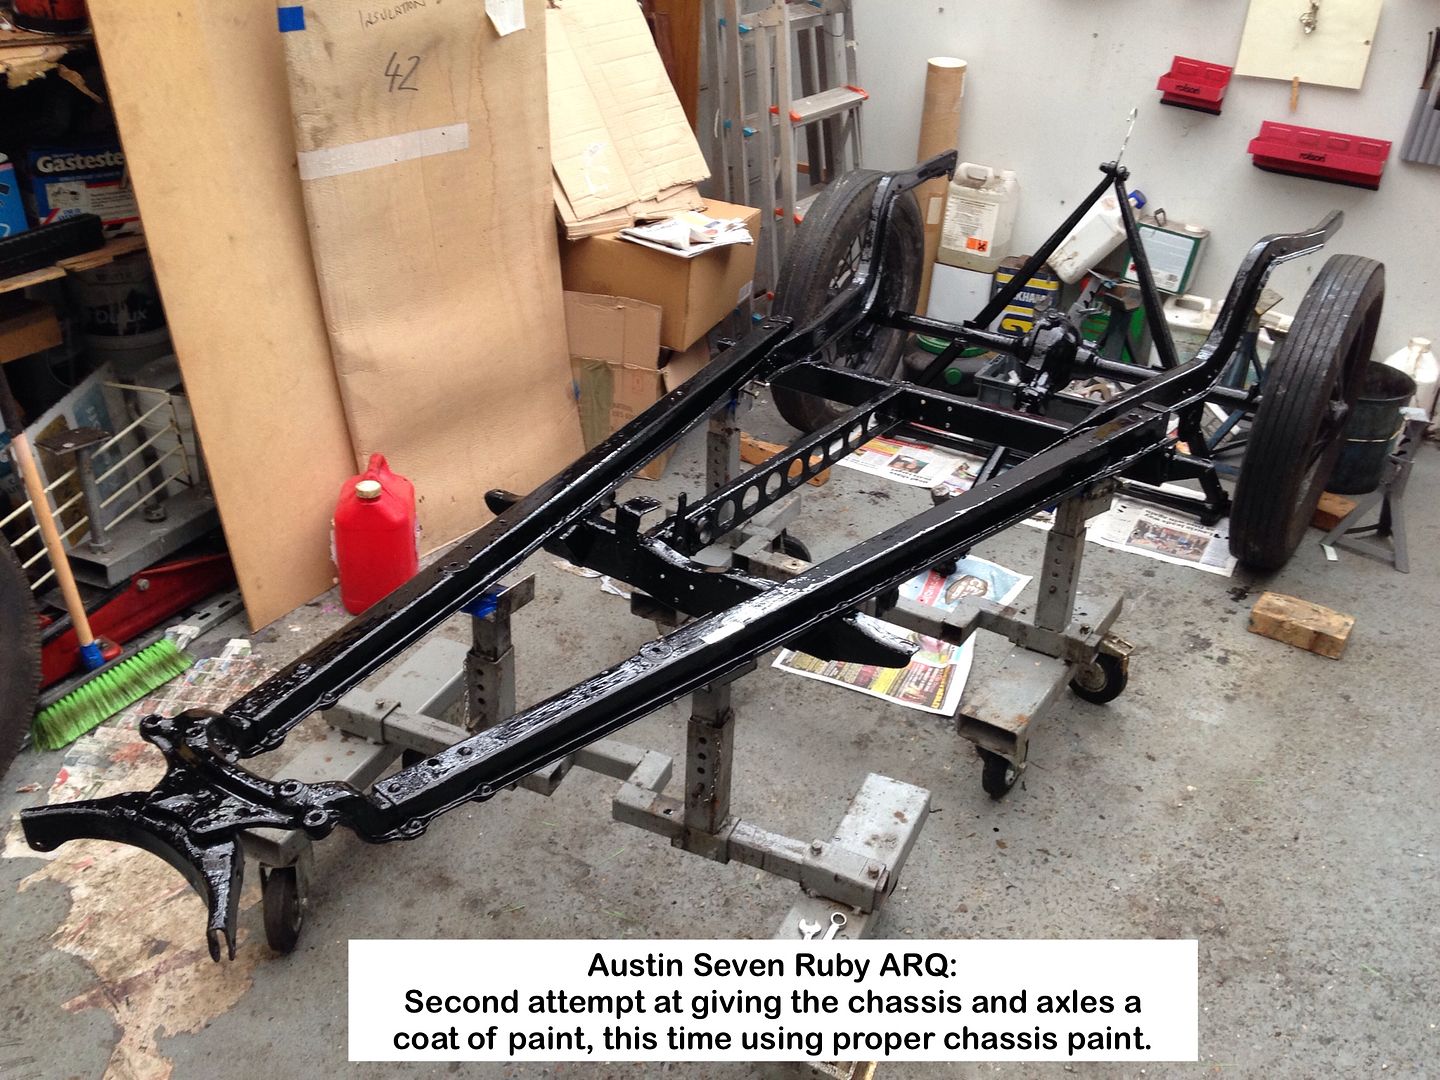
Chassis, axles and brake parts now painted using 'proper' chassis paint.
Anybody realise why the bituminous paint was a no-no?
Will store the parts against the Carport door once the paint has fully hardened, then assemble a table so that I can remove the door innards and start stripping paint off of them as well as the body parts previously removed.
I took two videos of me painting, each around 75min, but need to edit them before posting on YouTube.
Electric shower unit FUBAR so using a watering can 
Geoff - Well, when needs must and all that, but it works a treat
_________________
Too many hobbies, not enough time!
1935 Austin Seven Ruby ARQ
1957 Austin A35 2-door
1967 Morris Minor 2-door
2007 Fiat Doblò MultiJet (It carries the spares etc)
Model Engineering |
|
| Back to top |
|
|
OuBallie
Joined: 02 Mar 2013
Posts: 225
Location: South Norfolk next to Suffolk
|
| Posted: Thu Dec 17, 2015 3:36 pm Post subject: Ready to begin Phase 3. |
|
|
Chassis and axles stowed away:
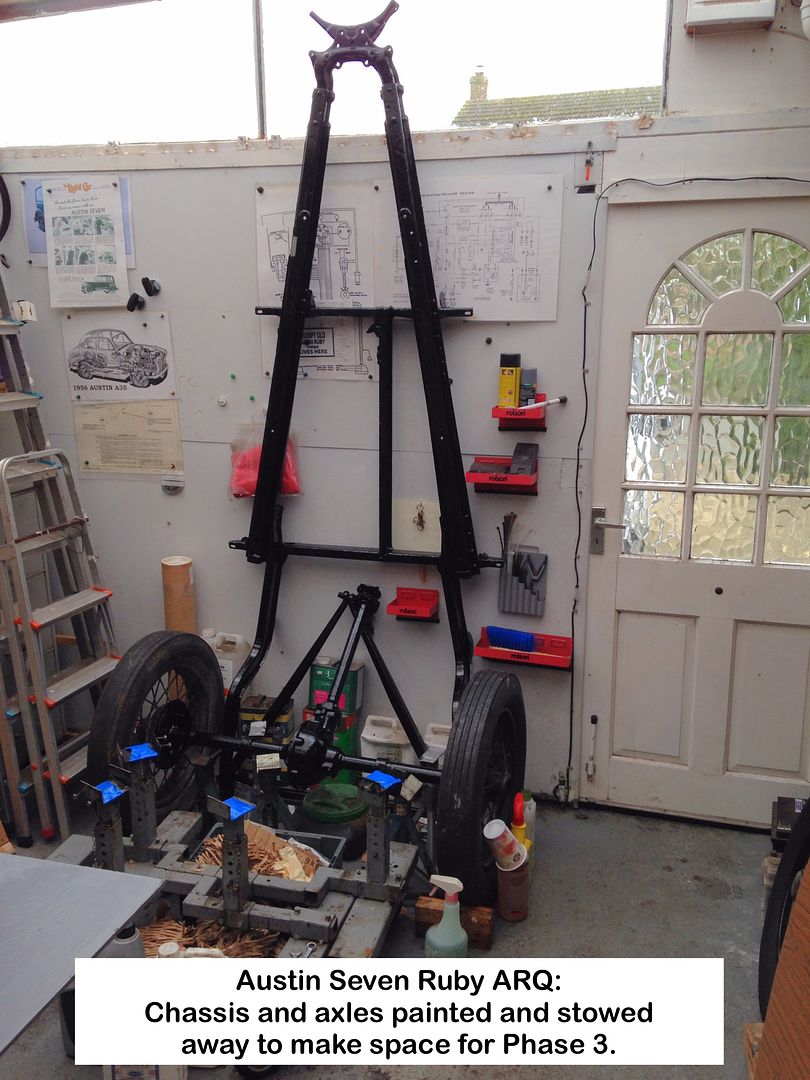
Phases 1&2 completed, namely removing the body then painting chassis and axles respectively.
Table assembled ready to start Phase 3 - To strip paint off of the body parts taken off.
I'm on my marks and ready:
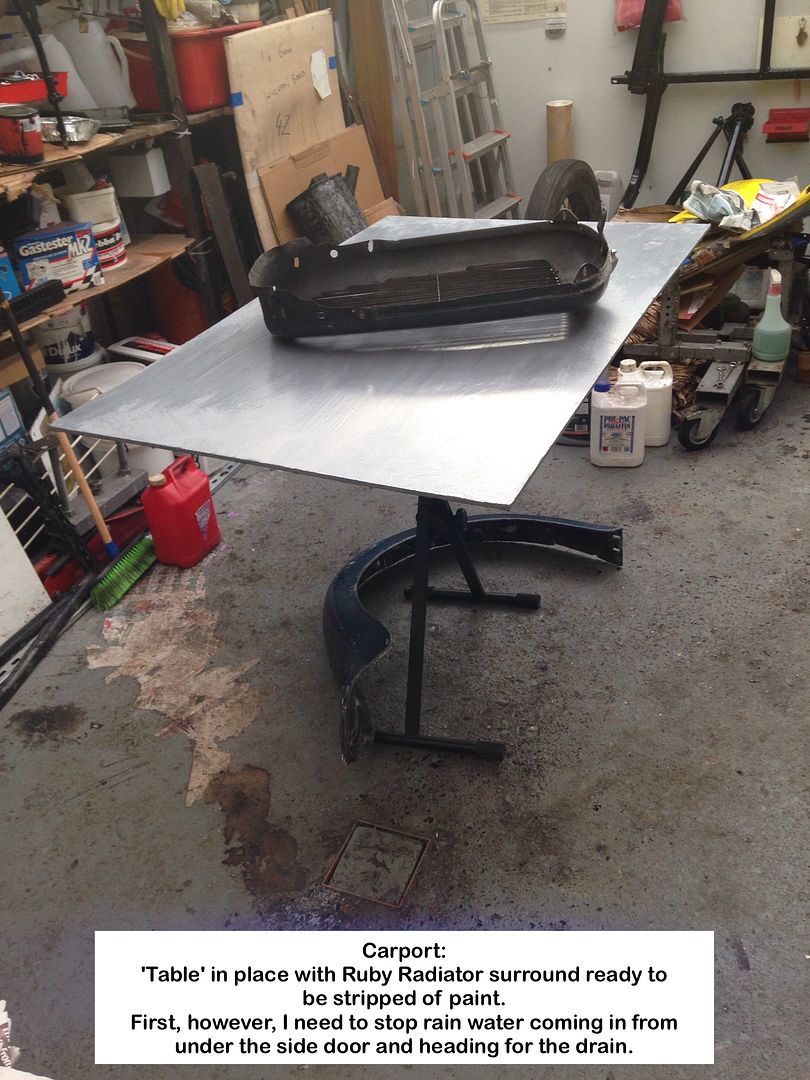
But first:
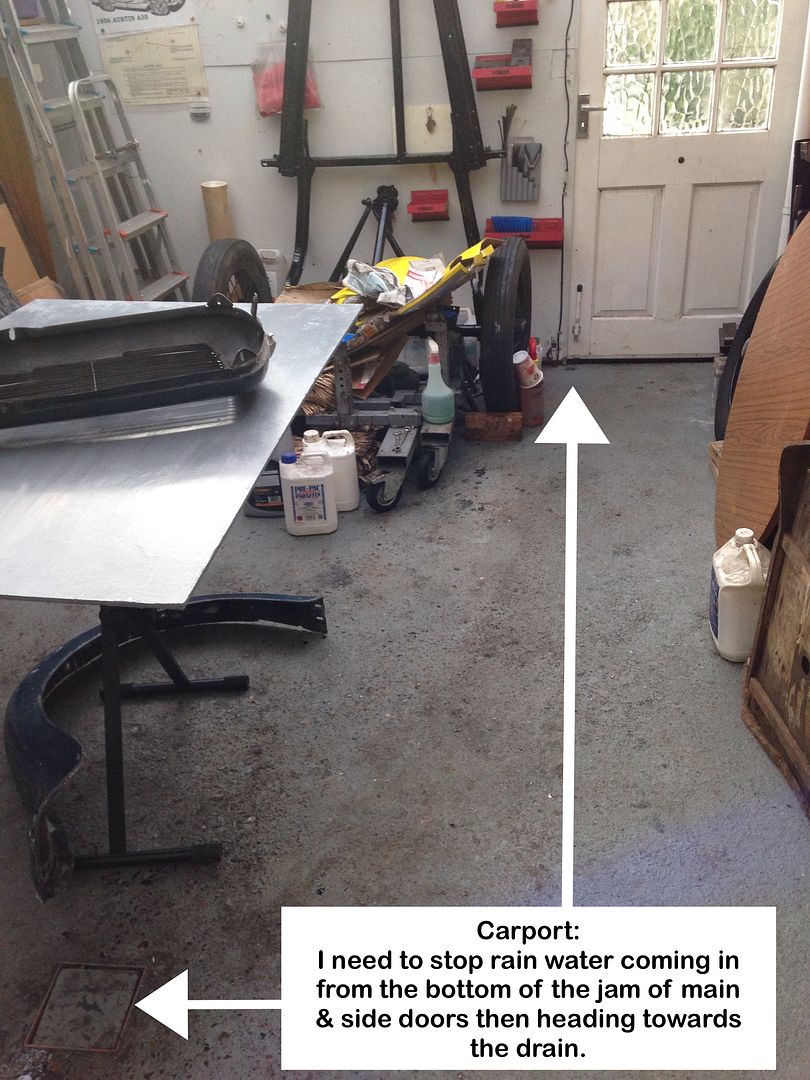
I need to sort this perpetual problem out!
Being an enclosed portion of the driveway, water flows towards the drain.
The side door opens outwards due to position of gutter downpipe, so normal door jam not possible
The floor is going to need a fresh coat of paint before I do any spraying/coach painting.
Geoff - Lesson learned about using the wrong paint, TEST first!
_________________
Too many hobbies, not enough time!
1935 Austin Seven Ruby ARQ
1957 Austin A35 2-door
1967 Morris Minor 2-door
2007 Fiat Doblò MultiJet (It carries the spares etc)
Model Engineering |
|
| Back to top |
|
|
kevin2306
Joined: 01 Jul 2013
Posts: 1359
Location: nr Llangollen, north wales
|
| Posted: Thu Dec 17, 2015 5:09 pm Post subject: |
|
|
If the door opens outwards, get a hardwood threshold fixed on the inside, sealed to the floor with sealant before fixing.
I have exactly that on the inside of my garage roller shutter door even though it has a rubber sealing strip at the bottom, never had any rain blow under that.
kev |
|
| Back to top |
|
|
OuBallie
Joined: 02 Mar 2013
Posts: 225
Location: South Norfolk next to Suffolk
|
| Posted: Sun Dec 20, 2015 11:49 am Post subject: Trip, trip, trip - Lawyers! |
|
|
kev,
That was my first thought, BUT that door is the only way into the bungalow, apart from a side gate that is bolted on the inside.
With today's penchant to sue for anything and everything, I can just imagine the sh1t I'd be in if someone wasn't paying attention and landed on their face.
I've done a check using a watering can and found that water is running down the cap between the doors and then flowing into the carport.
Have built a silicone 'deflector' to try and divert the water, but need to test again.
Can't believe I'm wearing effing long johns for the first time when working on the car!
Geoff - Other half fell over laughing
_________________
Too many hobbies, not enough time!
1935 Austin Seven Ruby ARQ
1957 Austin A35 2-door
1967 Morris Minor 2-door
2007 Fiat Doblò MultiJet (It carries the spares etc)
Model Engineering |
|
| Back to top |
|
|
D4B

Joined: 28 Dec 2010
Posts: 2083
Location: Hampshire UK
|
|
| Back to top |
|
|
OuBallie
Joined: 02 Mar 2013
Posts: 225
Location: South Norfolk next to Suffolk
|
| Posted: Tue Dec 22, 2015 11:12 am Post subject: |
|
|
D4B,
Thanks for the link.
The water is only coming in in that one area, the rest I've sorted.
Anyroad the concrete is so hard it would need the use of a jack hammer to shift.
It took me ages drilling a hole in the concrete for an expansion bolt iusing a Makita hammer drill, steel being far easier to drill.
Geoff - Made my fillings and bones rattle.
_________________
Too many hobbies, not enough time!
1935 Austin Seven Ruby ARQ
1957 Austin A35 2-door
1967 Morris Minor 2-door
2007 Fiat Doblò MultiJet (It carries the spares etc)
Model Engineering |
|
| Back to top |
|
|
Bitumen Boy
Joined: 26 Jan 2012
Posts: 1735
Location: Above the snow line in old Monmouthshire
|
| Posted: Tue Dec 22, 2015 11:27 am Post subject: |
|
|
| OuBallie wrote: |
It took me ages drilling a hole in the concrete for an expansion bolt iusing a Makita hammer drill, steel being far easier to drill.
|
What was your masonry bit like? The carbide tipped type do go blunt over time and, though the makers don't want you to know, can generally be resharpened a few times. It's easy enough to do it by eye using an ordinary bench grinder with a suitable wheel and makes an incredible difference - old bits you thought were only good for the bin performing as well as new ones. Might be worth a look |
|
| Back to top |
|
|
OuBallie
Joined: 02 Mar 2013
Posts: 225
Location: South Norfolk next to Suffolk
|
| Posted: Thu Dec 24, 2015 2:23 pm Post subject: |
|
|
Thanks Bitumen Boy,
It was a brand new bit, as I didn't have that size.
Like you I have sharpened them without any problem.
That silicone 'deflector' I added has just about cured the problem, having just had a wind swept downpour aimed directly at the doors.
Before the deflector, the rain water would be flowing into the Carport freely, but only a small puddle now.
Geoff - A happy bunny
_________________
Too many hobbies, not enough time!
1935 Austin Seven Ruby ARQ
1957 Austin A35 2-door
1967 Morris Minor 2-door
2007 Fiat Doblò MultiJet (It carries the spares etc)
Model Engineering |
|
| Back to top |
|
|
|
|
You cannot post new topics in this forum
You cannot reply to topics in this forum
You cannot edit your posts in this forum
You cannot delete your posts in this forum
You cannot vote in polls in this forum
|
php BB powered © php BB Grp.
|


