
Classic cars forum & vehicle restoration.
|
|
| Author |
Message |
BigJohn
Joined: 01 Jan 2011
Posts: 954
Location: Wem, Shropshire
|
 Posted: Mon Jan 27, 2020 5:06 pm Post subject: Posted: Mon Jan 27, 2020 5:06 pm Post subject: |
 |
|
Took the Golf for an MOT, passed no advisories, Hooray! Then the alarm started playing up on the run home, Boo! Two steps forward, one step backward. 
_________________
1974 Mk1 Escort. |
|
| Back to top |
|
 |
MikeEdwards
Joined: 25 May 2011
Posts: 2467
Location: South Cheshire
|
| Posted: Thu Jan 30, 2020 10:30 am Post subject: |
|
|
| badhuis wrote: | | Regarding "moving some shelving" - it seems half of all time spend in the garage is by cleaning up the work place, finding new spaces, making new shelves and moving things around. |
Yes, I have that issue too. And then the increased time in finding the stuff I've moved around.
I spent a bit of time the other day trying to sort out a problem with the dash lighting in the Firenza. The lighting is powered from a plastic "circuit board", which has tags around a hole. The lamp holders have capless bulbs in them, and push into the hole, making contact with the two tags and lighting the lamp.
There are four in the instrument panel, and two of them don't work. It's not the bulbs, so I can only presume that one or both tag has snapped off - they go brittle over the years and I had the same problem with the other car. So I spent some time making a flying lead with four LEDs on it, spaced out to get to each hole, then an in-line resistor to drop the 12v down to something suitable. Lots of heat-shrink used, ages messing around, tested it, all works, so I come to fit it in the car. Unfortunately it's nowhere near bright enough - I can see the light is on, but it doesn't do anything to light the tachometer.
Yesterday I made another flying lead, this time wiring directly to two bulb holders, and without the resistor. This addresses the problem of holding the lamps in place, and hopefully restores the lighting on that side of the dash. As I pondered it last night, though, I have another problem in that I either have to be very careful to put the holders in the correct way around, or need to insulate the contacts, which could be difficult as they're quite tight.
I did all of this to save me the time of removing the instrument panel, which means removing the whole dash first. I'm almost at a point where I've not saved any time, and will end up with a poor solution to the problem. |
|
| Back to top |
|
|
Bitumen Boy
Joined: 26 Jan 2012
Posts: 1735
Location: Above the snow line in old Monmouthshire
|
| Posted: Thu Jan 30, 2020 1:39 pm Post subject: |
|
|
| MikeEdwards wrote: | | I'm almost at a point where I've not saved any time, and will end up with a poor solution to the problem. |
 I think we've all been there at some point... I think we've all been there at some point...  |
|
| Back to top |
|
|
alanb
Joined: 10 Sep 2012
Posts: 516
Location: Berkshire.
|
| Posted: Thu Jan 30, 2020 5:28 pm Post subject: |
|
|
Ah modern technology, or not so modern, many years ago my son had a similar problem with his Nova sri when it wasn't that old and ended up buying a new printed circuit membrane, fortunately they were readily available. I had the fuel gauge fail on my Citroen Xantia and had to have a complete new instrument cluster again it was fairly new and was replaced under warranty, had it happened now it would write the car off.
_________________
old tourer
Morris 8 two seater |
|
| Back to top |
|
|
Vulgalour
Joined: 08 May 2018
Posts: 474
Location: Kent
|
| Posted: Thu Jan 30, 2020 11:43 pm Post subject: |
|
|
Happily, I now have the Princess at the new house. It had been staying at the old house with my friend while I got everything organised at the new house, and what a boon it was to have that little bit of extra time!
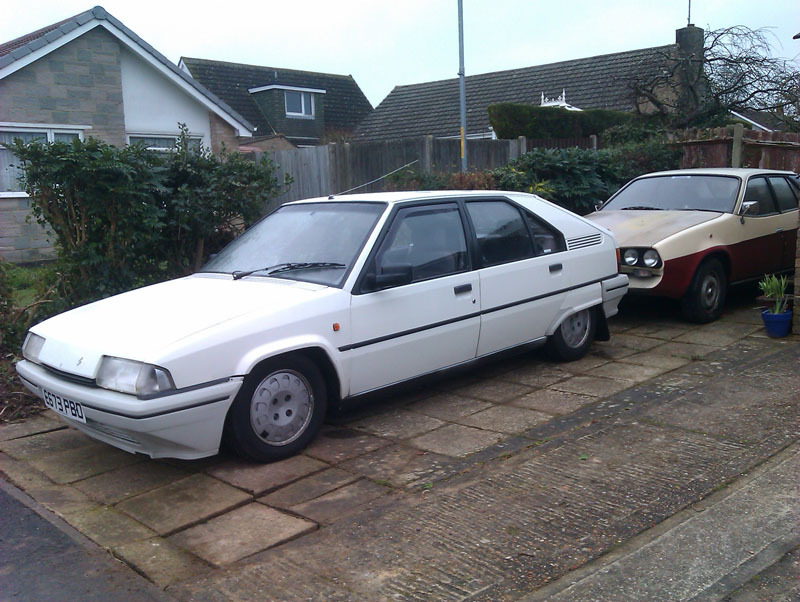
Unfortunately, the garage at the new house is just a little bit too narrow and almost too short to be practical as car storage unless we empty absolutely everything else out of it and, since we haven't got a shed yet, that's not really an option. Now everything is in one place, I can set to fixing the head after my little mishap with the valves a little while ago. |
|
| Back to top |
|
|
MikeEdwards
Joined: 25 May 2011
Posts: 2467
Location: South Cheshire
|
| Posted: Fri Jan 31, 2020 10:52 am Post subject: |
|
|
| There was a photo of your Princess on FB the other day on the back of a beavertail of some sort. |
|
| Back to top |
|
|
Vulgalour
Joined: 08 May 2018
Posts: 474
Location: Kent
|
| Posted: Fri Jan 31, 2020 12:50 pm Post subject: |
|
|
It was spotted more than once on it's long ride south.
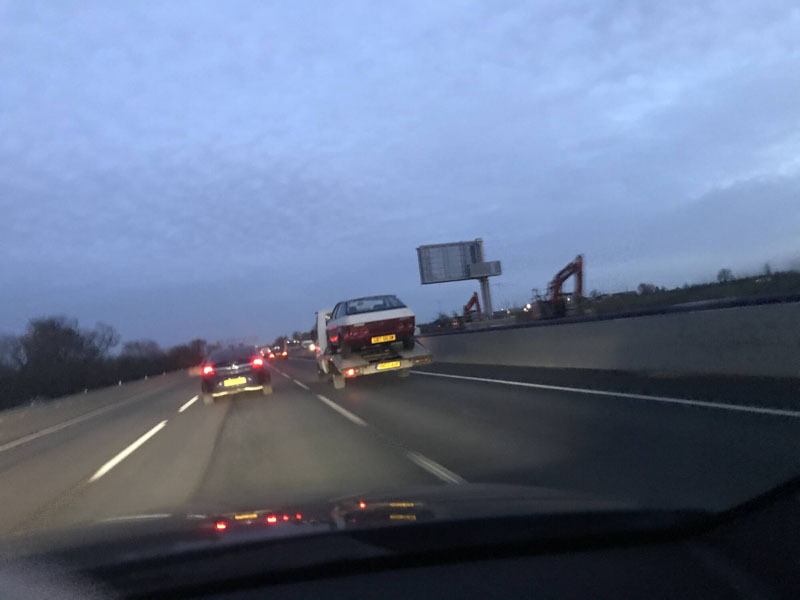
Couldn't fault the chap that did the delivery for me, he made it much more affordable and convenient than had I transported it myself. |
|
| Back to top |
|
|
alanb
Joined: 10 Sep 2012
Posts: 516
Location: Berkshire.
|
| Posted: Fri Jan 31, 2020 3:02 pm Post subject: |
|
|
Just love your BX I had 2 in succession in the early 90s G reg & K reg both company cars, good tow car too.
_________________
old tourer
Morris 8 two seater |
|
| Back to top |
|
|
Ray White

Joined: 02 Dec 2014
Posts: 6304
Location: Derby
|
| Posted: Sat Feb 01, 2020 9:00 pm Post subject: |
|
|
Today I turned my attention to the sump. XPAG engines seem to have a reputation for oil leaks so as I have had the rear crank main bearing machined to accept a speedi sleeve and modern oil seal I thought it would be spoiling the ship etc. to not upgrade the front end.
On examining the extension to the crank pulley on which the seal runs, it seemed to look very slightly corroded. It would probably be O.K. but I decided to replace it and fit a rubber lip seal.
Before fitting the new parts I thought long and hard about what finish I wanted for the sump. Originally, it would have been painted dark red to match the block. I am not keen on that.
An alternative would to be polished aluminium. This was going to be the preferred option but unfortunately there were just too many rough areas of fabrication to make it look good.
I know you don't spend all day looking at the sump - as it is, my wife says I spend too much time "faffing about" - but in the end I decided to paint in a silver grey colour. With a clear lacquer finish it should remain "shiny" .
With the ribbed sump stripped back to bare metal I applied a coat of Hammerite special metals primer in readiness for the silver grey top coat. I will leave the primer to dry overnight.
Faffing about. Huh! |
|
| Back to top |
|
|
badhuis

Joined: 20 Aug 2008
Posts: 1390
Location: Netherlands
|
| Posted: Mon Feb 03, 2020 10:49 am Post subject: |
|
|
Replaced the leaking, bad performing carburettor on the Jensen for a new Edelbrock one. Had to fabricate a mounting for the throttle cable and kick down lever. Engine runs much better now.
Then started on the door lock. It is pretty difficult to turn the key to lock it. So much that I have a fear of breaking the key. Cleaned and greased the lock on the workbench, it locks and unlocks well but still too much effort needed for the key. I then mounted an electric retraction motor from a central door locking kit (I have already installed a similar one in the other door). It entails a pin moving the locking / unlocking lever. Removed some trim panels from the lower dashboard to put the wiring across.
Next on the list is to check the upper door glass frame, maybe it needs a little tuning (it is adjustable in all directions). Then installing the door panel. Which is time consuming on a Jensen as it is surrounded by chrome plates at the edges. My car had new doors 20+ years ago, and the inner door panels were never installed so I have to drill multiple holes to screw the chrome plates in. Better take my time for it.
If all goes to plan the car will have electric central door locking, invisible on the car but so much better for the frugal door key locks.
_________________
a car stops being fun when it becomes an investment |
|
| Back to top |
|
|
norustplease

Joined: 11 Apr 2011
Posts: 779
Location: Lancashire
|
| Posted: Wed Feb 05, 2020 1:11 pm Post subject: Hubcaps |
|
|
More like what my car did to itself!
Whilst out with the Volvo the other day, a car drew up alongside me at the traffic lights. the driver wound down her window and said did I know that I had lost a hubcap. I asked where, and she gave a vague description of a previous junction.
I turned around in a pub carpark and then retraced my route, but could see nothing other than the usual crop of smashed modern plastic wheel covers. However, my rear offside hubcap was definitely missing. It is probably a trophy on some kid's bedroom wall now!!! Either that or as soon as I buy a new one, it will appear propped up against a wall somewhere!!
_________________
1953 Citroen Traction
1964 Volvo PV544
1957 Austin A55 Mk 1
Boring Tucson SUV |
|
| Back to top |
|
|
Rick
Site Admin

Joined: 27 Apr 2005
Posts: 22438
Location: UK
|
| Posted: Wed Feb 05, 2020 7:04 pm Post subject: |
|
|
Nothing particularly exciting, but the lower steering column on 'erindoors' Grand Vitara (silly name) has been exhibiting some play in the bottom UJ (there are two, the lower one cops all the muck and spray thrown up from the road). So a couple of hours over lunchtime/early pm were spent fitting a replacement, good job really as with it off, the lower UJ feels quite notchy so wouldn't have lasted much longer.
RJ
_________________
Rick - Admin
Home:https://www.oldclassiccar.co.uk
Videos:https://www.youtube.com/user/oldclassiccarRJ/videos
OCC & classic car merchandise (Austin, Ford ++):
https://www.redbubble.com/people/OldClassicCar/shop |
|
| Back to top |
|
|
Ray White
Joined: 02 Dec 2014
Posts: 6304
Location: Derby
|
| Posted: Wed Feb 05, 2020 7:28 pm Post subject: |
|
|
I made a start on fitting the new "fast road" camshaft and bearings. After bolting the load leveller to the block I winched it onto the bench.
My progress was halted by the discovery that the rear and centre bearing locating screws were missing. I seem to remember refitting them to the block when I sent it off for a rebore etc.
The trouble is that these are M8 x1 with a spigot end. These "mad metrics" are an obsolete thread with which all pre war Morris and MG owners will be familiar.
I tried unsuccessfully to machine the end of an old sump bolt before phoning the Octagon Car Club spares service and ordering a couple of new ones. I also ordered a 'magnetic' sump plug.
The camshaft retaining plate bolts were also missing but these seem to be normal M6 thread and I have a good selection of these fasteners. |
|
| Back to top |
|
|
Ray White
Joined: 02 Dec 2014
Posts: 6304
Location: Derby
|
| Posted: Fri Feb 07, 2020 8:48 pm Post subject: |
|
|
Having fitted the camshaft using Graphogen lube and located the rear and middle (split) bearings with the correct screws I turned to the front bearing. This is a thin split bearing that in the past would have needed reaming but this later design obviates that need. It is an interference fit and requires careful fitting. It is possible to use the thread in the end of the shaft to mount a gear press onto the end of the block. If such a devise is not available then it is quite possible to gently drift the bearing into place... but extreme care is required.
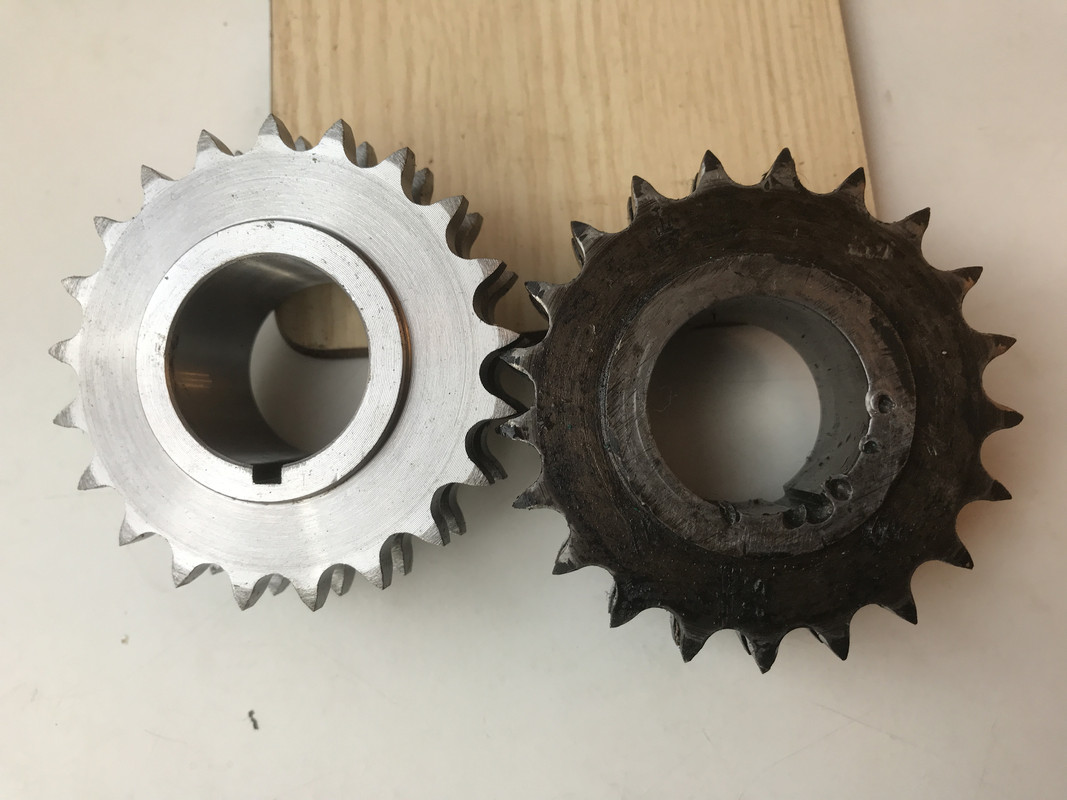
The new gears and chain come with no datum marks and where the original chain would have a couple of "bright" links, the new (improved) chain has none. I discovered that there were originally 13 links on one side of the highlighted links and 15 links on the other so I selected two suitable links and painted them with white enamel paint.
I then copied the scribed line on the old camshaft gear onto the new one. Using a new key (to fit the slightly wider slot in the new shaft) I trial fitted the sprocket. No problems.
The crankshaft gear will need to be marked later in relation to a "white" chain link but before everything is fitted I need to paint the engine mounting plate.
Compare the new sprocket with the old one. I fail to understand why anyone would abuse a timing gear in this manner.
 |
|
| Back to top |
|
|
Rootes75
Joined: 30 Apr 2013
Posts: 3804
Location: The Somerset Levels
|
| Posted: Sun Feb 09, 2020 2:59 pm Post subject: |
|
|
Did some more clearing and shifting in the shed this morning. Managed to make enough space to move the Commer back 4 ft, we have some more to shift but almost have enough space to get our 55 Hillman in and under cover.
_________________
Various Rootes Vehicles. |
|
| Back to top |
|
|
|
|
You cannot post new topics in this forum
You cannot reply to topics in this forum
You cannot edit your posts in this forum
You cannot delete your posts in this forum
You cannot vote in polls in this forum
|
php BB powered © php BB Grp.
|


