
Classic cars forum & vehicle restoration.
|
|
| Do you like or dislike the new dashboard ? |
| Yes I do like the new dashboard |
|
100% |
[ 7 ] |
| No I do not like the new dashboard |
|
0% |
[ 0 ] |
|
| Total Votes : 7 |
|
| Author |
Message |
MVPeters

Joined: 28 Aug 2008
Posts: 822
Location: Northern MA, USA
|
 Posted: Wed Nov 25, 2020 6:59 am Post subject: Posted: Wed Nov 25, 2020 6:59 am Post subject: |
 |
|
I wonder if it would be viable to find an older, not 'collectible' car with shiny leather seats? Then modify just the covers & install them on the MG seat frames. My '97 Lincoln Town Car, of no value at 350,000 miles, had several acres of such. Would something like a Rover 75 have anything suitable?
_________________
Mike - MVPeters at comcast.net
2002 MINI Cooper 'S' |
|
| Back to top |
|
 |
Keith D
Joined: 16 Oct 2008
Posts: 1128
Location: Upper Swan, Western Australia
|
| Posted: Wed Nov 25, 2020 9:12 am Post subject: |
|
|
Ray and Peter,
I have never really been conscious of matte or shiny leather. Leather was always just leather to me.
I've just been out to check on what is inside my cars. They are not shiny like patent leather shoes, but they are definitely not matte. The sun reflects across them. Every few weeks I treat the leather with either shoe polish, dubbin or leather nourisher, depending on how I feel on the day. The cars all live in a dark shed and only endure the Aussie sun when out on runs. The leather has become nice and soft and a pleasure to sit on. It is even exhibiting the small surface cracks that make leather so interesting. With all the treatment my leather gets, I would assume it to be almost waterproof.
Perhaps the shiny finish on pre-war cars is mainly due to the many miles of trousers and dresses that have polished them?
Keith
_________________
1926 Chrysler 60 tourer
1932 Austin Seven RN long wheelbase box sedan
1950 Austin A40 tourer
1999 BMW Z3
Its weird being the same age as old people.
You are either part of the problem or part of the solution |
|
| Back to top |
|
|
Ray White

Joined: 02 Dec 2014
Posts: 6302
Location: Derby
|
| Posted: Wed Nov 25, 2020 11:53 am Post subject: |
|
|
Wow! What an interesting range of responses!
Thank you all.
Lowdrag. You say you used Rexine because it was correct. I know my car is not strictly correct but I do try and keep to the rules if I can and only deviate where I feel it needs it. I think I have explained that I prefer leather so thanks but I won't be using anything else.
Mike, that would be a good idea if I wasn't so attentive to the detail. I not only want to get the correct number of flutes on the seats but also have the door cards done correctly. This is so often done poorly. There is also a fair bit of leatherwork behind the seats covering the wheel arches and the side screens box. I may also do the dashboard in the same leather if I have sufficient quantity.
For what I want to do I shall be starting from scratch with new hides. I just need to get the right ones!
Keith. Like you, I had not even considered how much shine there was on the leather until Peter posted those photos. I am sure Peter will confirm that the effect is created by the treatment process rather than heavy use - although I think constant rubbing can bring about a shine and I imagine that is something I could do with a matte leather - but it would make more sense to buy a semi matte leather in the first place; if only to ensure consistency across the piece.
I think it is the lack of grain in the 'Napa' sample that UK leather sent me that bothers me most so I will be getting a sample of their "classic " range but beige is the nearest to what I have been looking for and I am not entirely sure it suits..
Keith, I imagine your leather is totally water proof by now and must be just how we like it. !
I spent many hours restoring the hard, dried out leather in my Swallow and managed to bring it "back from the dead" so to speak. It took a fair amount of Neat's foot oil and saddle soap but it was worth it.
More suggestions re the grain / no grain choices would be appreciated. |
|
| Back to top |
|
|
peter scott

Joined: 18 Dec 2007
Posts: 7117
Location: Edinburgh
|
| Posted: Wed Nov 25, 2020 11:54 am Post subject: |
|
|
| Keith D wrote: |
Perhaps the shiny finish on pre-war cars is mainly due to the many miles of trousers and dresses that have polished them?
Keith |
I don't think so. Anyway, who wants to wait 70 years for their restored car to look old?
Here's a period photo of a car that hasn't had 70 years of bums. How often did the rear seats of two door cars get bums on them anyway?
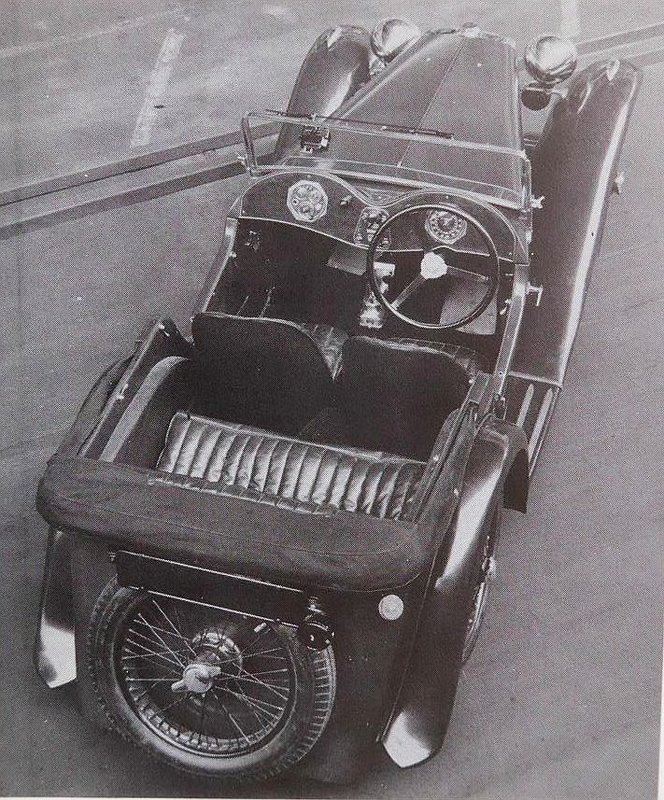
Peter
_________________
http://www.nostalgiatech.co.uk
1939 SS Jaguar 2 1/2 litre saloon |
|
| Back to top |
|
|
badhuis

Joined: 20 Aug 2008
Posts: 1390
Location: Netherlands
|
| Posted: Wed Nov 25, 2020 2:09 pm Post subject: |
|
|
| Ray White wrote: | | More suggestions re the grain / no grain choices would be appreciated. |
Not leather but pvc (I think?). Wrong grain - that kept me from fitting new underdash handles for my TR4. At one side, there is a big split. It looks not very tidy but...
I purchased a new handle but when comparing this to the original I decided not to fit it. The grain/texture is not coarse but fine and it has a matt finish whereas the original is more shiny. I rather live with the old, taped up original then to have to look at a too-modernish finish of a replacement part.
I could replace all the dash circumferences (top & bottoms) so all would be equal but then it all would look too new. Sigh.
Hope to find a better original someday. Thank god I am not a perfectionist 

_________________
a car stops being fun when it becomes an investment |
|
| Back to top |
|
|
peter scott
Joined: 18 Dec 2007
Posts: 7117
Location: Edinburgh
|
|
| Back to top |
|
|
alastairq
Joined: 14 Oct 2016
Posts: 1950
Location: East Yorkshire
|
| Posted: Wed Nov 25, 2020 3:11 pm Post subject: |
|
|
That's excellent....we all show gaps and tears as we get older.
I decided a couple of months ago to buy a new arm rest for the Mustang's driver's door. The original one ha a split in the vinyl, showing the orange foam underneath.
The new one [a pattern part, but from a reputable Mustang spares specialist looked similar, had moulded stitching, etc.. But was definitely a matt very dark grey...purchased as 'black'...
The original, in plastic/vinyl, was quite shiny....and the foam was a lot more rigid.
I was not impressed with the new item's appearance....very 'flimsy' by comparison.
The plastic/vinyl covering of the original, though split, may be recoverable with the right sort of solvent glues....the material has gone very hard with age....but I'd prefer the damaged, but repaired, appearance of the original to that new thing that helps me shut the door!
Perhaps there is a thread on repairing 60's vinyl coverings? Not sure how to soften it, for starters...
_________________
Dellow Mk2, 1951 built, reg 1952.
Fiat 126 BIS
Cannon special [1996 registered. Built in 1950's]
----------------------------------------------
Ford Pop chassis, Ashley 1172 bodyshell, in pieces. |
|
| Back to top |
|
|
Ray White
Joined: 02 Dec 2014
Posts: 6302
Location: Derby
|
| Posted: Wed Nov 25, 2020 4:56 pm Post subject: |
|
|
I am sure vinyl has it's place; in fact the TC would originally have been a mixture of leather and Rexine - with leather on the seat facings and Rexine on the dash. Earlier model years had polished veneers but was later changed to Rexine; presumably as a cost cutting measure - but also to give the car a more modern appearance.
Personally, I am not a fan of the modern equivalent vinyl and have decided that as I am starting from scratch with a new dashboard it will either be wood or leather. Presently leather is looking most likely - although I still hanker after the look of book matched burr Walnut. Maybe it is because there are no door cappings to match that I am a bit more swayed towards leather.
As is often the case my wife has pointed out the error of my ways. She has said (if it were her) she would try and match the leather to the new hood and side screens material. The hood and side screens have been professionally made from "Stayfast" which is an expensive type of canvas material and looks much more like beige. .
When I receive the leather samples I shall have a guide to which colour will best suit the car.
Funny how I seem to be going round in circles! |
|
| Back to top |
|
|
Keith D
Joined: 16 Oct 2008
Posts: 1128
Location: Upper Swan, Western Australia
|
| Posted: Thu Nov 26, 2020 6:32 am Post subject: |
|
|
Ray,
I think your intention of covering the dashboard in leather is certainly the right way to go.
Highly polished walnut looks fantastic, but in an open car it must contend with not only rain, but the sun. It also has to be perfect. I have seen many polished wooden dashboards that have been 'repaired' and most spoil the whole car. And remember that you spend all your driving time facing that dashboard. If you are not 100% happy with what you've done, then it will ruin your enjoyment of the finished vehicle. The greater cost of your leather only has to be paid for once. Your enjoyment will last long after the extra cost is forgotten.
Keith
_________________
1926 Chrysler 60 tourer
1932 Austin Seven RN long wheelbase box sedan
1950 Austin A40 tourer
1999 BMW Z3
Its weird being the same age as old people.
You are either part of the problem or part of the solution |
|
| Back to top |
|
|
Ray White
Joined: 02 Dec 2014
Posts: 6302
Location: Derby
|
| Posted: Fri Nov 27, 2020 2:07 am Post subject: |
|
|
| Keith D wrote: | Ray,
I think your intention of covering the dashboard in leather is certainly the right way to go.
Highly polished walnut looks fantastic, but in an open car it must contend with not only rain, but the sun. It also has to be perfect. I have seen many polished wooden dashboards that have been 'repaired' and most spoil the whole car. And remember that you spend all your driving time facing that dashboard. If you are not 100% happy with what you've done, then it will ruin your enjoyment of the finished vehicle. The greater cost of your leather only has to be paid for once. Your enjoyment will last long after the extra cost is forgotten.
Keith |
Keith. I can't tell you how many times I have changed my mind about what to do with the dashboard. Originally it would have been Rexine but that is only because they changed it from Walnut veneer mid production. I thought matching leather would be a reasonable compromise but I am still drawn to wood.
Anyhow..... as I said, I seem to have come full circle. When I started planning the interior the idea was to try and match the colour of the door cards which came with the car. These look to be part of a Moss kit and while they are admittedly vinyl, they have been well made and are quite attractive. I had originally planned on trimming the seats and the rest of the interior in a matching leather but then came the dreaded "mission creep" and I changed my mind in favour of total leather.
The door cards - which are quite involved - would need to be redone to match the seats etc.
The difficulty I now have is that none of the leather swatches I liked blend well with the new hood and side screens material; (Until the new body tub arrives I can't fit the hood etc.) but the hood colour is a kind of beige and the door cards are biscuit - so not too far apart.
I have, however, found a "biscuit" colour leather which could well be a reasonable match for the door cards - but here is the rub....
I have been avoiding cheap, corrected embossed leather in favour of high quality top grain or semi aniline hides but the "biscuit" colour hide is a cheapo leather. That said, the company selling it say it is their best selling auto leather and to be fair it is soft, supple and slightly reflective and has a nice quality feel. It is apparently also hard wearing.
However, there is always a reason why something is cheap. The problem with 'corrected' leather is that it is so intensively processed and re constituted that it's grain has to be embossed. It also doesn't breathe like a good quality hide. You pays your money etc....
So now I am at a cross roads and don't quite know which way to go. |
|
| Back to top |
|
|
Ray White
Joined: 02 Dec 2014
Posts: 6302
Location: Derby
|
| Posted: Tue Dec 01, 2020 10:52 pm Post subject: |
|
|
I am still trying to find a way of trimming my TC. The good news is that my body tub should be done soon.
In my car the seats had been trimmed in a horrid red vinyl. The door cards were a nice biscuit colour vinyl and well made - although all the other areas of trim had been home made from matching vinyl sheet but were not that well executed.
I later learned that the seats, although TC, were from a much earlier car. Put simply, they have a base which butts up to a squab with full length flutes... whereas later (correct) seats have a longer base that fits underneath the bottom of the squab (back) with flutes that finish 3" from the floor.
Surprisingly, I can still get a leather covering kit for the earlier seats which is much cheaper than buying a complete new set of "correct" seats; although they are available if money is no object. If I could find some of the later type seats, then kits are available to trim them.
Today I spoke to a TC enthusiast who is offering a pair of seats that would be correct for my year of car. They would need recovering and unfortunately they are incomplete (having no squab spring case) and although it might be possible to modify mine, if all I am able to use is the longer seat bases, it becomes a questionable exercise even if the price (£350) is negotiable.

One good thing that came out of the conversation is a recommended MG trimmer (PJM Motors)...which brings me back to the dilemma of what to do about the interior. Perhaps I could take my seats and door cards to them for trimming in leather. Apparently they don't mess about with vinyl because of problems with matching.
I have previously mentioned that I would like ALL leather but the kits being supplied are a mixture of leather and vinyl ... although, to be fair, Newton Commercial did agree to supply enough matching hide for me to do the dashboard. If they can supply seat coverings that match my door cards then I suppose it might be a cheaper option.
Being able to trim my seats and door cards in a leather of my choice is my preferred option not least because the DIY kits that are available don't fit properly. Pickerings of Bradford would need the car there to provide a "made to measure" service because - as they say - every car is different. |
|
| Back to top |
|
|
Ray White
Joined: 02 Dec 2014
Posts: 6302
Location: Derby
|
| Posted: Mon Dec 07, 2020 7:07 pm Post subject: |
|
|
I have had a small firm recommended to me by a fellow TC restorer so I have requested samples of 'full leather' seats and trim kits from classic car trimmers PJM Motors. Unlike the more well known suppliers who seem to lack flexibility, PJM are happy to supply me with enough leather to cover my dashboard.
-----------------------------------------------------------------------------------------------------------------------------------------------------------------------
On a different matter, I have made some progress with the heater. I previously posted photos of it located in the tool box. The bottom had rusted to holes so opening it up was easily achieved with my Dremel with the right angle attachment fitted.
I have extended the copper feed and return pipes through the box where they are joined to rubber heater hoses. Grommets are fitted to the holes. By chance I found an existing hole could be conveniently used for a pipe clip!


When I came to fit the new water take off plate to the rear of the cylinder head, I had to remove one of the exhaust manifold clamping brackets that utilises two of the bolts. The two distance pieces needed to be reduced on the lathe and two longer bolts sourced. I coated the gasket with 'Wellseal' and attached the plate to the head. The manifold clamping bolt was then tightened.

Some 15mm copper tubing with elbows was soft soldered and fitted through a grommeted hole in the toe board and attached to the rubber hose as can be seen in the photo.

I am using the hole normally reserved for the speedo cable but as I am swapping over the speedo with where the tacho would normally be positioned, I was spared the need for a new hole. (The speedo cable will go elsewhere.) I then cut a small section of hose and attached it between the pipe and the barbed outlet.

When it came to running the heater hose down the edge of the scuttle I was annoyed to find that my 'P' clips would not quite meet up with the holes in the bulkhead. I needed just 1/8" (or, less than half a hole!). Unfortunately it would seem that the clips I needed are not readily obtainable so I made three of my own from some scrap stainless steel sheet. They have 5/16" holes and will be bolted between the bulkhead flange and the front edge of the body tub. The photo shows the hose temporarily clipped to the bulkhead with my clips.
The return hose should fit snugly out of sight behind the vertical body timber.
My next job will be to make up the wiring and establish where it needs to go. |
|
| Back to top |
|
|
Ray White
Joined: 02 Dec 2014
Posts: 6302
Location: Derby
|
| Posted: Tue Dec 22, 2020 11:00 pm Post subject: |
|
|
Following on from my last post I have added some isolator valves to the heater pipework.
First I fitted a valve to the outlet pipe from the rear of the cylinder head. This was not as straightforward as I had hoped because space limitations prevented me from fitting a short length of 15mm pipe that I needed for the compression fitting.
I decided to modify the brass 'barbed' pipe but that meant removing it from the plate... and to do this the bolts holding the plate itself needed to be removed... which involved removing the exhaust manifold end support.!
With the bolts removed and the brass pipe separated from the plate, I could turn down the barbs to create a smooth surface on which to solder an equal length of 15mm copper pipe. I quickly realised however that the fitting could not be held in my 3 jaw chuck and so I changed it over to the independent 4 jaw. As anyone who has used one will know, setting up an odd shaped part in the 4 jaw chuck is a time consuming affair. You have to adjust all 4 jaws until there is no "wobble"
Eventually I had the pipe running straight and true and carefully reduced it to a point where a length of 15 mm copper pipe could be pressed on. I added solder to ensure a water tight fit.
The pipe could then be re fitted to the plate but to get it in the right place a certain amount of trial and error with various felt washers was required. Eventually the pipe was facing at the correct angle when tightened and the isolator valve (compression fitting) could be fitted.
The fitting was troublesome as the pipework was just a smidgen too long so had to be removed and shortened.
Eventually the installation was completed to my satisfaction.

The next isolator valve was much easier. I felt that although the valve on the engine would be easily accessible from outside; it would be convenient to have one that could be controlled from the driver's seat. I therefore have a second inlet control with a lever. (WRAS approved)

Just for good measure I have fitted an isolator valve to the return pipe where it joins the bottom hose. Here I met a problem with the water pump outlet being longer than standard which led me to remove 1/8" with my trusty Dremel. Another 1/8" was removed from the end of the (silver) pipe. A little trimming was also required at the other end of tis odd shaped pipe but it all went together nicely in the end.
 |
|
| Back to top |
|
|
Bitumen Boy
Joined: 26 Jan 2012
Posts: 1735
Location: Above the snow line in old Monmouthshire
|
| Posted: Wed Dec 23, 2020 3:34 am Post subject: |
|
|
| Are those the full bore isolating valves, Ray? From the pictures it looks like they are, but if anyone's thinking of doing likewise it's worth mentioning that these valves come in two flavours, full bore and a cheaper version that's nothing like full bore, which I doubt would be suitable for use on a car. |
|
| Back to top |
|
|
Ray White
Joined: 02 Dec 2014
Posts: 6302
Location: Derby
|
| Posted: Wed Dec 23, 2020 11:06 am Post subject: |
|
|
| Bitumen Boy wrote: | | Are those the full bore isolating valves, Ray? From the pictures it looks like they are, but if anyone's thinking of doing likewise it's worth mentioning that these valves come in two flavours, full bore and a cheaper version that's nothing like full bore, which I doubt would be suitable for use on a car. |
Good point BB. Yes, they are full bore. I made sure of it. |
|
| Back to top |
|
|
|
|
You cannot post new topics in this forum
You cannot reply to topics in this forum
You cannot edit your posts in this forum
You cannot delete your posts in this forum
You cannot vote in polls in this forum
|
php BB powered © php BB Grp.
|


