
Classic cars forum & vehicle restoration.
|
|
| Author |
Message |
Rootes75
Joined: 30 Apr 2013
Posts: 3814
Location: The Somerset Levels
|
 Posted: Mon Oct 11, 2021 7:06 am Post subject: Posted: Mon Oct 11, 2021 7:06 am Post subject: |
 |
|
Lovely bit if sunshine so we were able to crack on applying the filler layers to the front wings of the lorry, not much, just here and there where we need to achieve the contours after welding.
_________________
Various Rootes Vehicles. |
|
| Back to top |
|
 |
MikeEdwards
Joined: 25 May 2011
Posts: 2470
Location: South Cheshire
|
| Posted: Mon Oct 11, 2021 9:07 am Post subject: |
|
|
Now I've almost finished making the repair for the bottom of the nearside door pillar, I decided to make the sill so I can fit them both at the same time. That went reasonable well, it's a struggle to bend some of the smaller profiles on it but I think it will be OK.
_________________
1976 Vauxhall HP Firenza, 1976 Vauxhall Sportshatch (x2), 1986 Audi coupe quattro, 2000 Audi TT |
|
| Back to top |
|
|
Rootes75
Joined: 30 Apr 2013
Posts: 3814
Location: The Somerset Levels
|
| Posted: Sun Oct 17, 2021 1:50 pm Post subject: |
|
|
New welder arrived so have had a few hours using that, I welded in some patches to the passenger door skin. The weld quality is really good for a gasless Mig, on the lowest setting of 35amps. Very minimal blow through and after a bit of fettling and time to cool down we applied an initial layer of filler.
_________________
Various Rootes Vehicles. |
|
| Back to top |
|
|
badhuis

Joined: 20 Aug 2008
Posts: 1390
Location: Netherlands
|
| Posted: Sun Oct 17, 2021 6:41 pm Post subject: |
|
|
Replaced a damaged side marker light on the Lotus. Another side marker did not work. Dismantling and cleaning did the trick. Number plate lamps (mounted in the bumper) did not work, not so strange seeing that the wires were not connected. But I have a problem here, both lamps (Lucas L860) are broken. Basically it is a plastic lens which on the other side keeps a lamp. Of course, it being made from plastic, on both lenses the lamp-holders are broken. But the positive side is that they still are available new and cheap.
The front indicators and side lights did not work, also because the wires were not connected. The previous USA owner had second hand European bumpers shipped over from the UK. I think he got a bad deal because the front has a some damage to the fibre glass, and all metal fixings are very corroded. The combined indicator / side lamps are mounted in the bumper and are also corroded. But I managed to dismantle them and get them working again, using new earth wires to the base plates. Now that the front bumper is off the car I think I will try to repair the damage. The bumper also needs lower mounting brackets fabricated, fairly easy to do I think.
_________________
a car stops being fun when it becomes an investment |
|
| Back to top |
|
|
lowdrag
Joined: 10 Apr 2009
Posts: 1585
Location: Le Mans
|
| Posted: Mon Oct 18, 2021 6:34 am Post subject: |
|
|
A 600 mile weekend to celebrate the 60th anniversary of the E-type, all run by the Jaguar club and the local dealership, who put a lot of time effort and a lot of money into this affair. A beautiful weekend's weather which started cold with thick fog, which made driving interesting:-
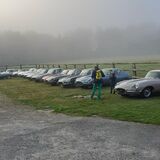
Followed by a jaunt to a golf club for lunch and on for the arranged grouping of the cars:-
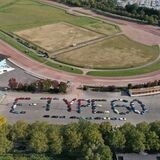
Then on to the dealership who had laid on a most fabulous champagne buffet for us all. |
|
| Back to top |
|
|
Bitumen Boy
Joined: 26 Jan 2012
Posts: 1735
Location: Above the snow line in old Monmouthshire
|
| Posted: Thu Oct 21, 2021 8:28 pm Post subject: |
|
|
Had a busy day today, started up the Herald for the first time since May 2020, pumped up the tyres, got it down off the blocks and moved it across the way to another garage under its own power. No sign of the time to bring it home and get an MOT though  For now it's back up on blocks and I left it running with a brick on the throttle until the little bit of petrol I put in for the move had run out, next thing is I'll have to go up in the next few days and put a drop of oil down the bores - like a wally I forgot to take an oil can with me... For now it's back up on blocks and I left it running with a brick on the throttle until the little bit of petrol I put in for the move had run out, next thing is I'll have to go up in the next few days and put a drop of oil down the bores - like a wally I forgot to take an oil can with me... 
Been planning the move for a while, the garage it was in needs a bit of work on the roof - not leaking, but very lightly built in the first place, and it really needs reinforcing from the underside so that a normal adult can actually get on top for maintenance purposes without going straight through. The other reason is that the garage it's in now is in the corner of the yard, with enough space to park a modern outside without blocking anyone else in, so come the end of the month I can SORN one of the moderns and save on rip off road tax  |
|
| Back to top |
|
|
MikeEdwards
Joined: 25 May 2011
Posts: 2470
Location: South Cheshire
|
| Posted: Fri Oct 22, 2021 9:05 am Post subject: |
|
|
Over the last couple of days I've fitted the door pillar bottom and tacked on the nearside sill. Next job is to remove the old rear wheelarch "repair" and sort out what's behind it.
_________________
1976 Vauxhall HP Firenza, 1976 Vauxhall Sportshatch (x2), 1986 Audi coupe quattro, 2000 Audi TT |
|
| Back to top |
|
|
Ray White

Joined: 02 Dec 2014
Posts: 6312
Location: Derby
|
| Posted: Sat Oct 23, 2021 1:15 pm Post subject: |
|
|
Somehow the last letter R went missing from the bonnet of my P38 Range Rover. Some people may think I am being pedantic but I simply HAD to replace it.!
I do have a spare "Range Rover" script but it is for a later model and is much bigger ... and looks too gaudy for my liking. It would also mean removing all the other letters which are well stuck on!
My solution was to make a template of the letter R and transfer the outline to some hardboard. I then cut out the letter and shaped it to match.

When satisfied I painted it silver. 
When dry I stuck it on the bonnet.

Last edited by Ray White on Mon Oct 25, 2021 10:25 am; edited 1 time in total |
|
| Back to top |
|
|
Bitumen Boy
Joined: 26 Jan 2012
Posts: 1735
Location: Above the snow line in old Monmouthshire
|
| Posted: Sat Oct 23, 2021 1:25 pm Post subject: |
|
|
| Ray White wrote: | Somehow the last letter R went missing from the bonnet of my P38 Range Rover. Some people may think I am being pedantic but I simply HAD to replace it.!
I do have a spare "Range Rover" script but it is for a later model and is much bigger ... and looks too gaudy for my liking. It would also mean removing all the other letters which are well stuck on!
My solution was the make a template of the letter R and transfer the outline to some hardboard. I then cut out the letter and shaped it to match.
When satisfied I painted it silver.
When dry I stuck it on the bonnet.
|
Interesting use of hardboard there, Ray! I wonder how well it will last? If the paint has soaked in to some extent it may surprise you but if it's just lying on the surface maybe not so long. If you end up making a replacement I would try some of this stuff on it before painting, hardboard should soak it up nicely especially if applied to the back first; https://www.screwfix.com/p/ronseal-wet-rot-wood-hardener-clear-500ml/63540?kpid=63540&ds_kid=39700060905598139&ds_rl=1243321&gclid=CjwKCAjw5c6LBhBdEiwAP9ejGyj1ToVXvTEB9UzTLeHLnhqJOVDZZ_VZKWoTgyIdnzgGG4mu60zUTBoCDIcQAvD_BwE&gclsrc=aw.ds |
|
| Back to top |
|
|
Ray White
Joined: 02 Dec 2014
Posts: 6312
Location: Derby
|
| Posted: Sat Oct 23, 2021 2:02 pm Post subject: |
|
|
Hi BB. As it happens, I used that wood hardener extensively when restoring the Austin Swallow. I could have replaced all the old timber but I wanted to keep it original. The wood hardener is fantastic stuff and I even used some on a partly rotten window sill on the previous house (Grade 2 listed building dated 1530) and it made a very good repair.
I am thinking of selling the P38; mainly because I seldom do more than 300 miles in a year and the insurance is getting expensive. I just want it to look reasonably well looked after.
Actually, I have the Scewfix 'no nonsense' wood treatment "clear" advertised on that same page. I think the hardboard will last quite well as the paint has soaked in and needed two coats.
The biggest problem for me is that the P38 headlining has started to sag and It costs hundreds ££ to have it fixed. With my dodgy knee and painful thumbs I am reluctant to try doing it myself.! |
|
| Back to top |
|
|
Rootes75
Joined: 30 Apr 2013
Posts: 3814
Location: The Somerset Levels
|
| Posted: Sat Oct 23, 2021 9:40 pm Post subject: |
|
|
More welding done this morning.
Got all my roof sections fabricated to go over the lorry, I have made the frame for it to go on. Its like a big mechano kit. I just have to transport it all from my daily work down to the yard and then start bolting it all together!
_________________
Various Rootes Vehicles. |
|
| Back to top |
|
|
Crashbox
Joined: 30 Apr 2021
Posts: 139
|
| Posted: Sun Oct 24, 2021 10:11 am Post subject: |
|
|
I'll be heading out to The Old Bull at Inkberrow shortly. It's the Vintage (Morris) Minor Register (VMR) Autumn pub meeting. The landlord of the pub is a member and owns a 1932 Minor four-seater Tourer. Keeping my fingers crossed for dry weather.
_________________
1989 2CV
1932 Morris Minor S.V. Two-Seater |
|
| Back to top |
|
|
Rootes75
Joined: 30 Apr 2013
Posts: 3814
Location: The Somerset Levels
|
| Posted: Sun Oct 24, 2021 2:35 pm Post subject: |
|
|
Lots more welding done this morning, the rear lower cab section had to be fabricated first though. It it shaped and the lower edge has a 5mm lip facing inwards.
I started by sketching out a template of the rear passenger lower edge and then using that as a mirror image for the drivers side. I then found a good hardwood offcut and planed it down so that it replicated the shape. A good clean piece of mild steel was then sourced and I clamped it to the wood template. The shaped edge was fettled back leaving just over a 5mm lip and then with the use of my panel beating hammers I tapped over the 5mm overhang to form the inward facing lip. Lots of prep and fabrication but once tacked in place it looked really good so we went on and fully welded it in place, it took 3-4 hours just to do this but its another piece ticked off the list, next weekend it will be a case of fettling back the weld and giving it a quick skim of filler to level it out.
_________________
Various Rootes Vehicles. |
|
| Back to top |
|
|
Ray White
Joined: 02 Dec 2014
Posts: 6312
Location: Derby
|
| Posted: Sun Oct 24, 2021 4:30 pm Post subject: |
|
|
You are really getting somewhere with it now.
I never know whether to primer first then filler or filler first then primer?
If you go with primer first some of it gets rubbed off when you sand down the filler so has to be added later anyway. |
|
| Back to top |
|
|
Rootes75
Joined: 30 Apr 2013
Posts: 3814
Location: The Somerset Levels
|
| Posted: Sun Oct 24, 2021 5:11 pm Post subject: |
|
|
We apply the filler straight on the metal once fettled back. I always recal the use of any filler as being frowned upon by our classic car enthusiasts round here, but even the best restorers use plenty of filler so these days I think its fine.
My plan is to get all the welding finished before the really cold weather hits us, then I can get the primers on and possibly some top coats before its too difficult to paint.
_________________
Various Rootes Vehicles. |
|
| Back to top |
|
|
|
|
You cannot post new topics in this forum
You cannot reply to topics in this forum
You cannot edit your posts in this forum
You cannot delete your posts in this forum
You cannot vote in polls in this forum
|
php BB powered © php BB Grp.
|


