|
|
| Author |
Message |
Aussie8/40
Joined: 14 Nov 2013
Posts: 12
Location: Atherton Tablelands, Farnorth Queensland, Australia.
|
 Posted: Fri Oct 09, 2015 7:05 am Post subject: 1938 Morris 8-40 Roadster (Aust) Ground-up Restoration Posted: Fri Oct 09, 2015 7:05 am Post subject: 1938 Morris 8-40 Roadster (Aust) Ground-up Restoration |
 |
|
Hi Everone,
So I have started my ground up resto, got it striped down and off to get chassis and panels blasted and primed. Now while I am waiting for these to return I am getting a start on the heart off this old gem.
Wondering if anyone can give info on taking out the Distributer, I have been told while on firing stroke on number 1 cylinder it should twist out .?? Done this and no movement ? May be seized in, any Feedback please.
[img]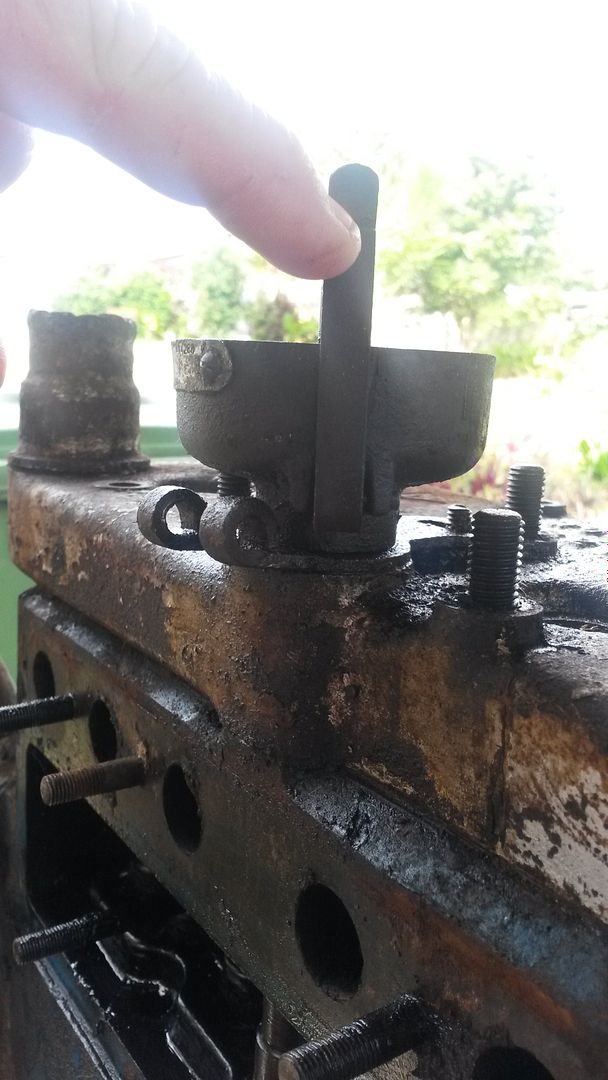
[img]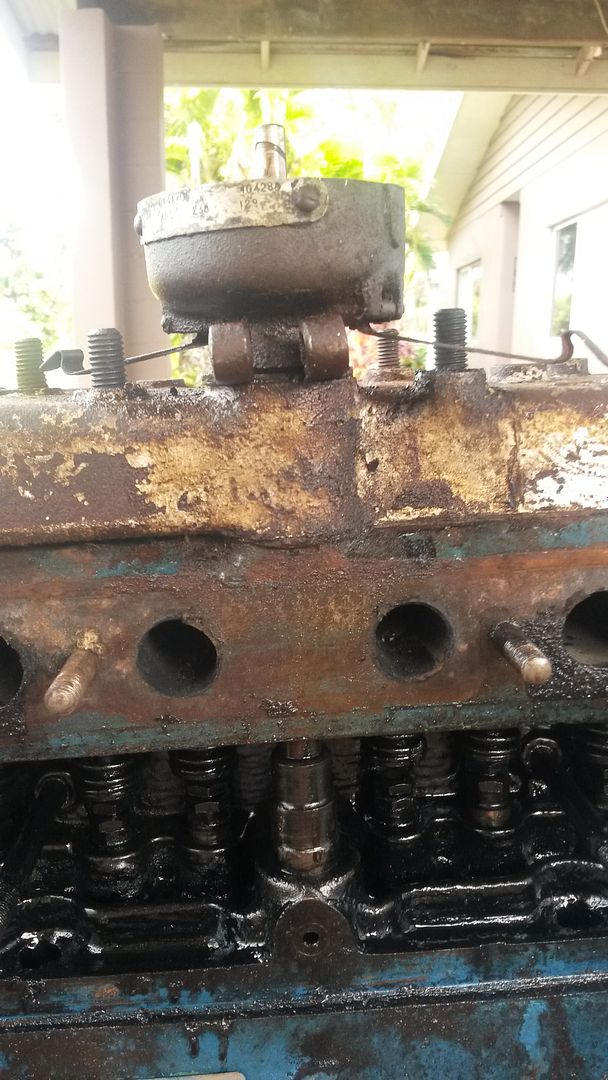
(pics fixed for horizontal scrolling, RJ) |
|
| Back to top |
|
 |
Penguin45

Joined: 28 Jul 2014
Posts: 381
Location: Padiham
|
| Posted: Fri Oct 09, 2015 4:15 pm Post subject: |
|
|
Should be a Lucas DK4 type, which is just a push fit into the block. Almost certainly held in place by corrosion. Start soaking with Plus Gas (or an upside down equivalent) at the earliest opportunity.
P45.
_________________
'67 Wolseley MkI 18/85, '70 Austin MkII 1800 The Landcrab Forum. |
|
| Back to top |
|
|
goneps
Joined: 18 Jun 2013
Posts: 601
Location: Auckland, New Zealand
|
| Posted: Fri Oct 09, 2015 9:36 pm Post subject: |
|
|
Distributor seized in head is a not uncommon problem, thought I've never experienced it myself. Take great care because it's all too easy to wreck
the distributor body. Removing the head with distributor in situ will at least give access to the shaft for gently driving it out rather than trying to pull
or lever the body from above.
The position of the crankshaft has no bearing whatsoever on removal. When refitting, the flat side of the distributor should face towards the left side of the car.
The clamp under the base of the distributor has been fitted upside down, and it appears that there is a stud trough the clamp in the centre of the head instead
of a set screw (M6 thread). With the clamp the right way up it has a vernier scale adjacent to the set screw, referenced to an arrow punch-mark on the head,
for making fine adjustments. Each increment is 5°.
Richard
Last edited by goneps on Sat Oct 10, 2015 4:23 am; edited 3 times in total |
|
| Back to top |
|
|
bjacko
Joined: 28 Oct 2013
Posts: 359
Location: Melbourne Australia
|
| Posted: Sat Oct 10, 2015 4:12 am Post subject: Morris 8 Distributor |
|
|
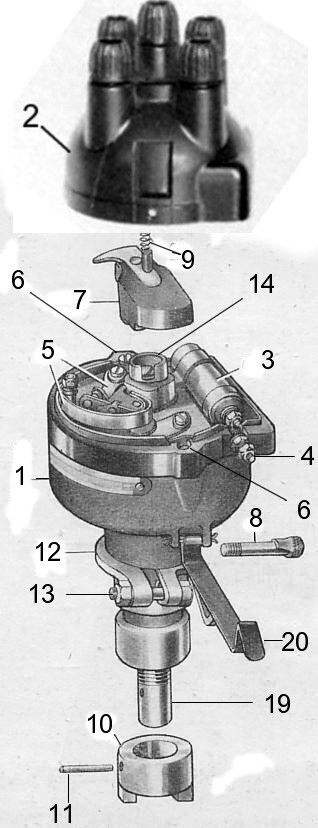
| The distributor is a DK4A P/N 404288 or 404288/S or Morris Motors ref number 38229. The clamp appears to be the correct way up. i.e. the clamp bolt is to the lower side of the clamp. |
|
| Back to top |
|
|
bjacko
Joined: 28 Oct 2013
Posts: 359
Location: Melbourne Australia
|
| Posted: Sat Oct 10, 2015 4:14 am Post subject: Distributor |
|
|
| Looks like i had a seniors moment. the clamp is UPSIDE down the bolt should be to the lower side. |
|
| Back to top |
|
|
bjacko
Joined: 28 Oct 2013
Posts: 359
Location: Melbourne Australia
|
| Posted: Sat Oct 10, 2015 5:11 am Post subject: Morris 8 Distributor |
|
|
 |
|
| Back to top |
|
|
roverdriver

Joined: 18 Oct 2008
Posts: 1210
Location: 100 miles from Melbourne, Victoria, Australia
|
| Posted: Sat Oct 10, 2015 9:30 am Post subject: |
|
|
Remove head complete with distributor. Soak around both sides of distributor with a mix of 50/50 ATF and Acetone well shaken. Repeat daily for a week or two, Using a block of wood as a drift, gently tap distributor from the underside. Shape the block or use a soft metal pipe if preferred.
_________________
Dane- roverdriver but not a Viking. |
|
| Back to top |
|
|
bjacko
Joined: 28 Oct 2013
Posts: 359
Location: Melbourne Australia
|
| Posted: Sun Oct 11, 2015 4:22 am Post subject: Morris 8 resto |
|
|
Recommend that you fit Ser E conrods and crank with shell bearings in lieu of poured bearings. Also get hardened valve seats.
Not only are the shell bearings easier but the Ser e crank is balanced.
The distributor can be pulled out in any position as can be seen from the picture above. You may also want to install electronic ignition. Kits are readily available in UK. |
|
| Back to top |
|
|
bjacko
Joined: 28 Oct 2013
Posts: 359
Location: Melbourne Australia
|
| Posted: Sun Oct 11, 2015 4:24 am Post subject: Morris 8 Resto |
|
|
| Don't forget the threads on the engine and gearbox are metric with BSF/BSW spanner sizes. |
|
| Back to top |
|
|
goneps
Joined: 18 Jun 2013
Posts: 601
Location: Auckland, New Zealand
|
| Posted: Sun Oct 11, 2015 4:39 am Post subject: Re: Morris 8 Resto |
|
|
| bjacko wrote: | | Don't forget the threads on the engine and gearbox are metric with BSF/BSW spanner sizes. |
Not all of them. Carburettor and exhaust pipe/manifold studs and nuts/bolts, also the three dynamo bolts, are BSF.
Richard |
|
| Back to top |
|
|
Rosco663

Joined: 17 Dec 2012
Posts: 257
Location: South Australia
|
| Posted: Thu Oct 15, 2015 6:51 am Post subject: |
|
|
Gidday Tony,
When I dismantled my Series 1 engine, the distributer had also taken root in the cylinder head. Couldn't turn it no matter how much penetrant was applied. As I was doing a full engine strip down the head was coming off anyway. It was necessary to press the shaft out it didn't take too much force to get it moving but when it did it virtually fell out. I did try to hammer it out with suitable drifts but it was placing a lot of shock load on the rest of the distributer - so off to the Father In Laws I went (home made hydraulic press 
Cheers
_________________
Rosco |
|
| Back to top |
|
|
bjacko
Joined: 28 Oct 2013
Posts: 359
Location: Melbourne Australia
|
| Posted: Thu Oct 15, 2015 6:56 am Post subject: Morris 8 resto |
|
|
Sorry Goneps but the dynamo mounting bolts and nuts were originally metric ex factory as were the carby mounting studs and nuts according to Morris Motors Parts List.
The stop bolts for the brake and clutch pedals are also metric. |
|
| Back to top |
|
|
goneps
Joined: 18 Jun 2013
Posts: 601
Location: Auckland, New Zealand
|
| Posted: Thu Oct 15, 2015 8:14 am Post subject: |
|
|
Afraid I disagree, Brian. The dynamo bolt in the adjustment slot screws into a machined thread in the dynamo front plate, and is 5/16"BSF x 22tpi.,
as are the two pivot bolts. The carburettor studs are 1/4"BSF x 26tpi. Exhaust pipe flange bolts, stud, and nuts are 3/8"BSF x 20tpi.
As you're well aware, Morris employed Metric threads for the simple reason that they were using machine tools inherited when they took over
the Hotchkiss works in Coventry. Why would Lucas suddenly decide to use a metric thread on its dynamos? It would make no sense.
In fact there's an anomaly in the Series 1 Parts List. It shows the dynamo bolts as part nos. JA5052 (front swivel, 1 req’d.) and CA1258
(rear swivel, 1 req’d.), which are the same part nos. as those used for the Inlet Elbow and Bell Housing respectively and therefore M8 x 1.0mm.
In Plate A of the Parts List JA5052 is marked as item 64, as is the adjustment slot set screw. However, the thread of the front plate of the
Lucas dynamo is unarguably 5/16”BSF.
Morris literature cannot be relied upon as gospel. The classic and widely-known proof of that is in the UB engine exploded diagram,
which shows the connecting rods the wrong way around. I doubt you'd slavishly adhere to that unhelpful information and fit your con-rods
the wrong way around.
Richard |
|
| Back to top |
|
|
bjacko
Joined: 28 Oct 2013
Posts: 359
Location: Melbourne Australia
|
| Posted: Fri Oct 16, 2015 5:00 am Post subject: Morris Threads |
|
|
I would point out that the difference between 8mm 1mm pitch and 5/16" BSF 22 TPI is 2 1/2 thousands of an inch on the diameter and 6 thousands of an inch on the pitch and I have no doubt that they would be easily interchangeable. Many mechanics believe because Morris metric bolts are BSF spanner size that they are BSF threads.
Regards Lucas and it's metric threads it would not surprise me in the least if they used the odd metric thread like they did with unified threads. British manufacturers like Morris and Lucas always seem to have a multitude of different parts which are almost identical to do the same job. e.g. look at the number of different part numbers Morris has for a simple 1/4" plain washer throughout their publications. |
|
| Back to top |
|
|
goneps
Joined: 18 Jun 2013
Posts: 601
Location: Auckland, New Zealand
|
| Posted: Fri Oct 16, 2015 5:19 am Post subject: |
|
|
Six thou. may not seem like much on paper, but in practice the difference between 22tpi and 25.4tpi is significant, to say nothing of the differences in pitch angle and profile—certainly enough that all but the most determined ham-fisted bodger would not attempt.
Furthermore, having spent a good number of years in the business of engineering fasteners I trust I'm able (a) to identify threads correctly and (b) to recognise the difference between a sound, undamaged thread and one butchered by having an incompatible thread forced through it.
I'd be less inclined to argue your point about Lucas in respect of post-war equipment, when the trend towards Americanisation got under way, than for pre-war kit. |
|
| Back to top |
|
|
|


