
Classic cars forum & vehicle restoration.
|
|
| Author |
Message |
jp928
Joined: 07 Jun 2016
Posts: 249
Location: Australia
|
 Posted: Mon Jul 04, 2016 5:07 am Post subject: Posted: Mon Jul 04, 2016 5:07 am Post subject: |
 |
|
Bit of work on the horn, which arrived dismantled. Coil is Ok, but no oscillation. Bit of cleaning the contacts with wet&dry paper, screw the contact in a little, all good. Boy is it LOUD on 12v! Now to work out what thread the screws are, as they are not in good condition - 1/8 or 5/32 W I think- the one holding the rear cover on looks like 1/8 - I hope its not BA, as our local engineering bits shop closed down partly to trade only.
Update - screws are 32tpi, but dia is odd - closest would be M4.5 x 0.8, which doesnt exist. Went to a screw shop, who advised drill/tap to M5 - done that, now have a horn.
jp |
|
| Back to top |
|
 |
jp928
Joined: 07 Jun 2016
Posts: 249
Location: Australia
|
| Posted: Wed Jul 06, 2016 4:07 am Post subject: |
|
|
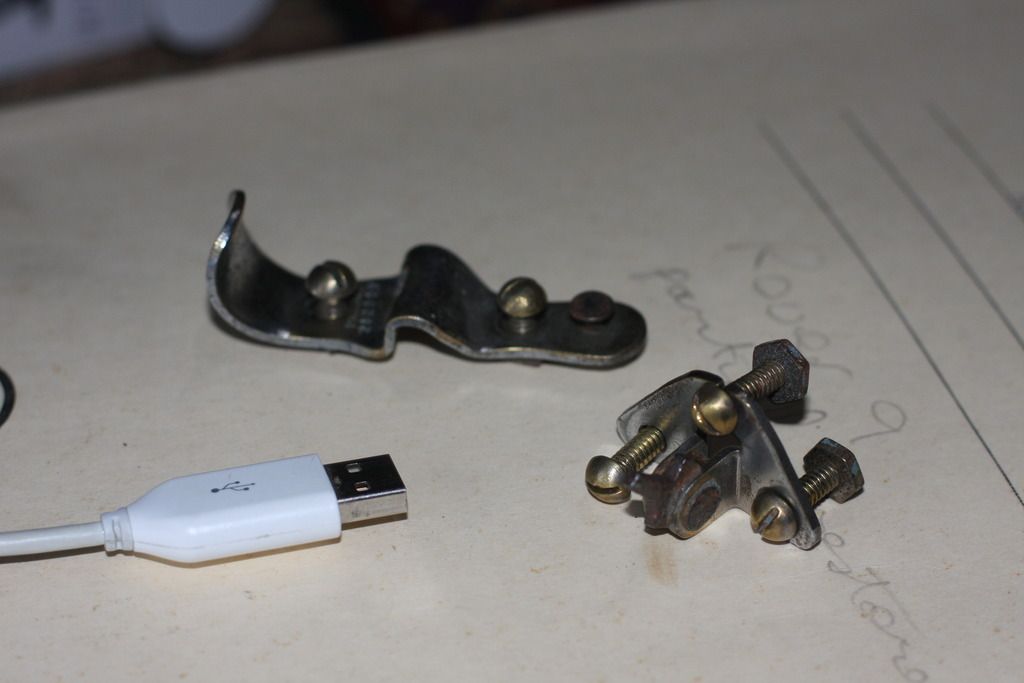
Some parts I cant identify below- have 4 of the bent flat things, 2 of the triangular fittings.
tks
jp
 |
|
| Back to top |
|
|
jp928
Joined: 07 Jun 2016
Posts: 249
Location: Australia
|
| Posted: Sun Jul 10, 2016 4:05 am Post subject: |
|
|
Next question - Magneto. Its listed on the engine rebuild as having been rebuilt, but pulling the plug lead cap off, it looks pretty second hand. Not having any idea whats acceptable, I could use some opinions from anybody who knows about such things. There is either a well defined scratch, or a partial crack on the outside, but it doesnt go through. The brass bits are thoroughly scratched by the carbon brush, and there is copious black on the red cap material.
Should I replace it? Will start searching now, but I dont know any more than the year and Lucas. Will the 'rotor button' readily come off the wheel with gear teeth around its edge?
Anyway, had to do some checking. With the cap off, and the rocker cover, I worked out which leads are which cylinders (I hope), and re assembled it all. Plugs out and connected to leads, I got nice fat sparks with fairly average hand cranking, so at least everything seems to work!
tks
jp |
|
| Back to top |
|
|
peter scott

Joined: 18 Dec 2007
Posts: 7118
Location: Edinburgh
|
| Posted: Sun Jul 10, 2016 8:44 am Post subject: |
|
|
Hi jp,
If you are getting a good spark then I wouldn't do anything with your distributor cap excepet just clean it.
Peter
_________________
http://www.nostalgiatech.co.uk
1939 SS Jaguar 2 1/2 litre saloon |
|
| Back to top |
|
|
jp928
Joined: 07 Jun 2016
Posts: 249
Location: Australia
|
| Posted: Sun Jul 10, 2016 11:41 am Post subject: |
|
|
Yes, I think I will leave well enough alone! Was very pleased, and a little surprised to see such healthy sparks on slow cranking.
tks
jp |
|
| Back to top |
|
|
jp928
Joined: 07 Jun 2016
Posts: 249
Location: Australia
|
| Posted: Mon Jul 11, 2016 6:16 am Post subject: |
|
|
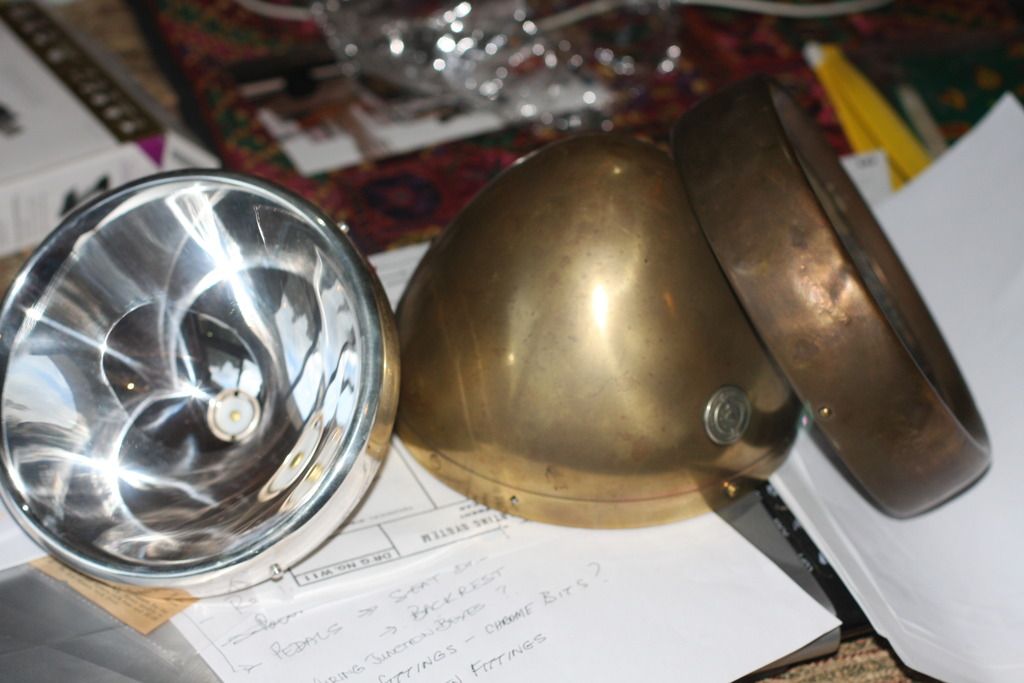
Bit of headlight work today. Got the correct spring loaded single contact leads, soldered a connector on the end, added an earth lead to the bulb holder, just waiting for correct bulbs now. Bit of polishing to do when its too cold to work in the garage. Body looks like brass, but the rim looks more like copper.
jp
Last edited by jp928 on Sat Aug 06, 2016 9:13 am; edited 1 time in total |
|
| Back to top |
|
|
jp928
Joined: 07 Jun 2016
Posts: 249
Location: Australia
|
| Posted: Thu Jul 14, 2016 8:43 am Post subject: |
|
|
More progress today!
After trying a Chinese '5/16 compression fitting' that was the wrong thread, finally got the correct nut through an acquaintance at a wholesaler, now have a usable outlet for the fuel tank. Doing an overnight leak test now.
The car had new front exhaust pipe, muffler and rear pipe, but storage near the sea had given the pipes an ugly coating of rust, so I pulled them all off, sanded the rust off, and gave them some treatment and a coat of high temp paint. The front exhaust hanger looks like an original part, but it seems not to line up well with the front pipe, so I will have do some spacing, and/or modify the front pipe to improve the alignment.
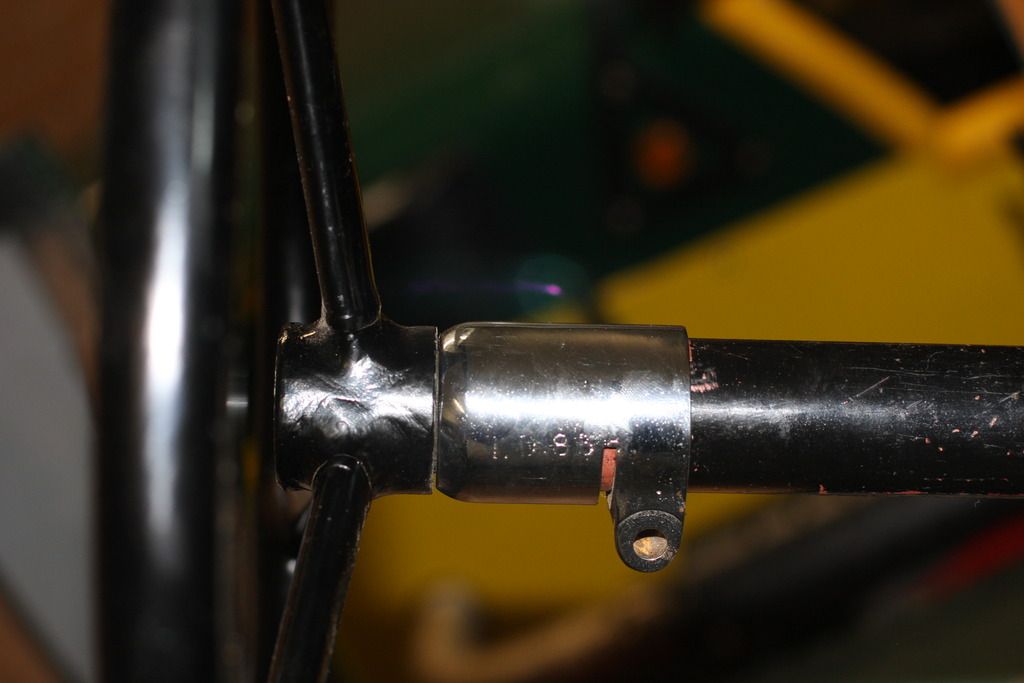
Early on when I tried fitting the chromed top steering column finisher (just under the wheel), it was obvious there wasnt enough shaft outside the column casing to properly engage the steering wheel. Couldnt work this out for a while, but when I looked at the parts book, it showed a slit and pinch bolt on the main box where the column outer tube went in. Undid the pinch bolt, measured the inner column sticking out of the outer tube - a few smacks with a big hammer, and it moved, so I was on the right track. A bit more persuasion produced the necessary clearance, and after cleaning up a bit of bruising from the persausion, the whole thing will now go together properly. Locked up the pinch bolt of course. All I need now is a short domed, chromed, 7/8-18tpi bolt!
Pics will follow...
jp
Last edited by jp928 on Mon Jul 18, 2016 3:58 am; edited 1 time in total |
|
| Back to top |
|
|
jp928
Joined: 07 Jun 2016
Posts: 249
Location: Australia
|
| Posted: Fri Jul 15, 2016 9:49 am Post subject: |
|
|
Last time underneath I noticed the primary brake rod (big one off the pedal) was slightly bent, as was the right rear rod. Got them off today, and after a bit back and forth, got them functionally straight enough to put back on. Balance lever is now pretty much centered and even. Not dead straight, but pretty close - its quite difficult to get them dead straight in all 3 planes.
jp |
|
| Back to top |
|
|
jp928
Joined: 07 Jun 2016
Posts: 249
Location: Australia
|
| Posted: Sat Jul 16, 2016 8:19 am Post subject: |
|
|
Maybe I am a bit denser than others, but I just plead ignorance here. With the central switch panel (Lucas C.S.6, pictured earlier) it seemed natural on seeing the rear cover held on by two knobs that one would access the terminals by removing the rear cover. When I looked at attaching wires to the terminals and tightening the grub screws, it was obvious this wouldnt work - you could not slide the back cover on with wires attached. Then I noticed that the only way to fit the switch unit to the dash was two screws through the back cover sides. The only way to get access to the grub screws was with the facia removed - remove two screws holding the two levers on their shafts, slide them off, and the facia comes off. Then you can fix the body to the dash, feed the wires up from underneath, tighten grub screws, refit facia, done.
I plan to fit a remote modern fuse block on the firewall so I rarely need to disturb anything on the dash, and run all main feeds off that. Will have a smaller block under the dash to feed dash light, horn, turn indicators and stop light, all separately fused.
While I was underneath playing with the exhaust I found the magneto kill lead was a crappy piece of single core copper wire loosely connected. I removed the points cover, and fitted a longer multi strand lead with a connector on the end for a bit of security.
Mate suggested a clever way to check if the dynamo cut out was working. Get everything connected, and check that no smoke escapes when battery connected first - cut out should stay open, zero drain. Then apply a charger to the Dynamo lead and ground, and the cut out should close based on the voltage . Or maybe the charger wont even see the battery ? I think the cutout light windings circuit is permanently connected, so if there are enough volts across it, it should work.
Sound right ?
jp |
|
| Back to top |
|
|
jp928
Joined: 07 Jun 2016
Posts: 249
Location: Australia
|
| Posted: Mon Jul 18, 2016 4:04 am Post subject: |
|
|
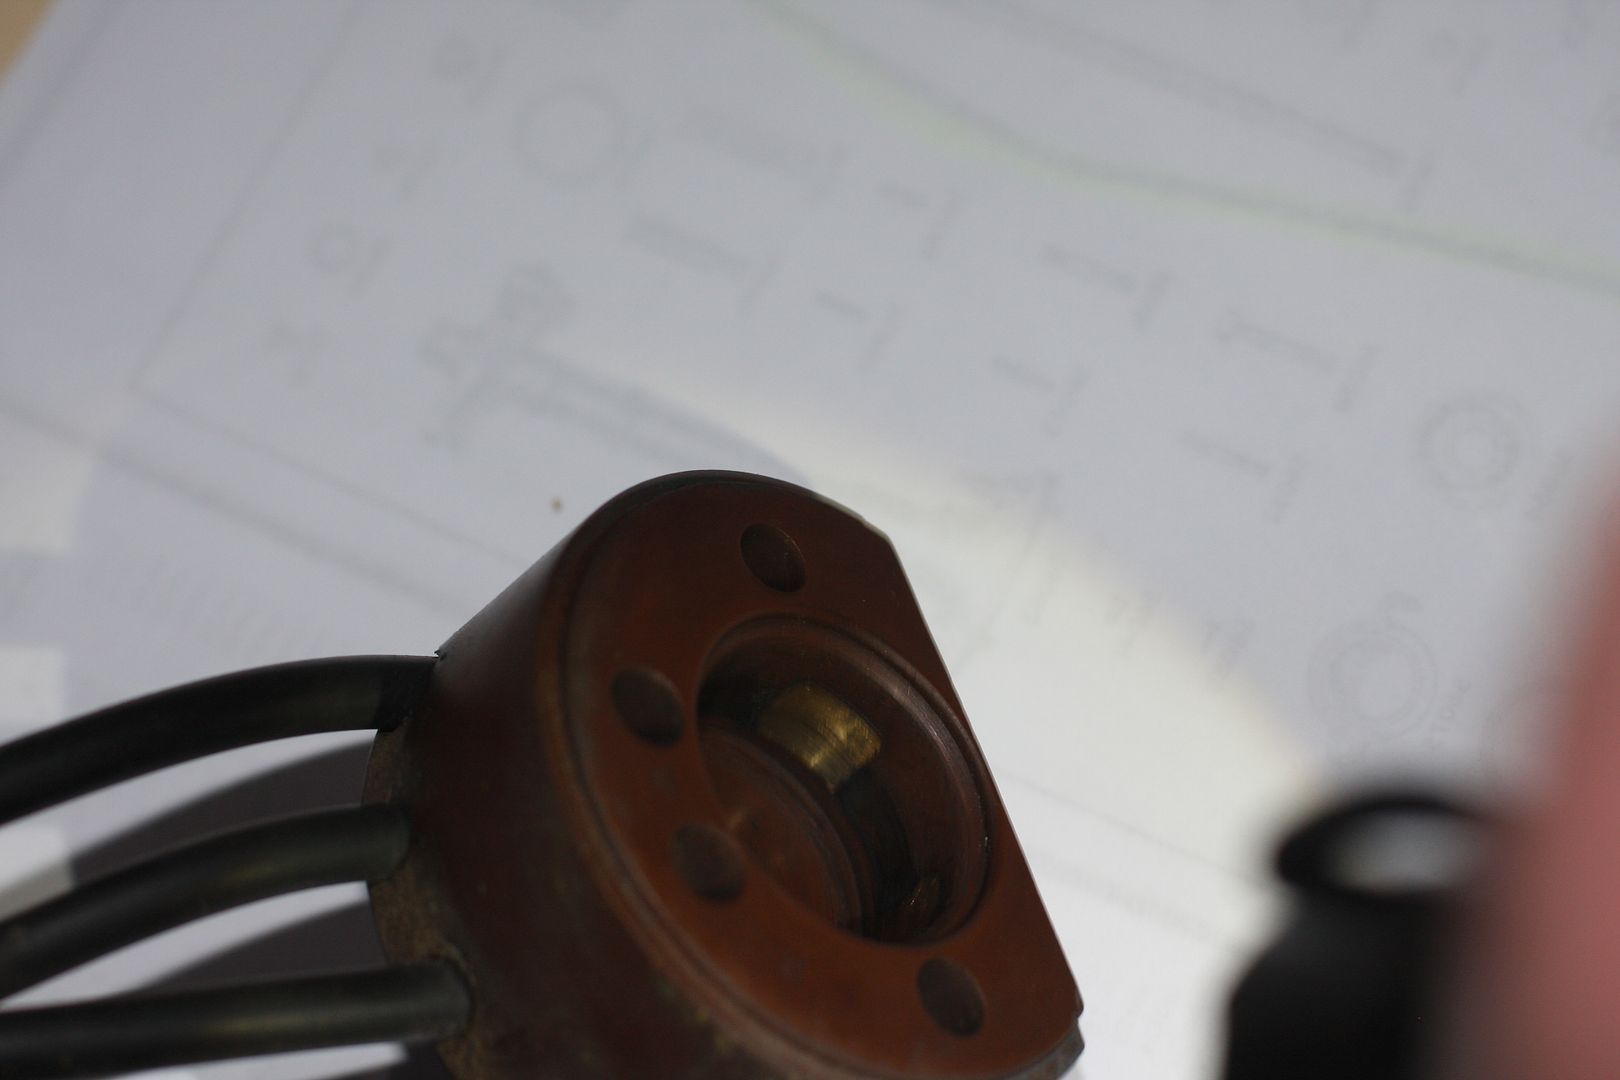
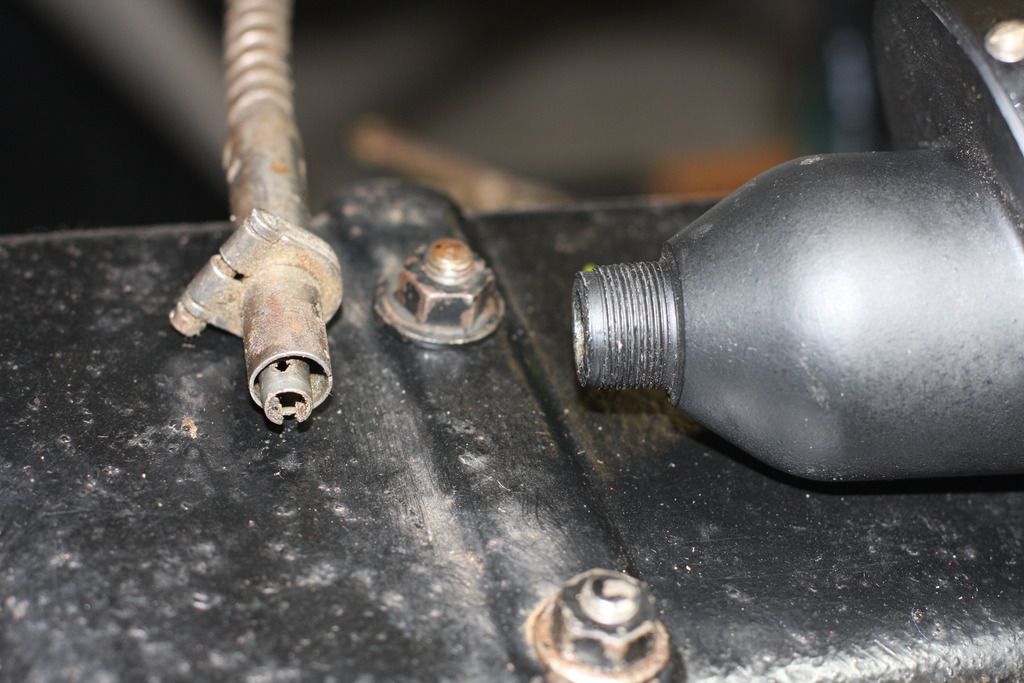
Tackling the speedo connection now. Cable looks ok, but when I try to couple them....something missing - see below. The outer tube around the cable end is too big to go into the recess in the speedo body, and there is nothing to screw onto the speedo to retain the cable.
Anybody know what I should see here please?
tks
jp
 |
|
| Back to top |
|
|
peter scott
Joined: 18 Dec 2007
Posts: 7118
Location: Edinburgh
|
| Posted: Mon Jul 18, 2016 9:15 am Post subject: |
|
|
Your cable looks like it might be the original so perhaps your speedo instrument is of the wrong type? The cable inner expects to be coupled to the instrument with a little screw that is threaded into/passes through (at right angle) the protruding shaft and the outer just clamps around a plain tube.
Peter
_________________
http://www.nostalgiatech.co.uk
1939 SS Jaguar 2 1/2 litre saloon |
|
| Back to top |
|
|
jp928
Joined: 07 Jun 2016
Posts: 249
Location: Australia
|
| Posted: Mon Jul 18, 2016 11:28 pm Post subject: |
|
|
Yes. Looks like I am now after either a cable to suit a governor type speedo, or a pin type chronometric speedo head!
Bugger.
jp |
|
| Back to top |
|
|
jp928
Joined: 07 Jun 2016
Posts: 249
Location: Australia
|
| Posted: Fri Jul 29, 2016 9:39 am Post subject: |
|
|
Found an instrument repairer who says he can make my speedo cable fit the speedo, and supply a gearbox if a correction is needed between the speedo drive and the speedo head . The speedo gearing is 2850 rev/mile, but the speedo cable drive is around 870....
Made up a remote fuse panel to go on the firewall, mirroring the Lucas switch panel leads. Once that works I wont have to play with the Lucas panel anymore.
Lagged the front exhaust pipe and muffler to reduce the heat radiated out to the wooden flooring. Fitted it all up, just need to find a hanger for the rear end now.
Got a nice big 6V battery and started making the heavy starter leads. The left side of the scuttle has holes (with nice chromed ferrules) for the battery leads, and I have been able to run them so they will get up to the starter switch and back to the starter hidden under the interior trim. Going to fit an isolation switch in the positive lead high on the toe board. Hope none of the smoke gets out when I connect it all up!
jp |
|
| Back to top |
|
|
jp928
Joined: 07 Jun 2016
Posts: 249
Location: Australia
|
| Posted: Tue Aug 09, 2016 5:38 am Post subject: |
|
|
Finally got all the wiring worked out and connected. As a last test before closing the isolator, I put a meter across the isolator pins. Full battery volts! That shouldnt be. disconnect +12 from starter, problem gone. check starter - body is earth because dynamo is earthed, but negative pole is also earth, which is wrong, as the starter is switched in the earth line. Starter motor up on the bench. Verify symptom. With the end cap off can see there is a fibre washer inside the body under the neg connector. Remove the nut securing the neg post to the body - steel washer, no fibre in sight, but the actual bolt comes through something insulating in the body. Happen to have a fibre washer handy, so all back together.
Still seeing a strange potential across the isolator, but nothing happens when I close it, no smoke, no smell, no drains evident up at the main switch board. Still a bit mystified, thinking on it some more. Have a handy tool for this area - digital ammeter that plugs into a fuse socket.
Update - bit the bullet, closed the isolator - no smoke escaped, so I hit the starter, and she spun over (no plugs) fine. Saw 25psi oil pressure, all looked and sounded fine.
Real progress!
Now to set up for a test with a tiny bit of fuel, fire extinguisher handy, and go one more step.
jp |
|
| Back to top |
|
|
roverdriver

Joined: 18 Oct 2008
Posts: 1210
Location: 100 miles from Melbourne, Victoria, Australia
|
| Posted: Tue Aug 09, 2016 10:44 am Post subject: |
|
|
You are doing well, especially as it is a case of feeling your way. Start up day should be quite exciting.
I am enjoying reading about your progress.
_________________
Dane- roverdriver but not a Viking. |
|
| Back to top |
|
|
|
  |
Classic cars forum & vehicle restoration. Forum Index
-> All our old cars, vans, lorries etc |
All times are GMT + 1 Hour
Goto page Previous 1, 2, 3, 4, 5, 6, 7, 8, 9 Next
|
| Page 2 of 9 |
|
You cannot post new topics in this forum
You cannot reply to topics in this forum
You cannot edit your posts in this forum
You cannot delete your posts in this forum
You cannot vote in polls in this forum
|
php BB powered © php BB Grp.
|


