|
|
| Do you like or dislike the new dashboard ? |
| Yes I do like the new dashboard |
|
100% |
[ 7 ] |
| No I do not like the new dashboard |
|
0% |
[ 0 ] |
|
| Total Votes : 7 |
|
| Author |
Message |
Ray White

Joined: 02 Dec 2014
Posts: 6304
Location: Derby
|
 Posted: Tue Mar 10, 2020 10:33 pm Post subject: Posted: Tue Mar 10, 2020 10:33 pm Post subject: |
 |
|

Here is a dilemma. These are the external pipes which transfer oil from the sump via the pump and filter to the bearings etc. There is also an external oil line from the block to the head.
The pipework adds interest to the engine and is part of the antiquated design. There is, however, a problem. There is a possibility of fracture with the sudden loss of oil pressure as the contents of the sump are emptied.
I have it on good authority that this potential for disaster can be SUBSTANTIALLY ameliorated by fitting a modern spin on canister filter adapter. Fortunately, I have one ready to fit.
Some experts, however, believe that flexible stainless steel hoses are a pre requisite for reliability. There are now purpose made flexible pipes with Dowty seals. These are not only guaranteed not to fracture but also much easier to make leak free - a problem well known to owners who struggle with banjo fittings and copper washers.
Other authorities say there is but a 5% chance of failure if properly installed and that there is a problem with some flexible lines in so far as they are too small a diameter and can severely restrict oil pressure.
A set of replacement flexible pipes would cost something like £75 from a reputable MG supplier. The cost is admittedly uncomfortable but how much worse it would be for the engine to be starved of oil at full chat.?
The question is: should I forget about the vintage "look" and modernise in the interests of reliability? |
|
| Back to top |
|
 |
badhuis

Joined: 20 Aug 2008
Posts: 1390
Location: Netherlands
|
| Posted: Wed Mar 11, 2020 11:10 pm Post subject: |
|
|
Keep the old ones. I love they way they look, how the copper / bronze fittings are cut at an angle and soldered to the pipes. You will not see this on a new set. They look fine to me, if they do not have actual pinholes. I am not a fan of too much restoration. This will add to the original look of the engine / car.
Do not be too scared of using old mechanicals. If something fails, repair. Do not change it all for new / newer solutions.
Part of the fun of running an old car is knowing it can fail, usually at the most uncomfortable time. I think Very Happy
Of course you are entitled to your own opinions!
_________________
a car stops being fun when it becomes an investment |
|
| Back to top |
|
|
Salopian
Joined: 05 Jan 2010
Posts: 354
Location: Newport Shropshire
|
| Posted: Thu Mar 12, 2020 7:25 pm Post subject: |
|
|
The canister oil filter was almost impossible to obtain 50 years ago and was expensive when located. The pipes had a record of failure as you say.
The cheap and easy fix of the period which I carried out was to remove the original pump pipes and filter then remove the filter bypass valve from the block (located on the pump flange seem to recall a bolt screws in to pull it but it was 1974 when I did this so memory may not be spot on) then plug with a bolt the original feed point to the oil gallery.
All that is then needed is to fit a later used pump with its element filter housing. Think I got one from a 4/44 engine. This feeds the oil gallery via the old bypass valve port and takes an easily available filter element.
Ah well perhaps not so cheap and easy now but mine has been entirely satisfactory since done - I still have the car!
_________________
Jonathan Butler
Alvis SD 12/50 1928 MG TD 1950 |
|
| Back to top |
|
|
alanb
Joined: 10 Sep 2012
Posts: 516
Location: Berkshire.
|
| Posted: Fri Mar 13, 2020 10:04 am Post subject: |
|
|
Have you seen this from Moss, looks like the original canisters
DESCRIPTION PRICE
(each) QTY
OIL FILTER ASSEMBLY, SPIN-ON CONVERSION
Part Number: 435-375
APPLICATION:
MG TB, TC & TD (TO (E) 14223)
£155.15 ADD
REPLACEMENT OIL FILTER
Part Number: GFE166 £2.90
_________________
old tourer
Morris 8 two seater |
|
| Back to top |
|
|
Ray White
Joined: 02 Dec 2014
Posts: 6304
Location: Derby
|
| Posted: Mon Mar 16, 2020 10:19 am Post subject: |
|
|
Thanks guys. I have investigated the risks involved with fractures in the original pipes and come to the conclusion that the most important thing is to be sure that the filter is fitted tightly to the block by it's clamp. Most failures, it would appear, have been due to floppy filter attachment putting strain on the banjo bolts. The old pipes do look good so I have painted them and refitted with new copper washers.
Alan. I have this filter. It is a modern spin on concealed inside a traditional looking canister. It (and it's special cradle) has also has been painted and fitted. Looks good.
I have just received the oil pump back from Roger Furneaux in Devon who has machined the gears so they now have the correct 0.002" clearance. He is very reasonable and does a great job.
I have taken advise and packed the pump with Vaseline. This apperently helps with getting it primed at start up. Later versions of this pump (which have the filter attached) have a priming hole but mine doesn't.
The external oil pipe to the rocker shaft has a special banjo bolt with take off for the oil pressure gauge. Mine was missing so I have fitted a new one.
Here is a photo of the engine so far with the cylinder head and tappets fitted. I used copper spray on the solid copper head gasket and torqued down to 50 ft lbs.

The water pump and thermostat assembly is now fitted and the crankshaft front oil seal is now carefully sandwiched between the sump and the timing chain cover. I have used all new bolts. (The sump bolts are special "mad metric" (8x1mm) with 1/4: ww heads). It is so nice to use new fasteners especially when the original ones have been butchered by previous owners.
The tappets will need adjusting and the clutch and new 5 speed gearbox fitted then I can put it back on the chassis. |
|
| Back to top |
|
|
alastairq
Joined: 14 Oct 2016
Posts: 1950
Location: East Yorkshire
|
| Posted: Mon Mar 16, 2020 10:31 am Post subject: |
|
|
That does indeed look like a smart job, Ray.
Whilst I appreciate the solid oil lines are a fixed length[for this application].....I would have been inclined to include an anti-vibration routing..which means a longer pipe...with perhaps a loop in the middle, or an S-bend somewhere?[ Much as one does with a solid capillary tube?]
_________________
Dellow Mk2, 1951 built, reg 1952.
Fiat 126 BIS
Cannon special [1996 registered. Built in 1950's]
----------------------------------------------
Ford Pop chassis, Ashley 1172 bodyshell, in pieces. |
|
| Back to top |
|
|
Ray White
Joined: 02 Dec 2014
Posts: 6304
Location: Derby
|
| Posted: Mon Mar 16, 2020 10:39 am Post subject: |
|
|
| alastairq wrote: | That does indeed look like a smart job, Ray.
Whilst I appreciate the solid oil lines are a fixed length[for this application].....I would have been inclined to include an anti-vibration routing..which means a longer pipe...with perhaps a loop in the middle, or an S-bend somewhere?[ Much as one does with a solid capillary tube?] |
I agree. If the pump or the filter had not been bolted securely to the block - and mounted on the body or chassis, for example - I would have done things differently. Voices in the MG fraternity say that the existing set up is 95% reliable unless used for racing where a dry sump would probably be utilised anyway.
Thanks for your approval. |
|
| Back to top |
|
|
Ray White
Joined: 02 Dec 2014
Posts: 6304
Location: Derby
|
| Posted: Fri Mar 20, 2020 11:18 am Post subject: |
|
|
 A94013.jpg[/img] A94013.jpg[/img]
This is a neat gadget. It is an oil pressure regulator that fits on the pump. Very easy to fit. Just unscrew the plug and replace with the adjuster. It gives you control over your oil pressure.
One of the problems with a rebuilt XPAG engine is too much pressure to the rocker shaft which can result in a messy leak from the rocker cover or even the cap.
On the other hand, as an engine wears, the pressure could need increasing. This gadget saves messing about with different strength springs etc. Again, with Peter Edney parts, it is not cheap but the quality is there.
 |
|
| Back to top |
|
|
Rick
Site Admin

Joined: 27 Apr 2005
Posts: 22439
Location: UK
|
|
| Back to top |
|
|
Ray White
Joined: 02 Dec 2014
Posts: 6304
Location: Derby
|
| Posted: Sat Mar 21, 2020 10:54 pm Post subject: |
|
|
Something that has impressed me about the TC engine is the attention given to it's cooling system. The original "bellows" type thermostat was designed to maintain all the engine coolant at 74 degrees. The designer of the X series of engines, Claude Bailey, ensured that cooling of the head was considered in conjunction with the thrermosyphon cooling of the block, specifically to avoid stress cracks occurring from cold starts.
Until nodular cast iron became the norm the original "grey" iron was quite susceptible to fracturing due to cold start temperature differences - so a means of gently warming the block with hot water from the head was provided that bypassed the radiator until 74 degrees C was reached. Then the thermostat bellows could begin to close of the bypass port with a built in "skirt". All the coolant could then begin to flow through the radiator... but the magic 74 degrees was still maintained.
This thermostat was a clever and sophisticated devise that continually regulated water temperature. Obviously, the radiator needs to be in tip top condition to avoid overheating as no thermostat is able to compensate for insufficient flow but unfortunately this all comes at a price.
Modern replacement thermostats lack this sophistication so as a compromise an optional restrictor is fitted in the bypass port. The reproduction "bellows" thermostats available are not much better because their skirts seem incapable of either closing off or opening the bypass fully.
Unfortunately, my original thermostat was missing so I have approached the problem of block/head temperature equivalence from a different angle.
I plan to fit a heater and utilise the bypass system for a take off point. As the port will be permanently open a "bellows" thermostat would not be compatible. Instead, I have a simple 74 deg."wax stat" thermostat... but to compensate for the loss of temperature regulation I have fitted an upgraded water pump which has a six blade impeller - a big improvement in flow rate over the standard four bladed unit. Tests have shown this substantially reduces "hot spots'' in the system.
Bypass opening in the new thermostat housing which will allow me to plumb in a heater.
 |
|
| Back to top |
|
|
Ray White
Joined: 02 Dec 2014
Posts: 6304
Location: Derby
|
| Posted: Wed Mar 25, 2020 2:43 pm Post subject: |
|
|
I felt that the design of the original master cylinder heat shield (missing on my car) was less than ideal. Reproductions are available but cost about £100 - so I decided to make my own from some scrap polished stainless steel. The result looks better than I had expected and should work as intended.

 |
|
| Back to top |
|
|
Ray White
Joined: 02 Dec 2014
Posts: 6304
Location: Derby
|
| Posted: Thu Mar 26, 2020 8:33 pm Post subject: |
|
|
I have now reached the stage where the engine and gearbox can go back in the chassis.

The 22mm copper elbow on the top of the rocker cover is to be the take off for an exhaust vacuum crankcase ventilation system. I will need to reduce the pipe size down to 15mm and fit a catch can and check valve. The Evac. system is a big improvement on the old draft tube and a better solution for a forced induction engine than the ubiquitous PCV valve.
A typical installation. (not connected). Stops oil leaks and improves engine efficiency.  |
|
| Back to top |
|
|
norustplease

Joined: 11 Apr 2011
Posts: 779
Location: Lancashire
|
|
| Back to top |
|
|
Ray White
Joined: 02 Dec 2014
Posts: 6304
Location: Derby
|
| Posted: Thu Mar 26, 2020 10:34 pm Post subject: |
|
|
I have read some of Neil Cairns writings ( it's hard to avoid them; he is so prolific!) but not that one. I will read the full YB story. Thanks.
I like the Y type MGs. If I ever feel the need for a classic saloon it would be high on the list. |
|
| Back to top |
|
|
Ray White
Joined: 02 Dec 2014
Posts: 6304
Location: Derby
|
| Posted: Sat Mar 28, 2020 7:15 pm Post subject: |
|
|
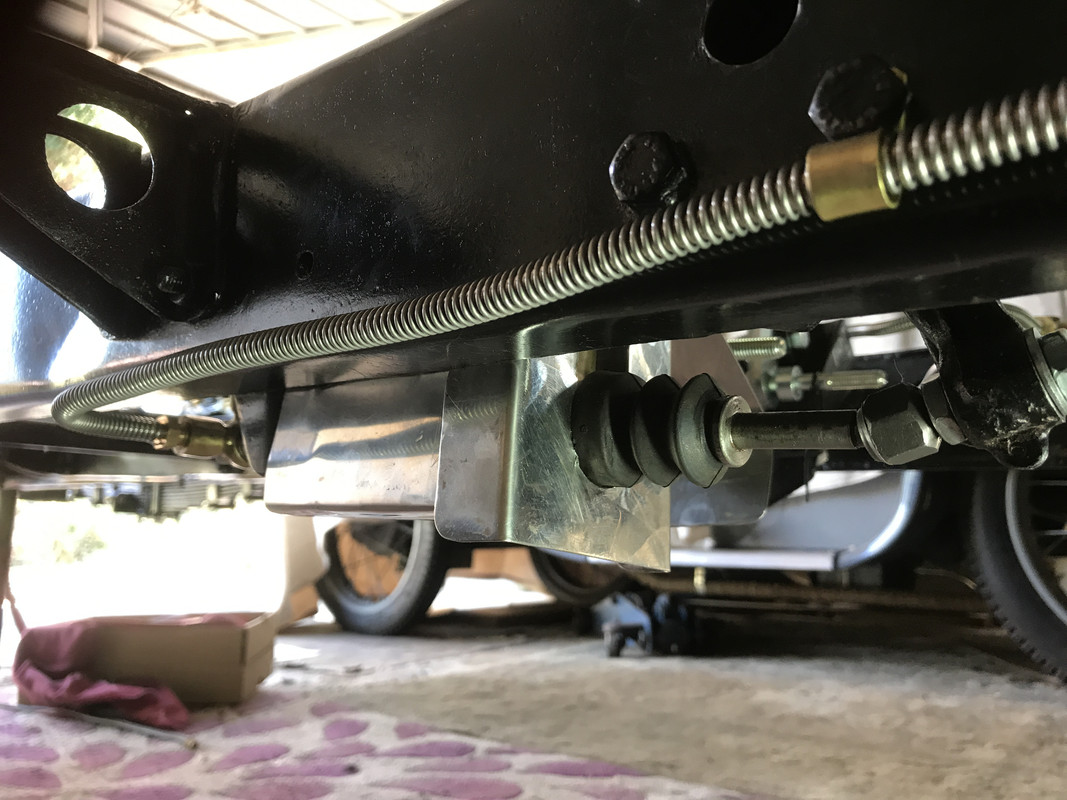
The engine and gearbox being lowered into place.

..now being bolted down. The new gearbox mountings are handed. Not in the photo but I have used the o/s one to secure the heat shield. It is also attached to the chassis so is properly secured.

Just visible is the area of gearbox webbing that had to be filed away to ensure it cleared the cross member.
 |
|
| Back to top |
|
|
|


