|
|
| Author |
Message |
peter scott

Joined: 18 Dec 2007
Posts: 7124
Location: Edinburgh
|
 Posted: Wed Nov 17, 2010 5:05 pm Post subject: Make Your Own Parts Posted: Wed Nov 17, 2010 5:05 pm Post subject: Make Your Own Parts |
 |
|
When I bought my car it was very much a kit of parts and not a complete kit at that. Some I was able to source from the usual suppliers but others appeared unobtainable. With little prospect of an early solution I decided to try my hand at making the missing items. The nice thing about pre war cars is that a high proportion of the parts can be reproduced with only basic tools.
One of the first that I attempted was the nearside rear inner door card. Fortunately I did have the original for the offside so I had a pattern all be it in mirror image. My offside card was already in bits as it needed restitching so I cut out paper patterns for the various pieces of leather and arranged them as efficiently as I could as one piece. I was very fortunate that a local leather supplier was able to provide me with a very good colour match to my existing leatherwork. Then with some trepidation (the leather isn't cheap) I cut out the various pieces according to my patterns and stitched them up with my wife's sewing machine. Domestic machines are not ideal and I got through quite a few packets of needles before the job was completed but I think the result is a passable copy of the original. The photo is current and shows that the stitching has now held together for 17 years. The inset in the bottom left shows the leather pieces prior to stitching. Not shown is the fact that I used headlining material to form the door pockets for this and the other doors all of which needed replacement.

In the end I had cut it pretty fine on the leather and only had enough left over to make a key fob!
Another part that I couldn't find was the lock body for the boot lid handle. I did have the original Mazac part but it was broken. In this case I obtained a small piece of 1/4" thick brass plate to make the flange with the fixing holes in it and I silver soldered a brass plumbing fitting to the back in order to form the tubular body. With a bit of drilling and filing this created a much stronger part than the original. The chrome plating I left to the professionals.
The inset shows the Mazac part on the left and my brass version, before it was chromed, on the right.

After tackling the boot lid handle I got a little bit more ambitious and thought that I could also make the chrome waist line strips that were missing from the driver's and nearside rear passenger doors. Once again I bought 1/4" thick brass for the purpose and again resorted to a brass plumbing fitting to form the driver's door lock body. I used short lengths of brass rod to form the projections that carry the fixing screws. All the parts were silver soldered.
The driver's door strip didn't prove too difficult because it is parallel sided but the rear door strip is curved. At first I tried cutting the full length with a hacksaw but if you've ever attempted to cut 1/4" brass then you'll understand why I abandoned this. My eventual solution was to drill multiple holes along the shape of the strip and then to cut through the webs with the hacksaw. A bit of grinding and filing produced the desired shape.
The photo shows the "easy" front door and rather labour intensive rear door strips and one of the offcuts below. Once again the chroming was left to the professionals.

All of this took place 17 years ago and I've never in the intervening years come across any spares for these parts so I think it was worth the effort. Having said that, I did come across one other part that I made. This was the little flexible shaft that couples the wiper motor to the pantograph. It was only after seeing one in the flesh connected to another pantograph that I realised that I had the original after all. I just hadn't recognised it for what it was.
_________________
http://www.nostalgiatech.co.uk
1939 SS Jaguar 2 1/2 litre saloon
Last edited by peter scott on Fri Jul 07, 2017 1:07 pm; edited 2 times in total |
|
| Back to top |
|
 |
bob2
Joined: 06 Dec 2007
Posts: 1727
Location: Malta
|
| Posted: Thu Nov 18, 2010 8:33 am Post subject: |
|
|
really impressive stuff, that's true dedication peter.
well done and btw I really like your jag, seen a couple over here in malta and they are wonderfully styled cars, love them!! |
|
| Back to top |
|
|
roverdriver

Joined: 18 Oct 2008
Posts: 1210
Location: 100 miles from Melbourne, Victoria, Australia
|
| Posted: Thu Nov 18, 2010 10:26 am Post subject: |
|
|
Well done Peter. You are a man after my own heart! If you haven't got it then make it!
There are many little bits and pieces that can be made for our vehicles, sometimes to complete a restoration, but also sometimes just to keep the car on the road.
Your leatherwork reminds me of when my wife and I restored a Model A Ford back in 1972. We couldn't afford to have the upholstery done professionally, so we bought some suitable looking fabric for the seats and my wife worked with the sewing machine to recreate the seat covers etc. We had no idea of exactly how the seat squab had been manufactured, but the remains indicated that it was two pieces of material with stitching to form tubes into which the stuffing went. We stuffed ours with kapok from an old mattress. Looked good when it was finished, and still looked reasonable 18 years and about 250,000 miles later when we sold the car.
Here is a photo while the car was being restored-

_________________
Dane- roverdriver but not a Viking. |
|
| Back to top |
|
|
peter scott
Joined: 18 Dec 2007
Posts: 7124
Location: Edinburgh
|
| Posted: Thu Nov 18, 2010 12:43 pm Post subject: |
|
|
Thanks for your kind comments guys. You talking about trying to work out how missing upholstry is fabricated Dane reminds me of making my own headlining. I didn't have the original headlining to work with but did have a black & white photo of an interior. In the Jag the piping that divides the upper parts of the headlining from the lower is meant to match the colour of the seat leather but in the photo I was using, the tone of the headlining and that of the leather was the same so I assumed that the piping was made from head cloth. The result doesn't look bad but it's not as the factory intended. Bottom left in this collage:
Peter

_________________
http://www.nostalgiatech.co.uk
1939 SS Jaguar 2 1/2 litre saloon |
|
| Back to top |
|
|
Desperatdan
Joined: 23 Aug 2011
Posts: 3
Location: Germany
|
| Posted: Wed Aug 24, 2011 7:46 pm Post subject: Jaguar ss |
|
|
Hello Peter, its nice to see all these photos of your SS. As not really prewar I dont assume to be considered one of the club but I recentley bought a 2.5 Ltr. Model Year 1947
and am currantley going through a very badly bodged restauration carried aut somewhere in Australia or New Zealand. All things well I shall get her on the road this week and hope to be covering a few pleasurfull miles before winter comes.
By the way, you may have seen the car for sale on cars and classics recently
its the burgendy over silver one.
Cheers, Dan. |
|
| Back to top |
|
|
Ray White

Joined: 02 Dec 2014
Posts: 6342
Location: Derby
|
| Posted: Wed Jan 14, 2015 9:58 pm Post subject: |
|
|
[img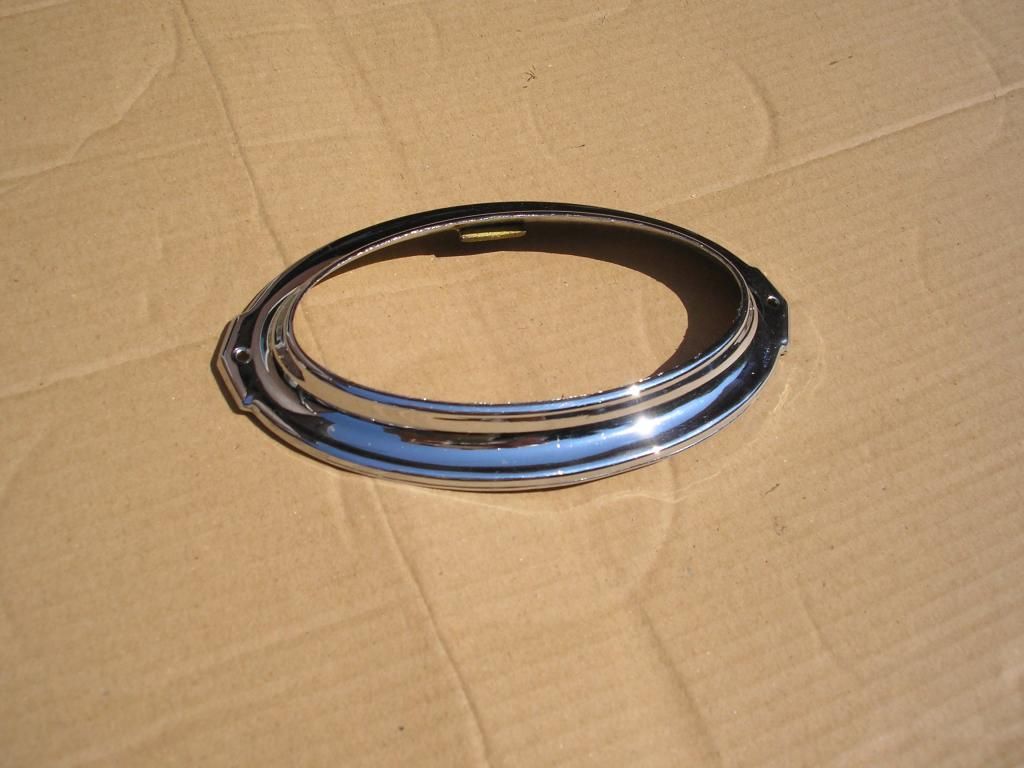 [/img] [/img]
Hi Peter. I found this interesting thread which is right up my street. Obviously, there are numerous suppliers for Austin Sevens but when it comes to Swallow items I have often found myself having to craft various bits and pieces.
This is the surround for the interior light They were originally made by Willmot Breeden. Unfortunately, the glass is broken and I would like to find a replacement for it. In the unlikely event that another glass ever becomes available I have been thinking of how I could make something that would do the trick.
The surround is brass and (as you can see) oval in shape and the photo is aprox. actual size. I have chrome plated it with a D.I.Y kit (which is fine for small parts).
I am open to suggestions from those with more imagination than me about how to make the domed cover. I would think getting a glass one made would be unrealistically expensive but perhaps a resin or plastic one could be moulded so long as it was opaque.
Any ideas? |
|
| Back to top |
|
|
ukdave2002
Joined: 23 Nov 2007
Posts: 4117
Location: South Cheshire
|
| Posted: Wed Jan 14, 2015 10:41 pm Post subject: |
|
|
Hi Ray
3D printing may provide a solution. I'm tempted to get a 3D printer, but first need to be confident that there is some CAD software that is both affordable and relatively easy to use!
Dave |
|
| Back to top |
|
|
Ray White
Joined: 02 Dec 2014
Posts: 6342
Location: Derby
|
| Posted: Wed Jan 14, 2015 10:48 pm Post subject: |
|
|
| I think that's what they call thinking outside the box, Dave. |
|
| Back to top |
|
|
Peter_L
Joined: 10 Apr 2008
Posts: 2680
Location: New Brunswick. Canada.
|
| Posted: Wed Jan 14, 2015 11:01 pm Post subject: |
|
|
The thread is interesting and informative, it shows how, with the minimum of tools, it is possible to produce some of the items on earlier vehicles.
I defy anyone to make a surface mount integrated circuit, let alone remove and replace it.
Local artisans should perhaps be considered for certain tasks, even if not car related. Carpenters with knowledge of wood. Seamstress, who can making a sewing machine sing. Model locomotive or similar, who may be able to turn, mill or shape a one off item. Glass blowers, for that elusive light lens or cover.
Craftsmen who understand the materials with which they work, the end product doesn't matter.
In the days when one of my business interests involved vibrating plaster of paris in small moulds, we found the answer in a "specialist" shop. Quite what we were to do with 20 such devices left the shop owner in total disbelief. Dismantling the said items did teach us a lot.
I am afraid all the "one liners" and "innuendoes" have been heard. |
|
| Back to top |
|
|
Ray White
Joined: 02 Dec 2014
Posts: 6342
Location: Derby
|
| Posted: Wed Jan 14, 2015 11:39 pm Post subject: |
|
|
Hi Peter. You are lucky if you can find a local artisan to take on a "one off " these days. The problem is that most craftsmen working from home or in small businesses have had a hard time of it staying afloat; so every job they take on needs to pay as well as possible.
One idea I had to create an oval domed cover for my interior light would be to make a wooden former in the shape required and with the aid of a heat gun, press out the shape in pvc through a corresponding oval hole in some plywood.
I have no idea if it will work but perhaps worth a try. |
|
| Back to top |
|
|
peter scott
Joined: 18 Dec 2007
Posts: 7124
Location: Edinburgh
|
| Posted: Thu Jan 15, 2015 12:14 am Post subject: |
|
|
Hi Ray,
I like Dave's idea of getting into 3D printing but this maybe a rather expensive solution for a single item. I think your resin thoughts and a plaster mould would be more appealing. I'm sure it would be possible to persuade another Swallow owner to let you take an impression of their lamp glass.
Peter
_________________
http://www.nostalgiatech.co.uk
1939 SS Jaguar 2 1/2 litre saloon |
|
| Back to top |
|
|
Ray White
Joined: 02 Dec 2014
Posts: 6342
Location: Derby
|
| Posted: Thu Jan 15, 2015 12:46 am Post subject: |
|
|
| peter scott wrote: | Hi Ray,
I like Dave's idea of getting into 3D printing but this maybe a rather expensive solution for a single item. I think your resin thoughts and a plaster mould would be more appealing. I'm sure it would be possible to persuade another Swallow owner to let you take an impression of their lamp glass.
Peter |
I have the original glass so no problem with making a mould.
Thanks for your advise. I just need some guidance as not tried making any resin or plastic parts before.
As it happens, this is a spare light. I am always looking for any rare Swallow parts as they will come in handy if the basket case I know of comes my way looking for a new life. |
|
| Back to top |
|
|
peter scott
Joined: 18 Dec 2007
Posts: 7124
Location: Edinburgh
|
|
| Back to top |
|
|
Ray White
Joined: 02 Dec 2014
Posts: 6342
Location: Derby
|
| Posted: Thu Jan 15, 2015 5:12 pm Post subject: |
|
|
Thanks. It looks like a whole other world.
There's a first time for everything, I suppose.  |
|
| Back to top |
|
|
peter scott
Joined: 18 Dec 2007
Posts: 7124
Location: Edinburgh
|
|
| Back to top |
|
|
|


