
Classic cars forum & vehicle restoration.
|
|
| Author |
Message |
MooiMeisie
Joined: 04 Jan 2010
Posts: 41
|
 Posted: Tue Apr 18, 2017 12:00 pm Post subject: Fuel tank sender unit. Posted: Tue Apr 18, 2017 12:00 pm Post subject: Fuel tank sender unit. |
 |
|
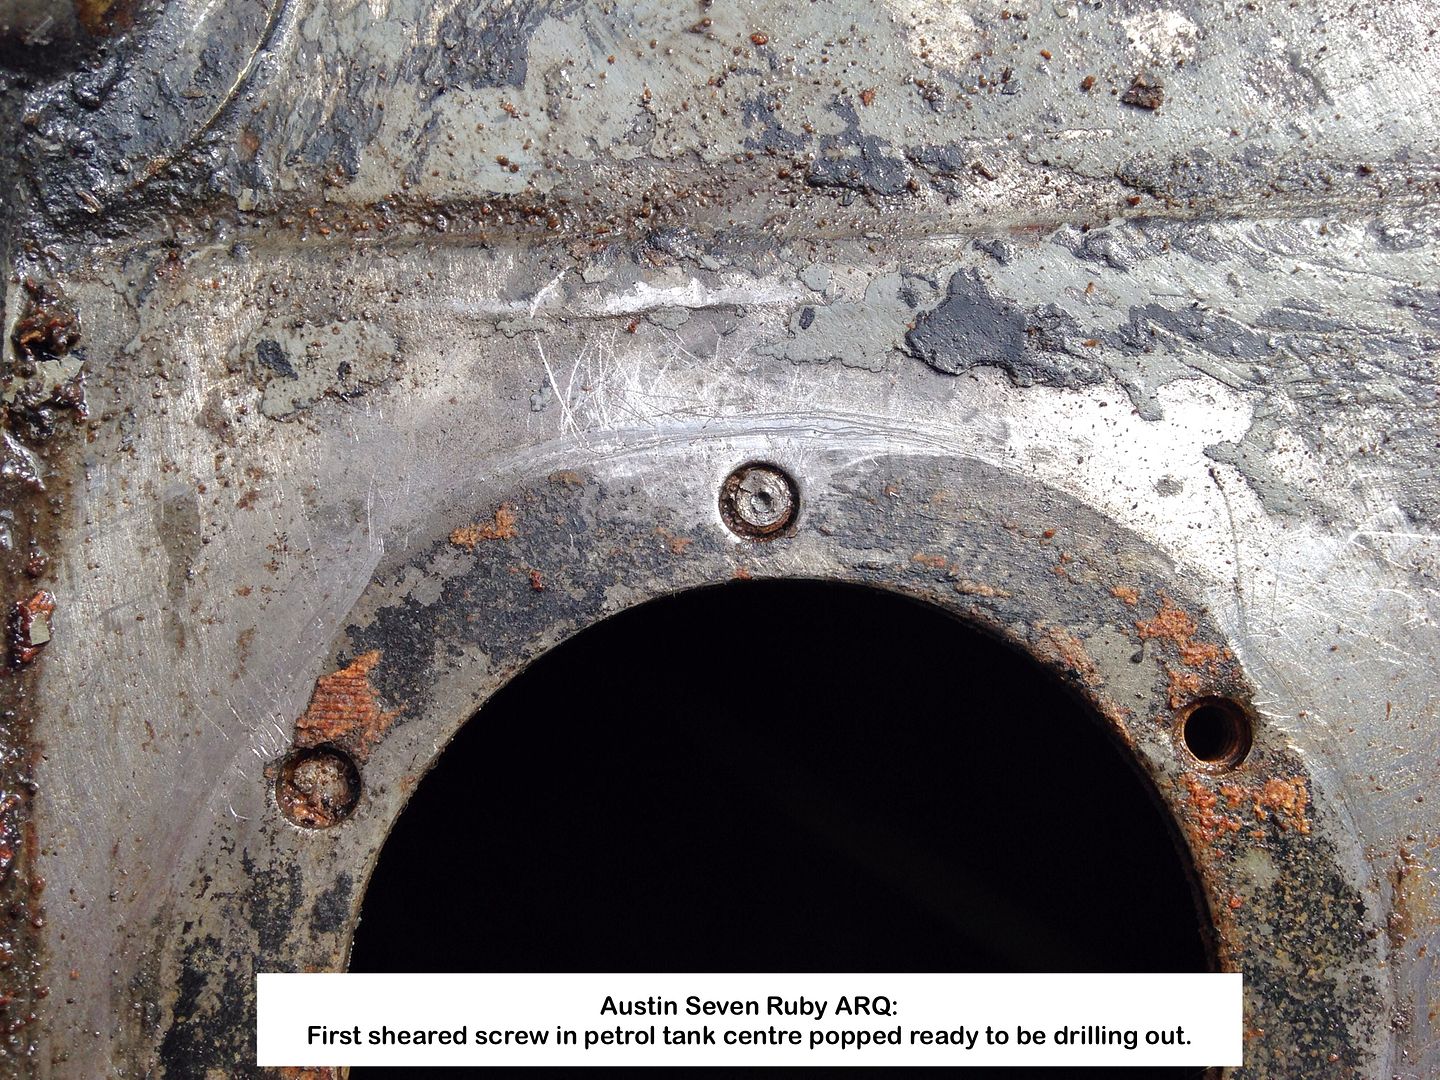
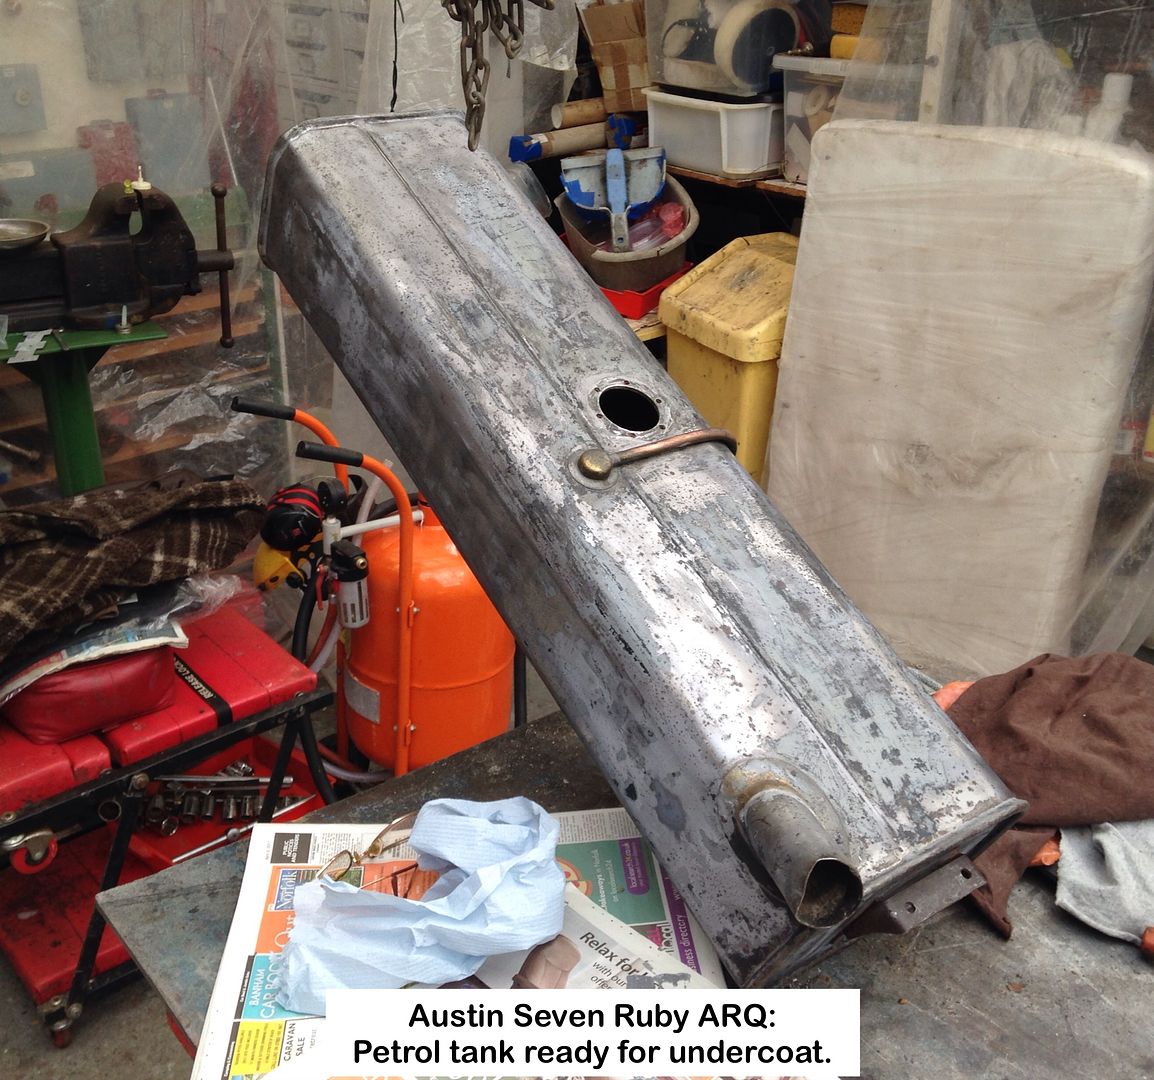
I removed the petrol tank sender unit on the 6th April but only now able to post details, having since then suffered from that horrid head cold and red eyes that's been doing the rounds, and the worst I've experienced to date.
Photos show the angst experienced in removing the screws, the slots having been well and truly mangled.
Was thinking of using one of the tank sealers, but will the two baffle plates prevent full coating?
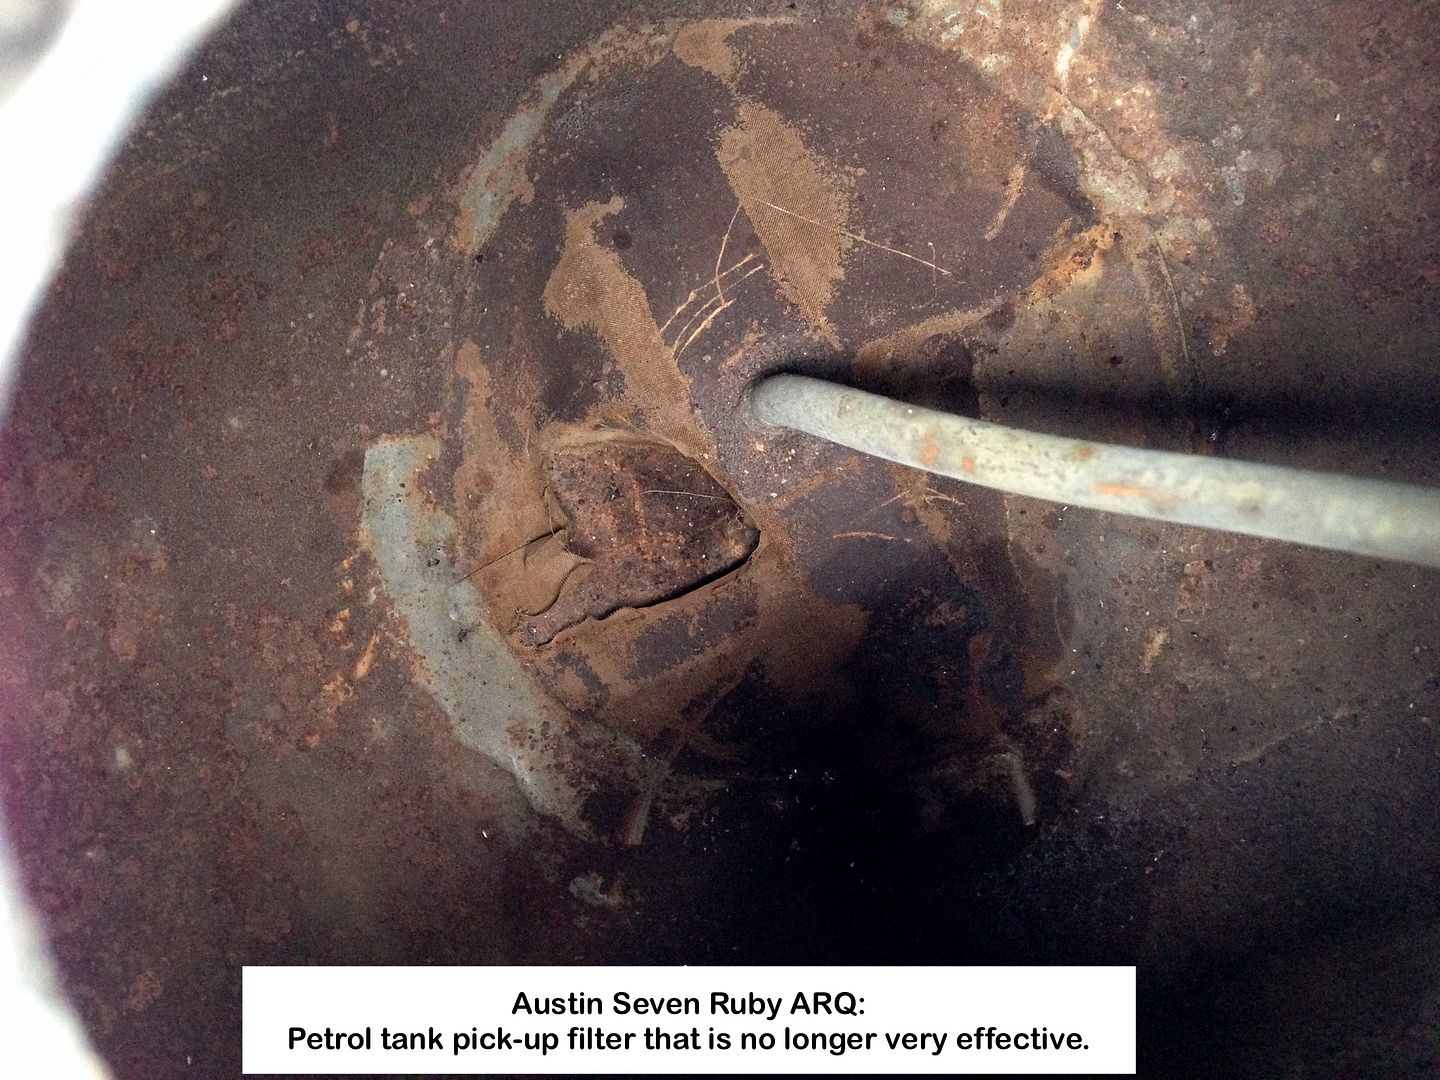
The gauze filter has a chunk missing so ineffective, see last photo, but I was going to fit a remote filter onto the bulkhead in any case.
The screw slots had been so well and truly mangled that even a hollow ground screwdriver was ineffective, this after a week of squirting every release agent I had at them.
I even went so far as to use a knife to scrape away the cork gasket, opposite the screws, in an effort to get the stuff to wick onto the threads, all to no avail.
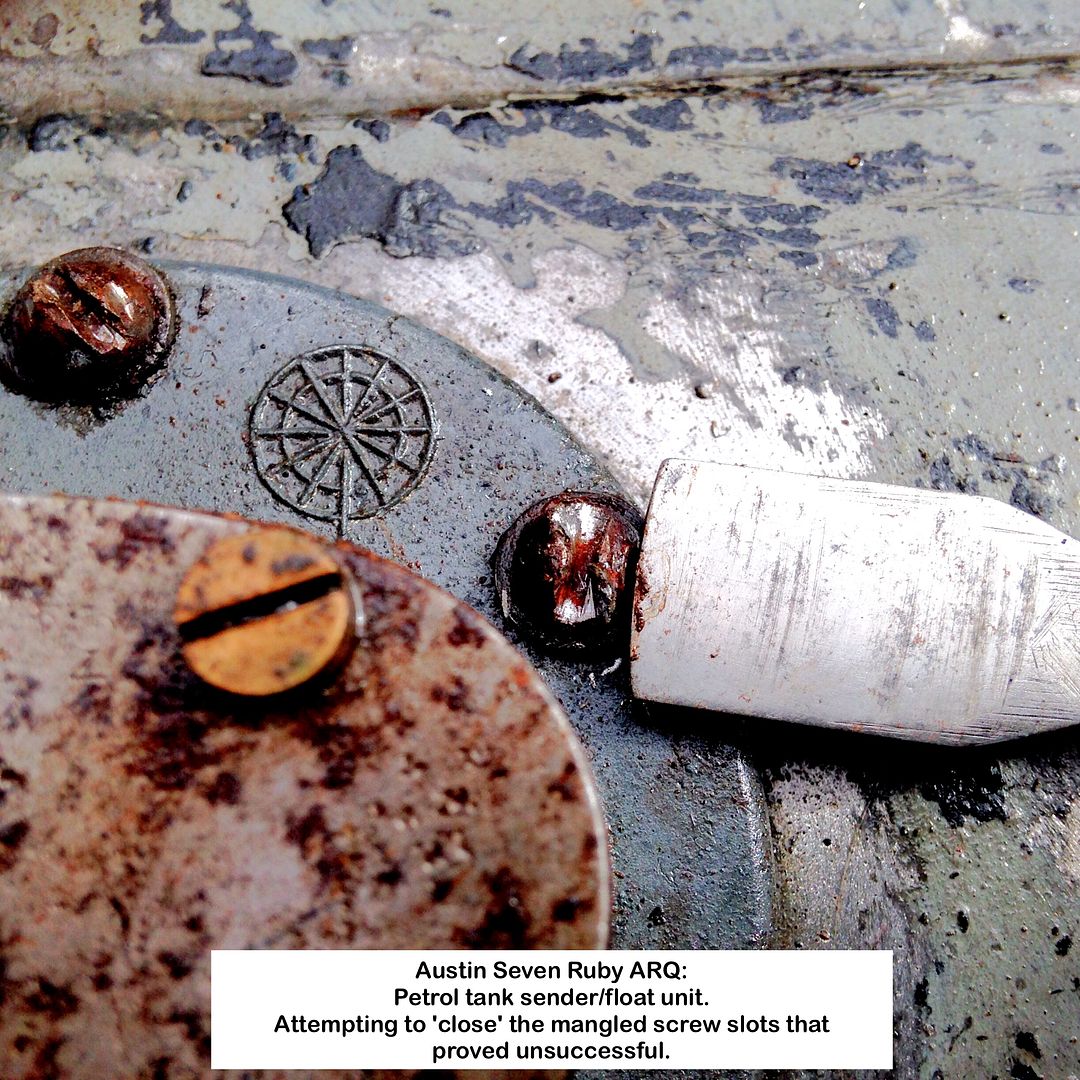
'Brain out of gear' brute force the only solution now.
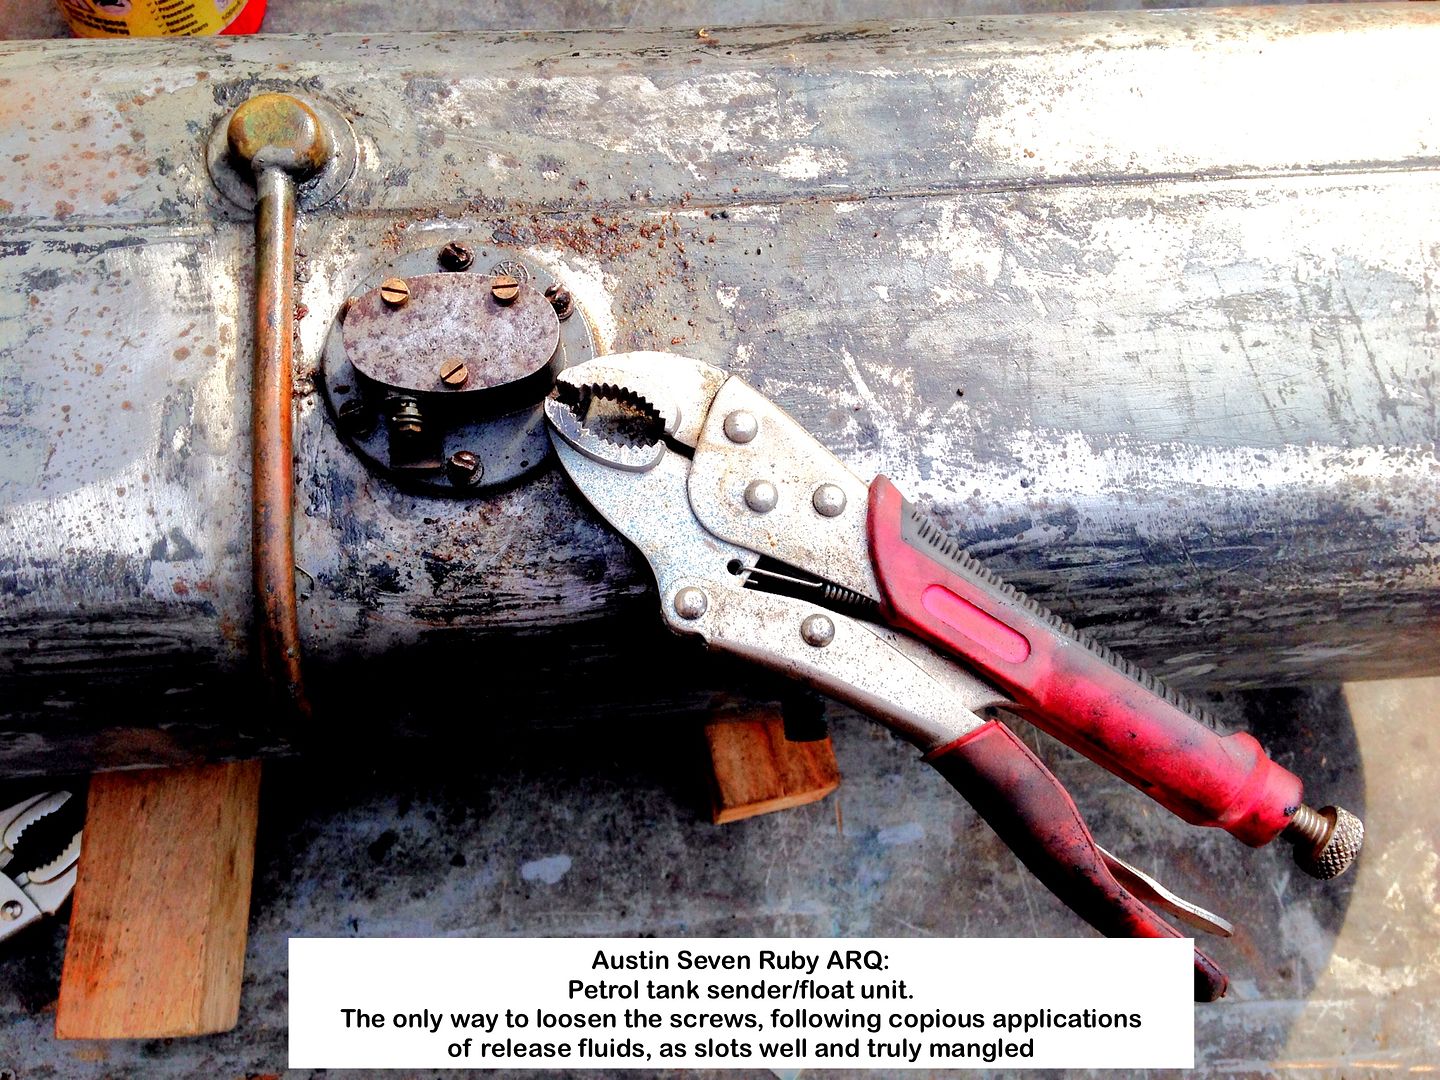
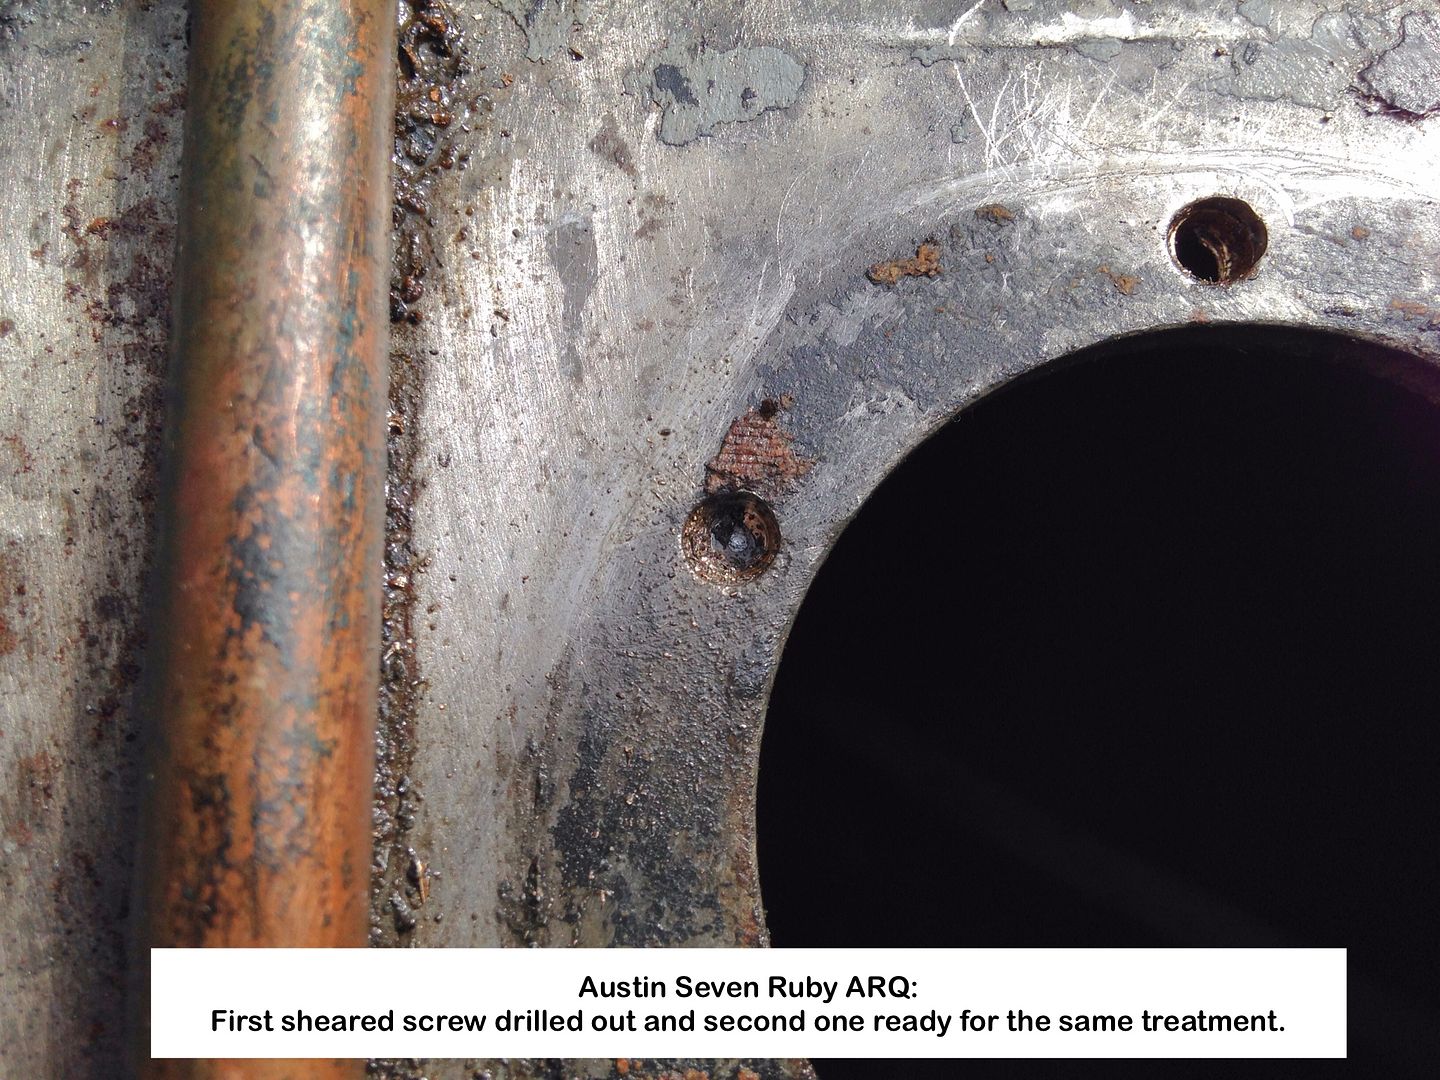
Four screws eventually succumbed, but the last two sheared, turning the air blue.
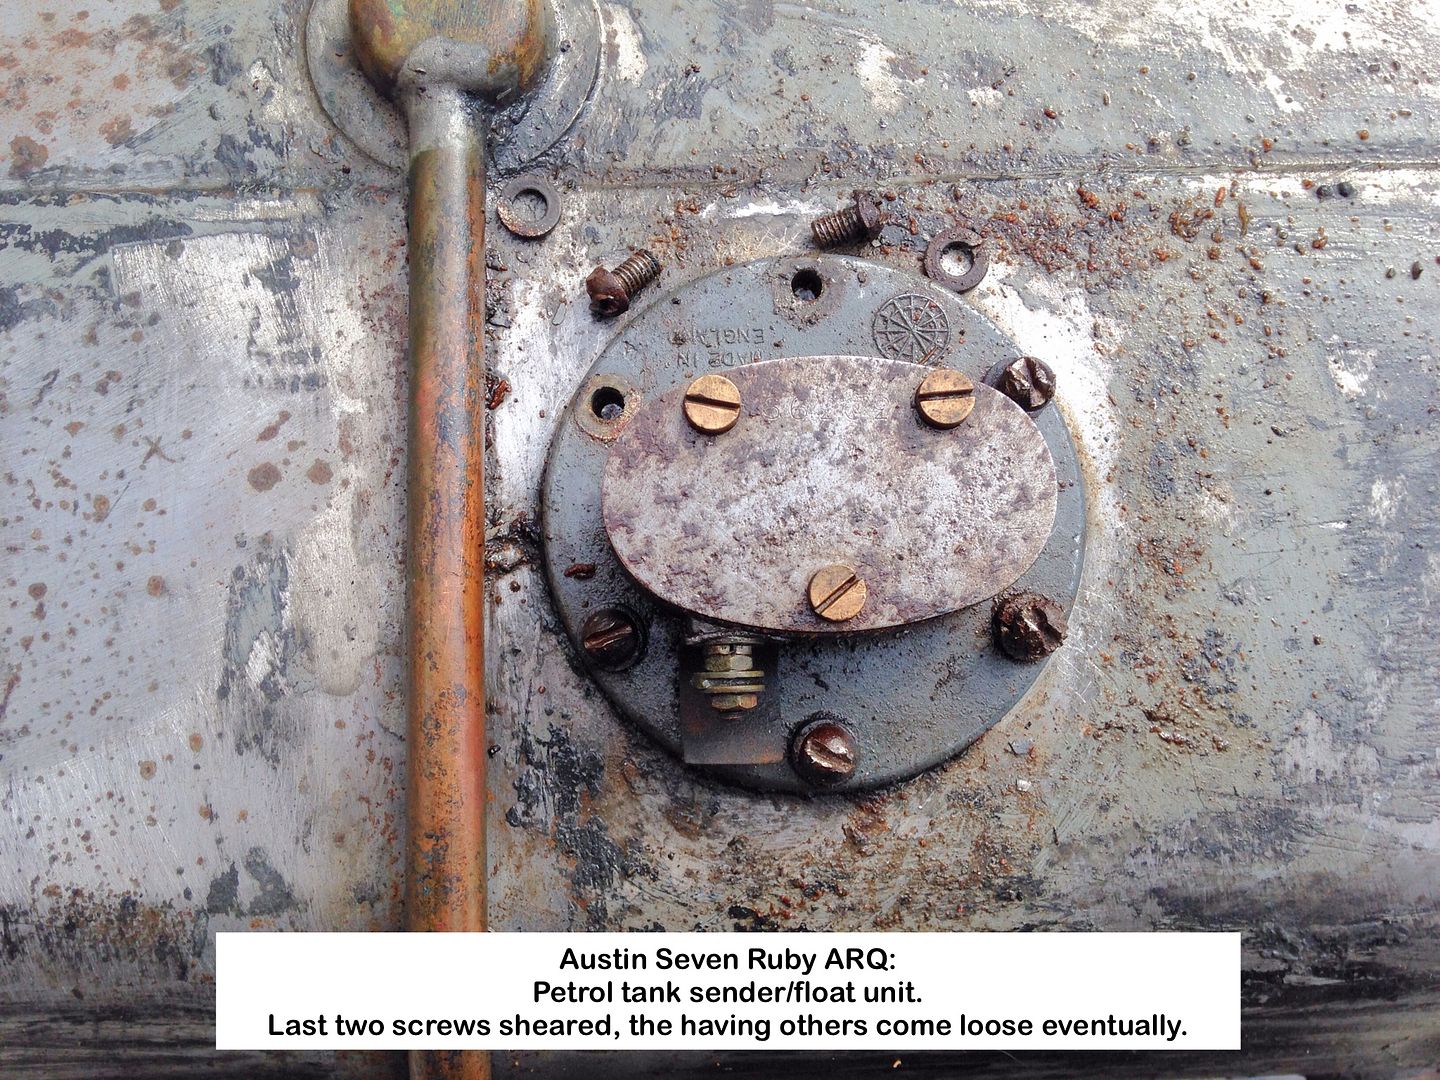
Sender unit removed to reveal the sheared screw stubs.
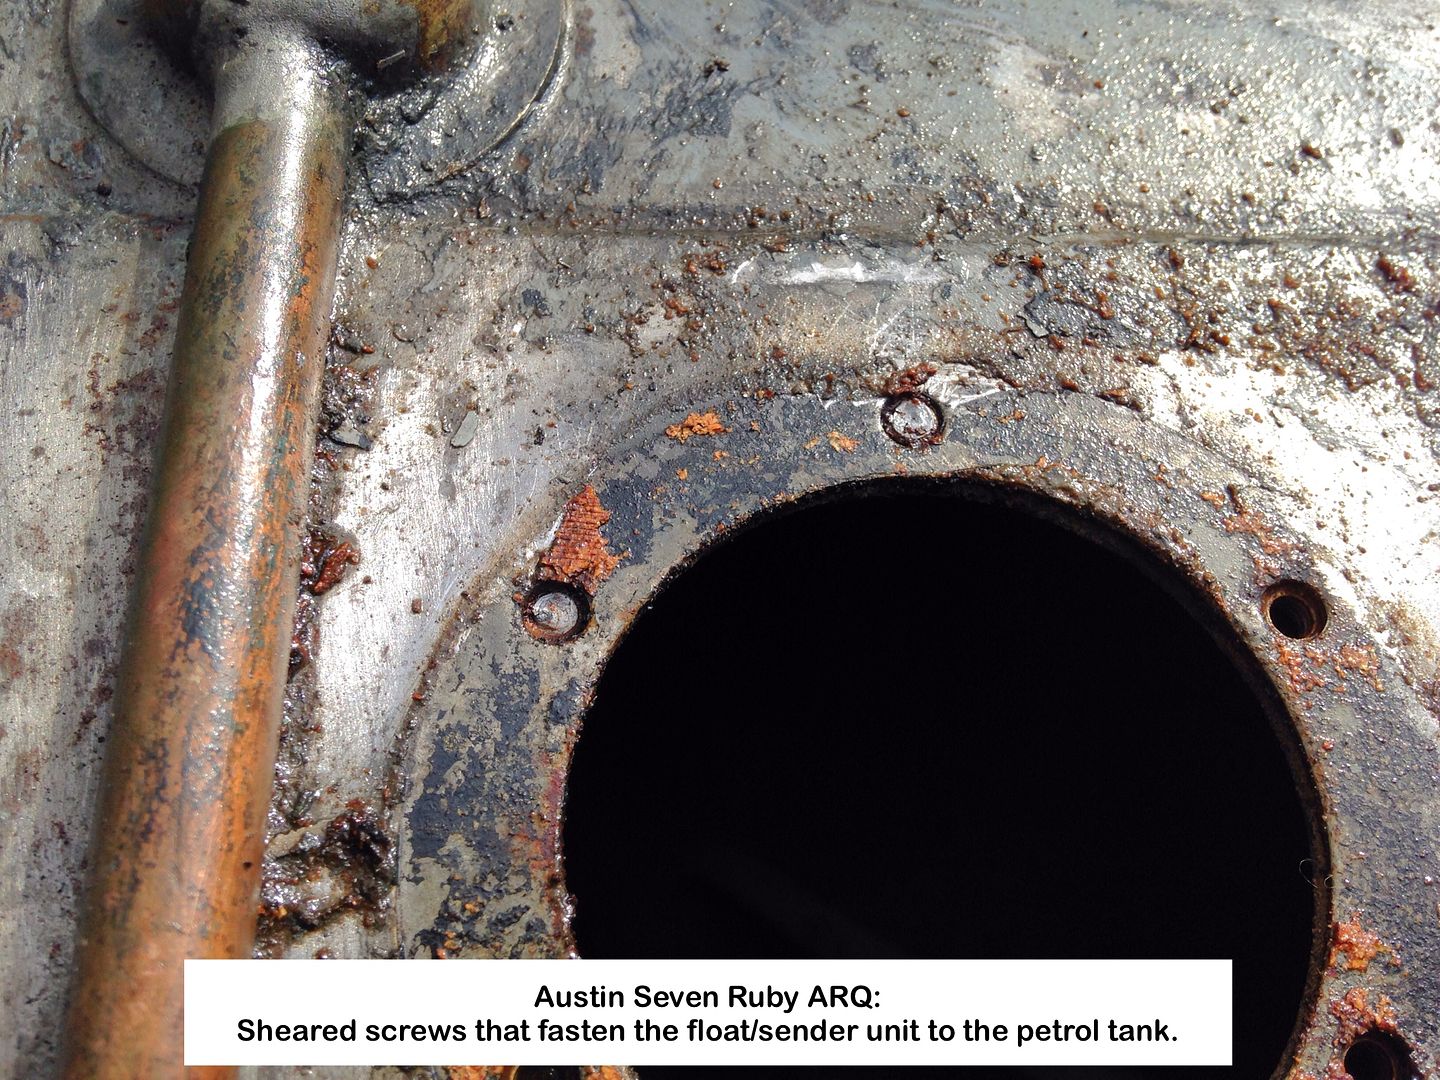
One of the sheared bits ready to be drilled out.
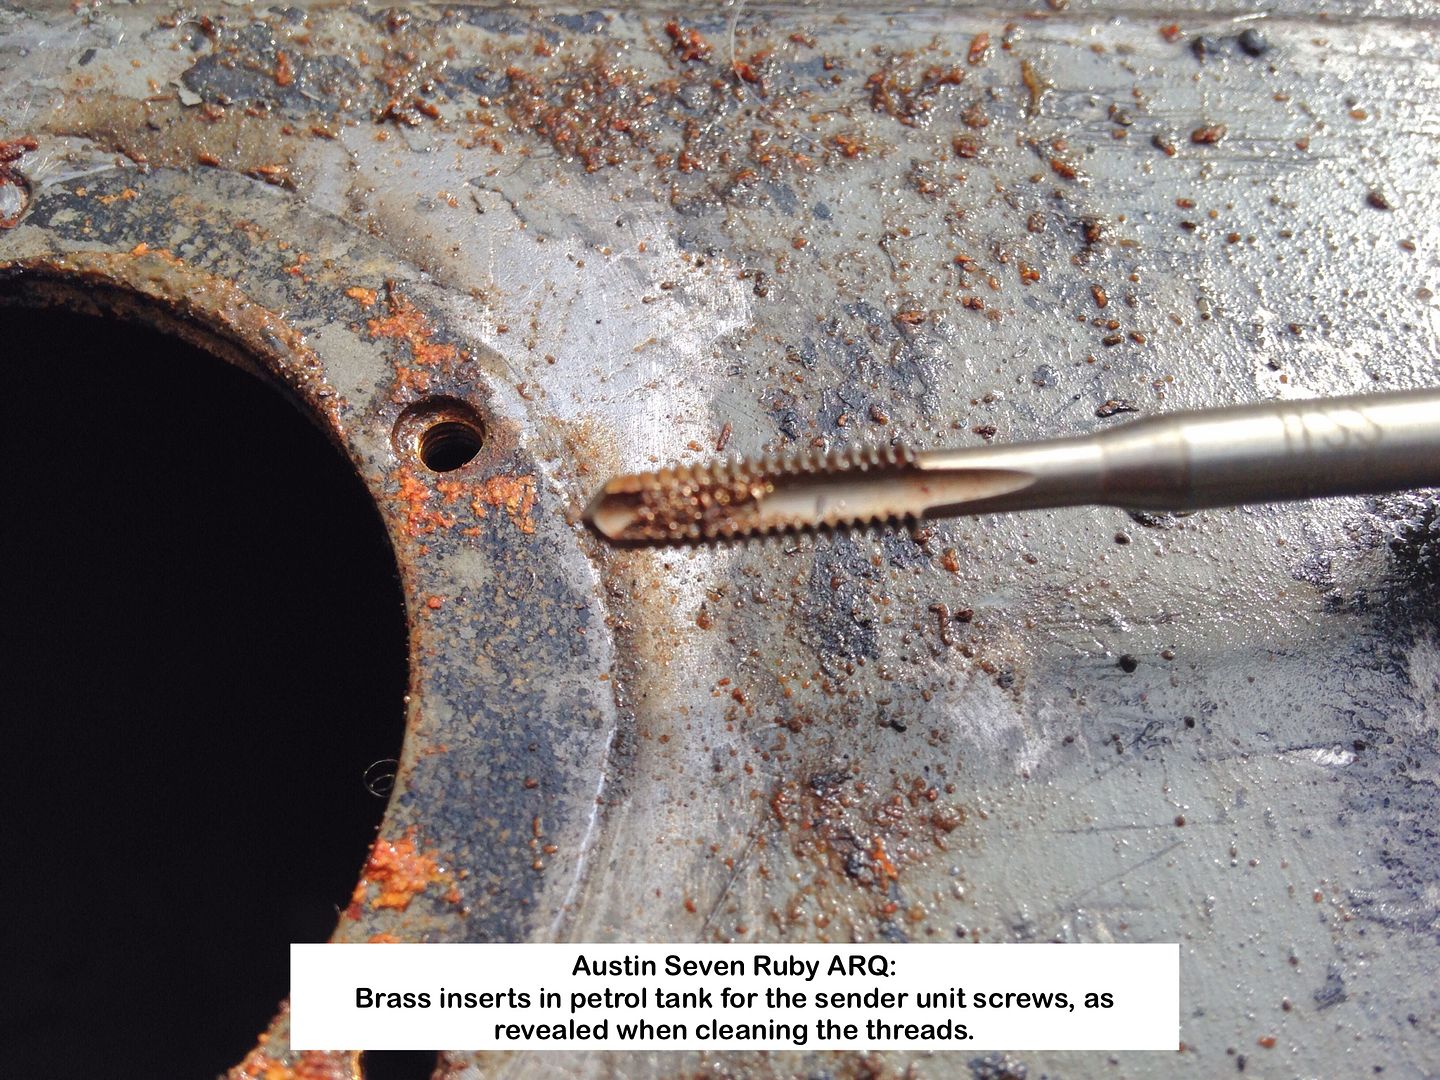
One sheared screw drilled out, one to go.
Threads cleaned up revealing brass inserts.
Need to find BA brass screws to replace the rusted in steel ones now.
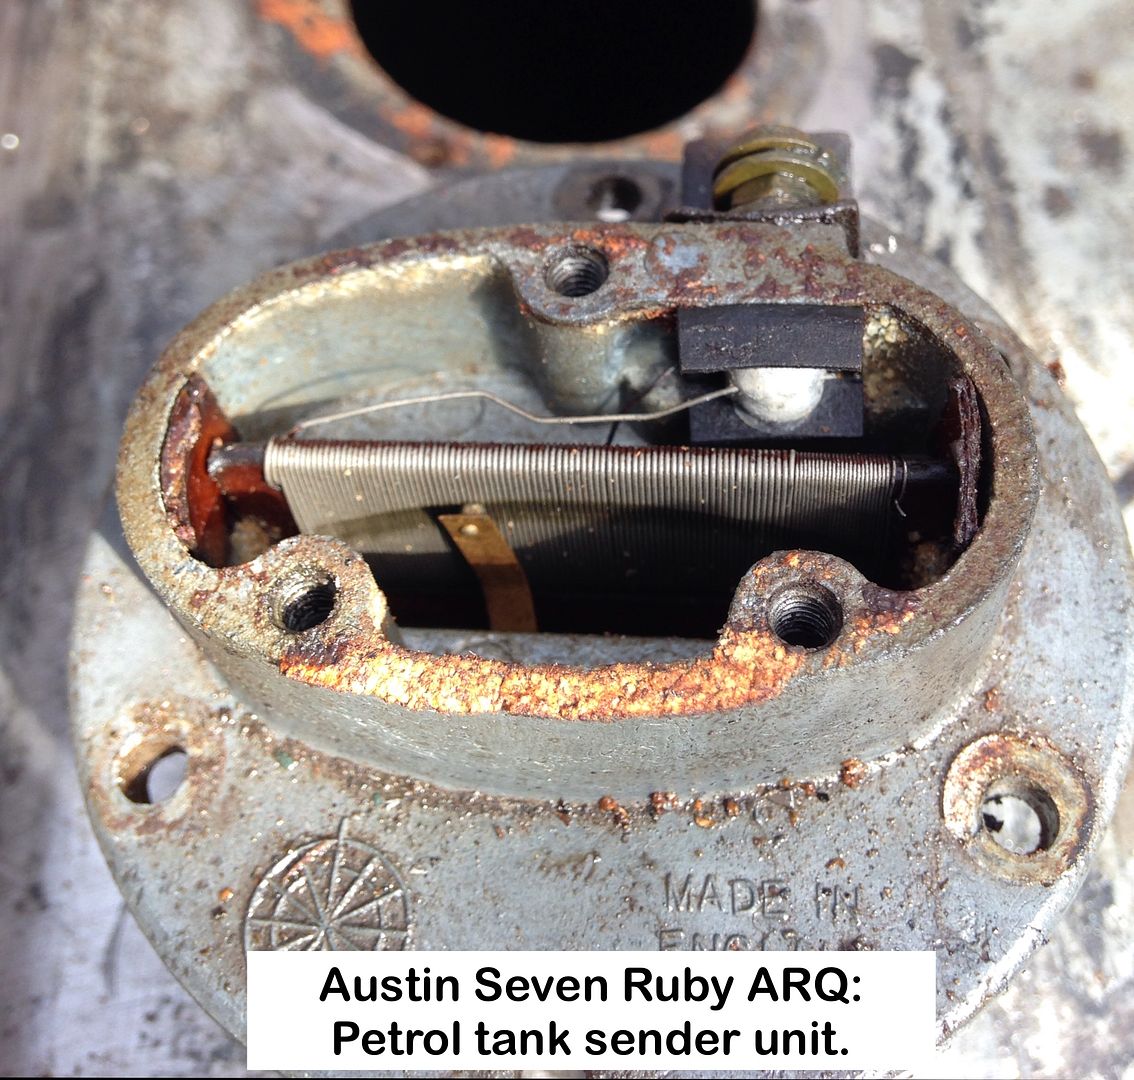
Sender/float unit in all its glory.
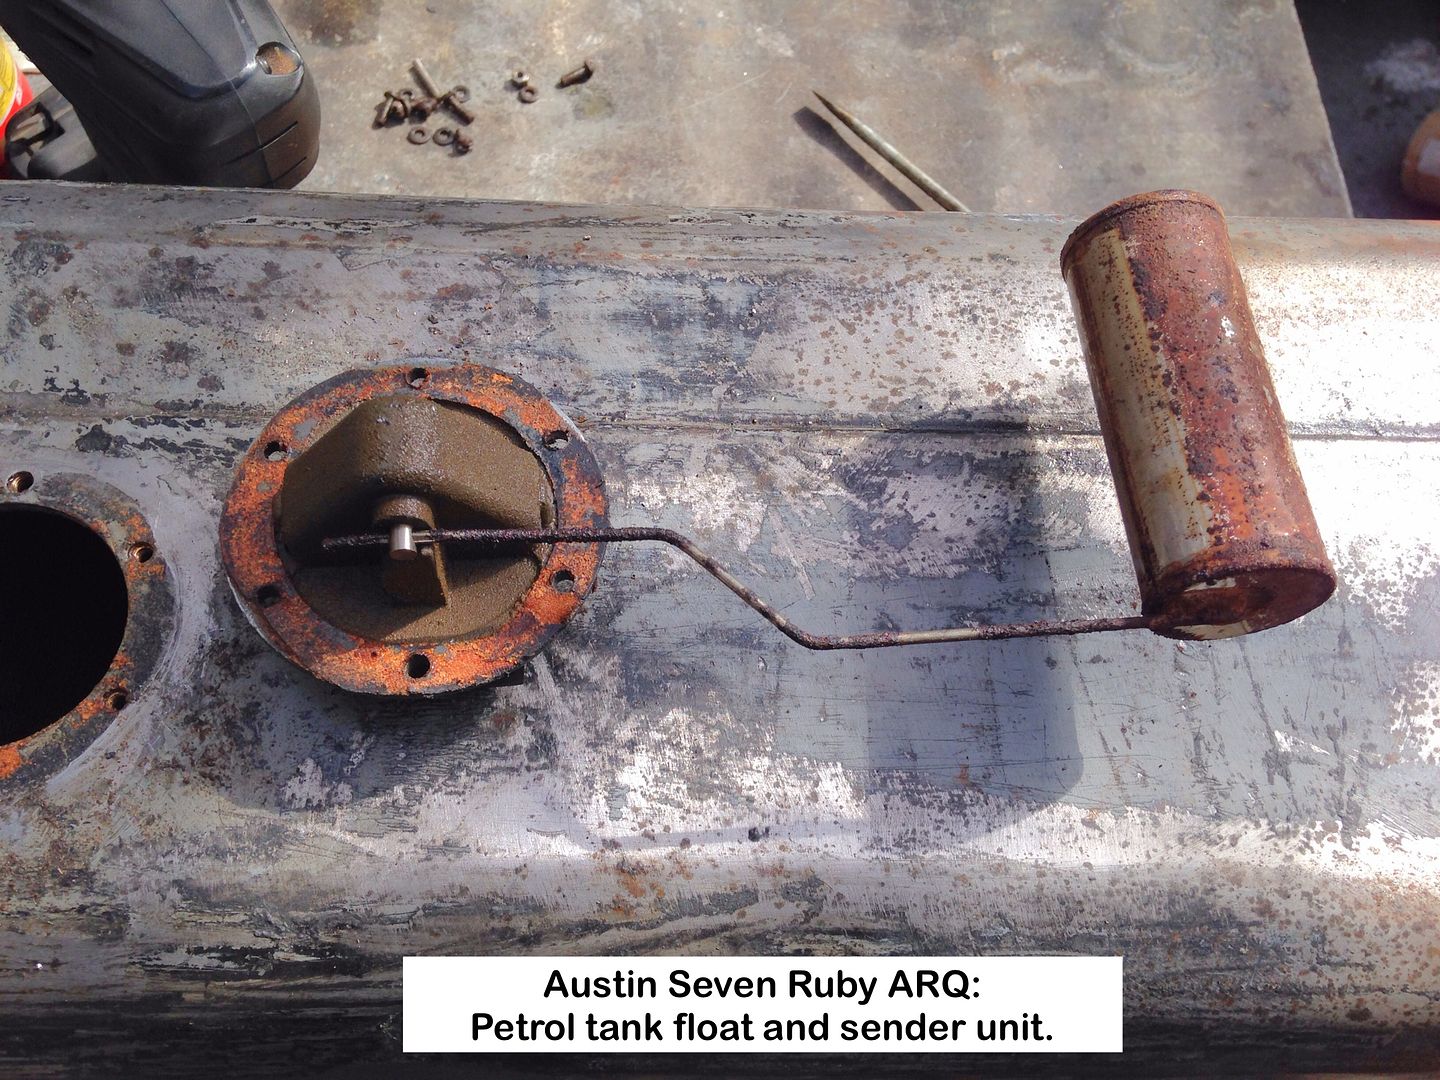
The heart of the sender section.
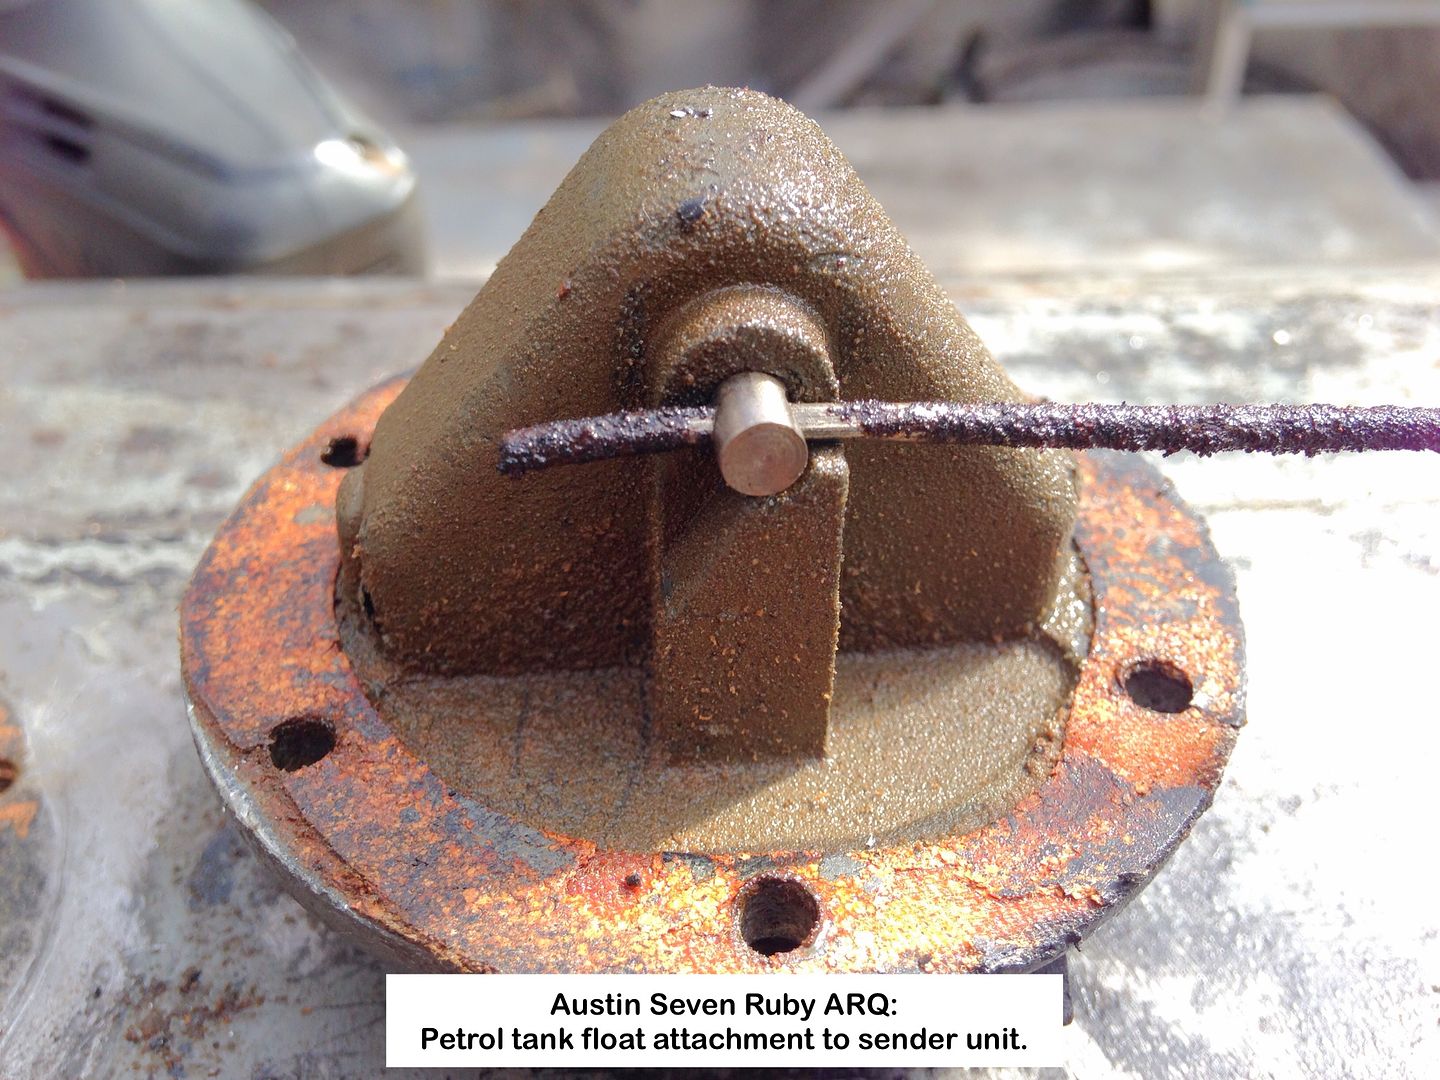
Attachment of the float to sender.
The gauze filter inside the tank has a piece missing, so no longer of any use.
Suggestions please on what to do with/best way to remove, the gauze plus how to deal with the two end baffles if using a tank sealer?
For the two baffled areas, I don't fancy cutting a hole in the top of each end, ala the sender unit.
Inside of the tank looks reasonable, but there is 'scale' in the filler pipe baffled end, but cannot see into the opposite end.
Geoff - Time to practice welding prior to Mud Wing repairs. |
|
| Back to top |
|
 |
MooiMeisie
Joined: 04 Jan 2010
Posts: 41
|
| Posted: Mon May 01, 2017 1:57 pm Post subject: Crushed glass |
|
|
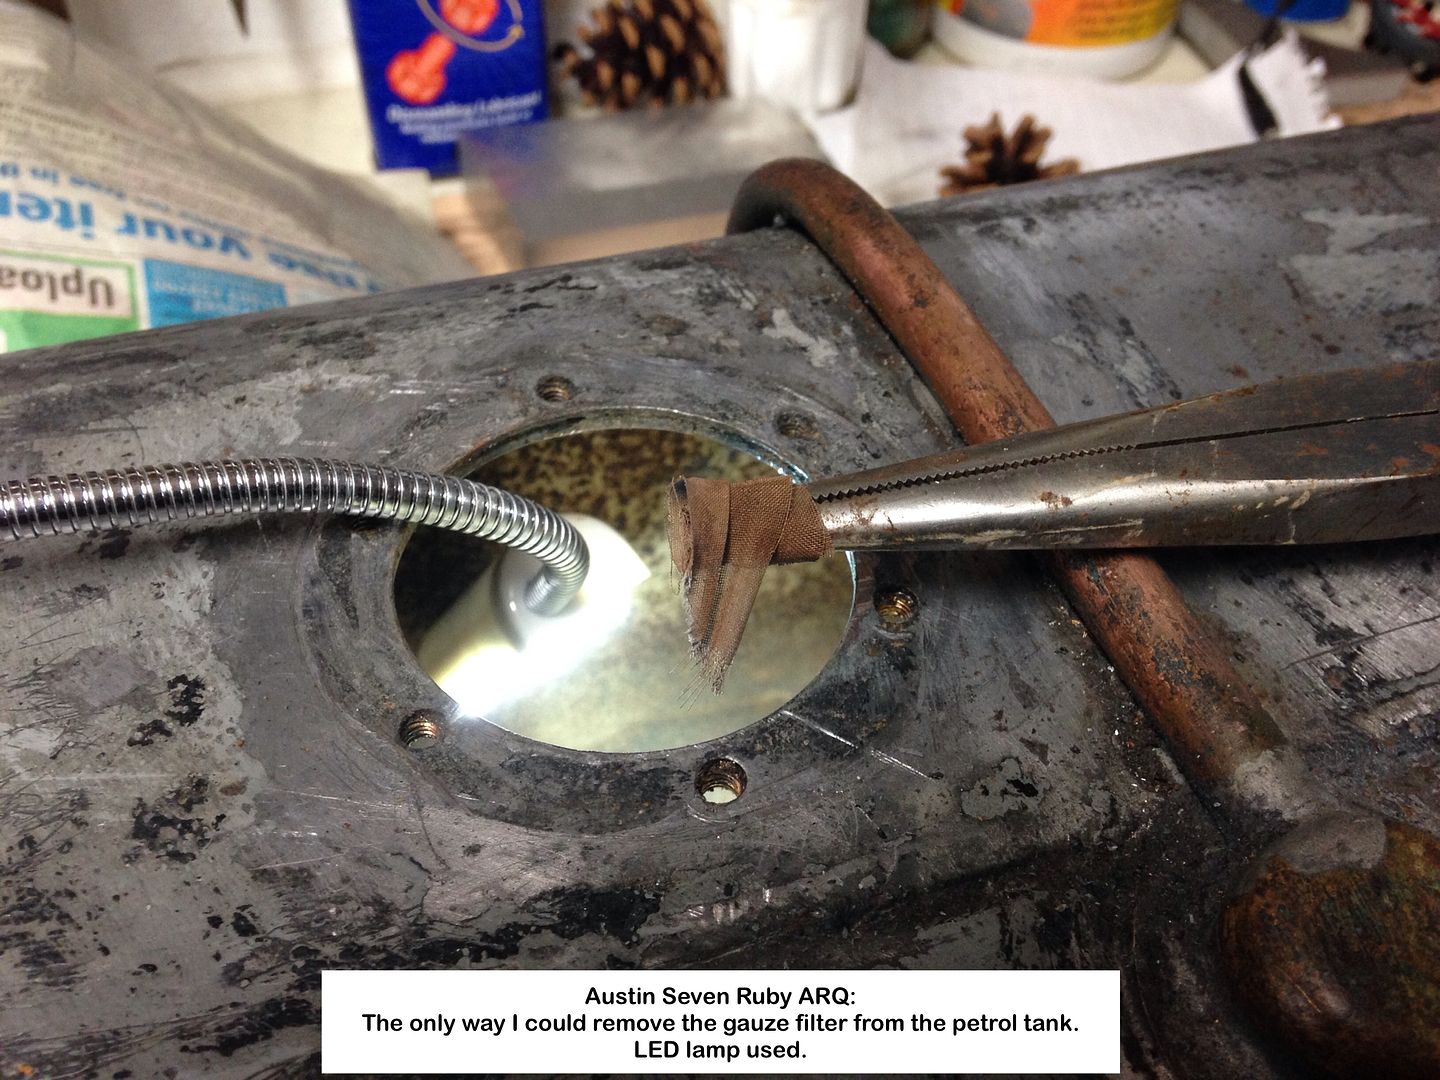
The petrol tank gauze filter was easy to remove, then painted.
A long nosed pair of pliers came to the rescue.

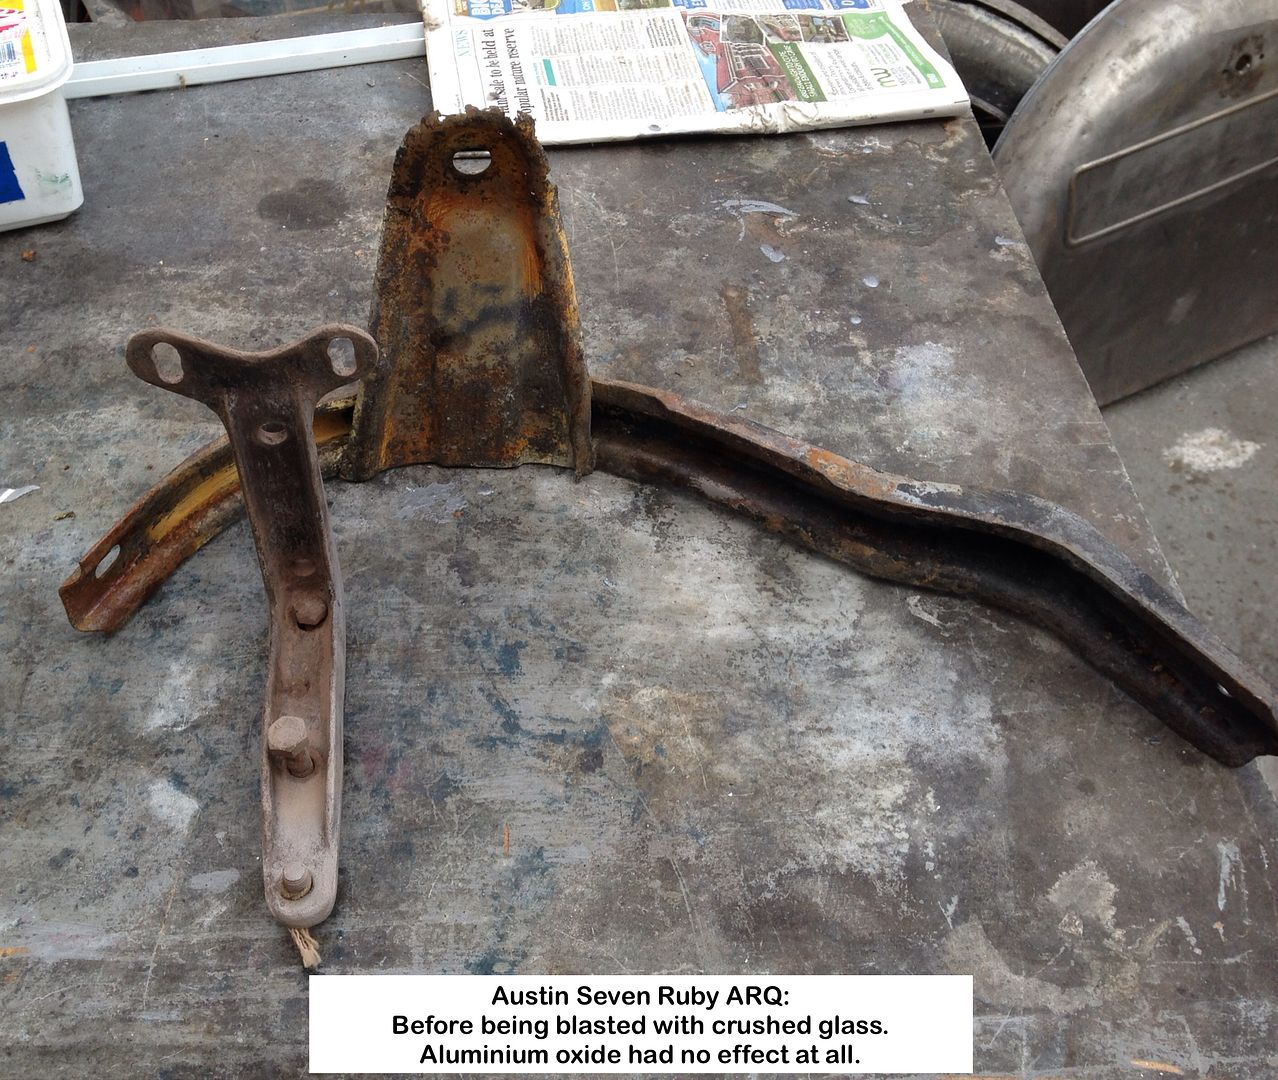
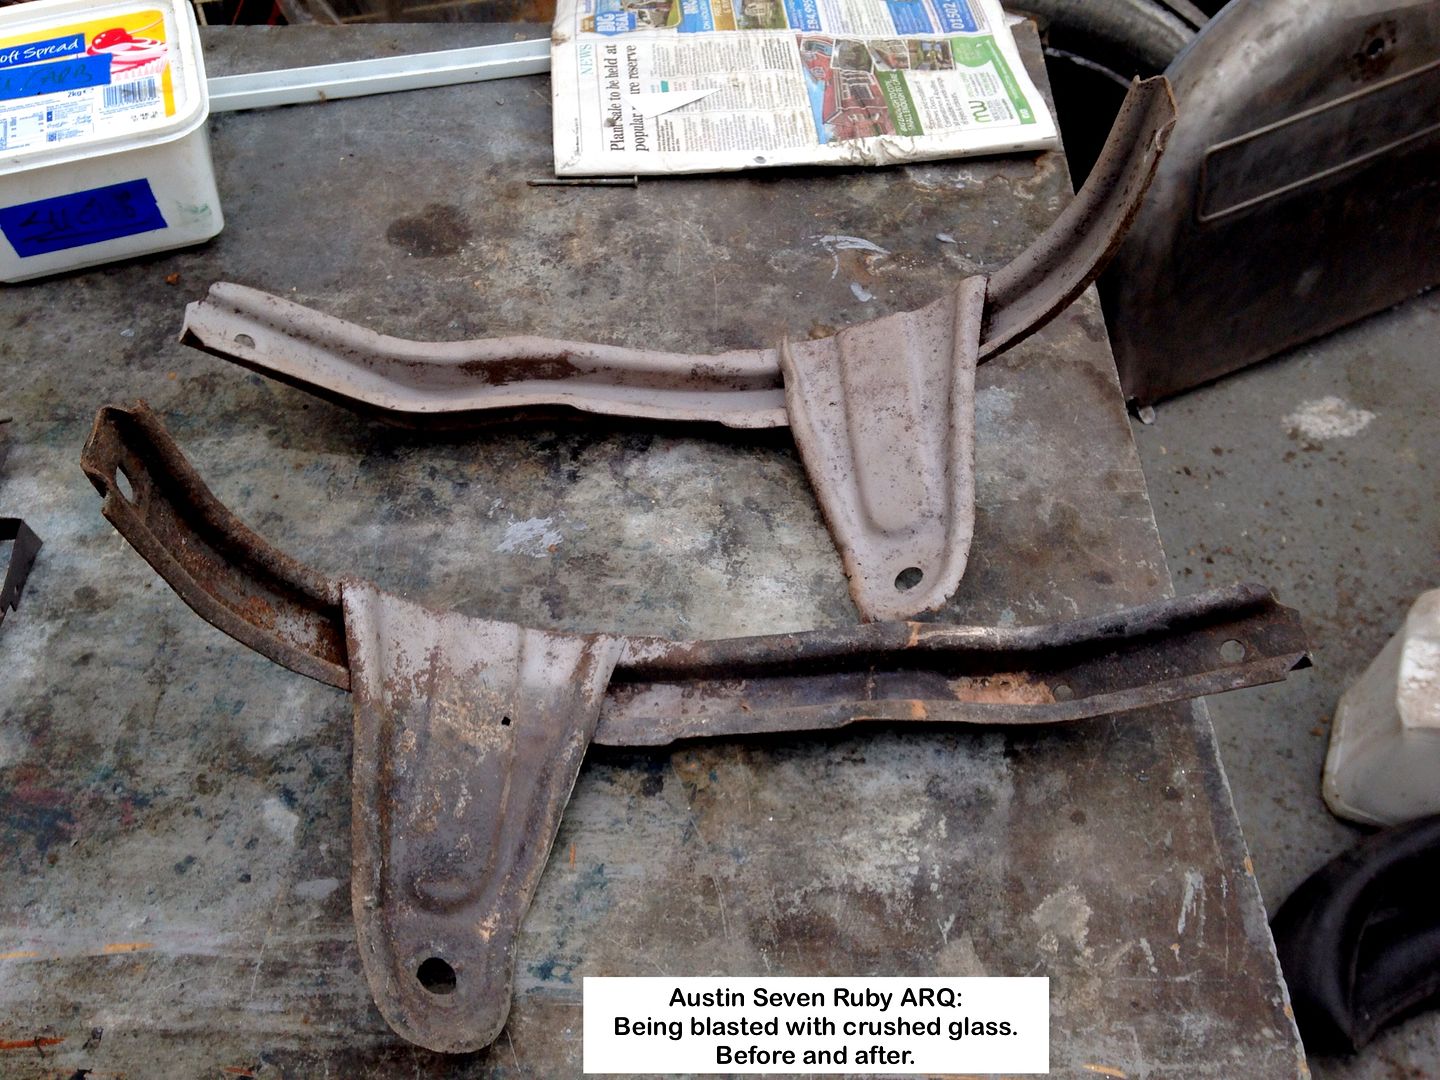
Crushed glass in the sandblaster.
Neither aluminium oxide nor twisted wire wheel, in L-grinder, had any effect on removing all the hard detritus on these front Mud Wing supports.
Someone on Facebook said he has had success using crushed glass, so I ordered a 25kg bag as nothing to loose.
Started with a 5mm nose piece on the gun, but soon changed to a 4mm, the smallest I had, and that was soon doing its job.
Needed a few passes on some areas, as that cr@p was well and truly stuck on.
Used the glass to do all the other parts, and there is far less 'dust' produced compared with the aluminium that needing the inside of the window cleared frequently, even with the SideBlastAir in operation.
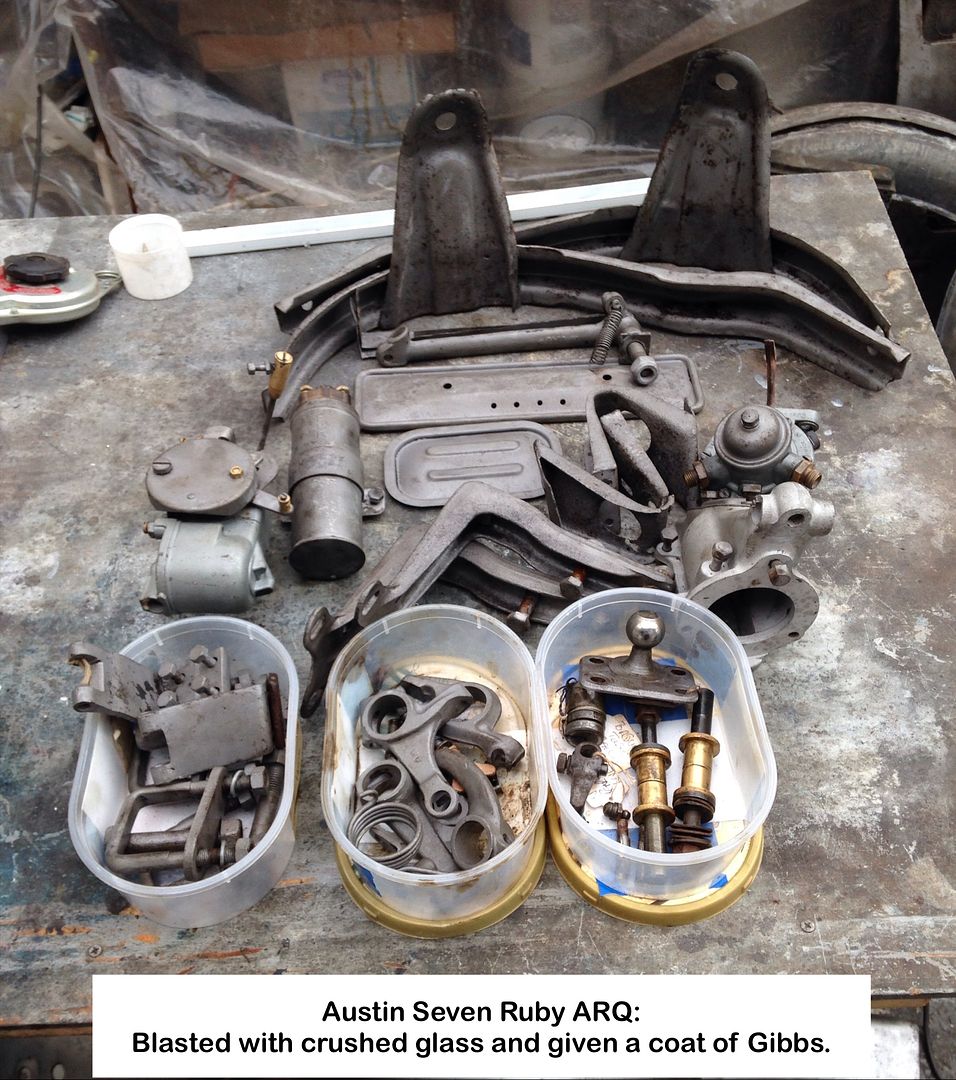
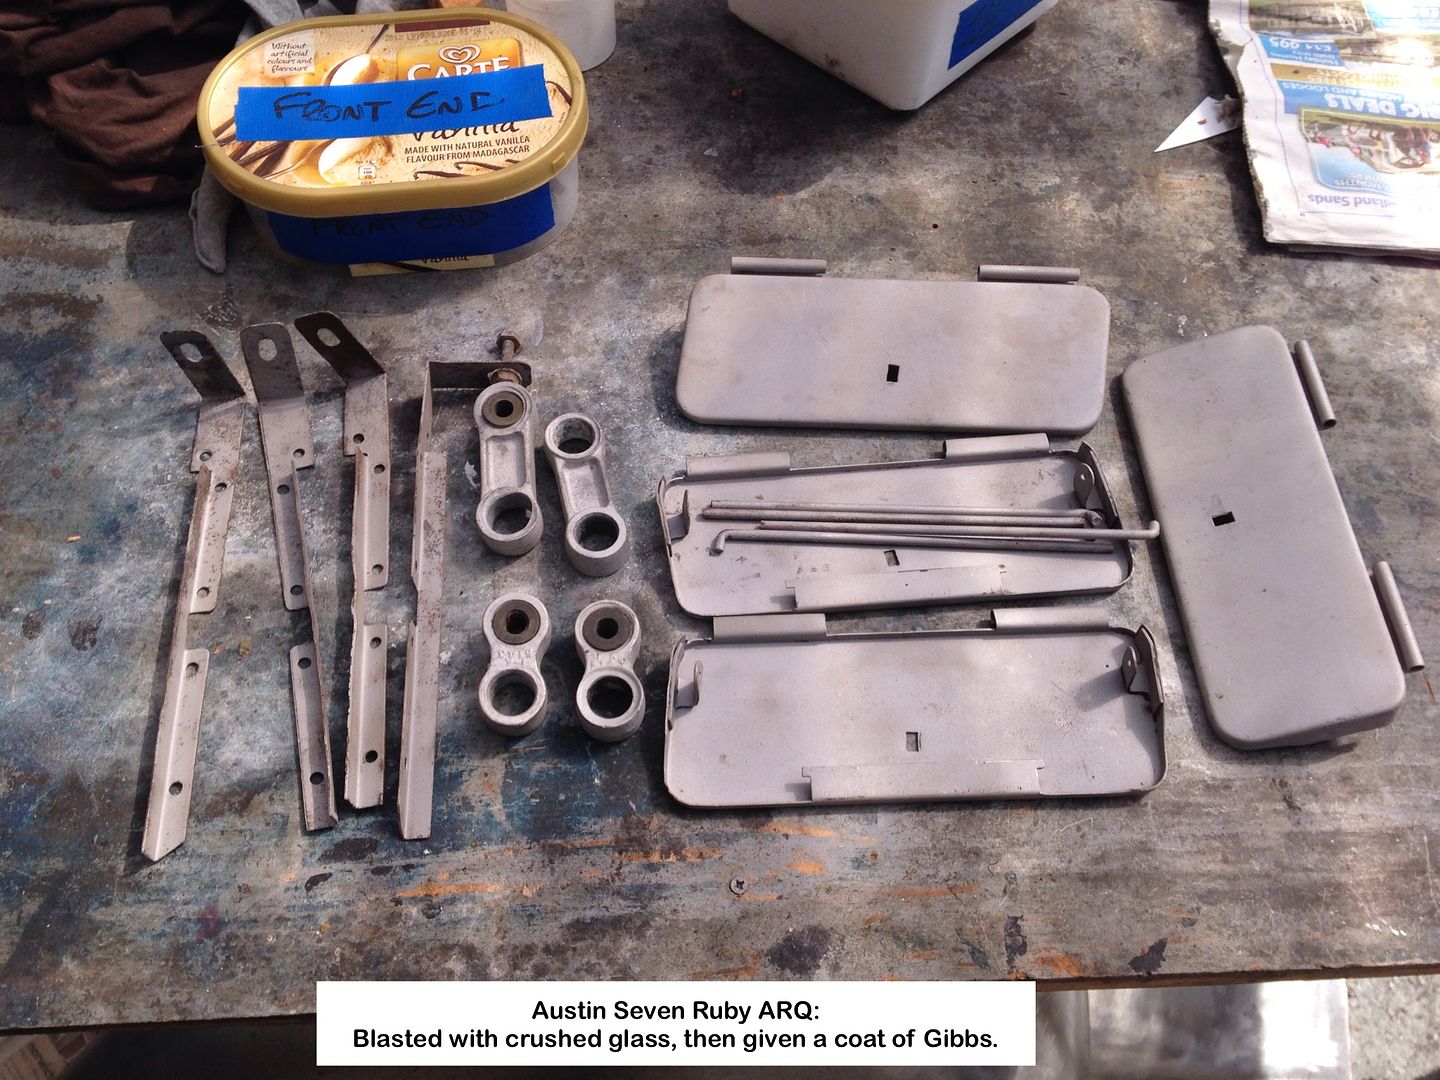
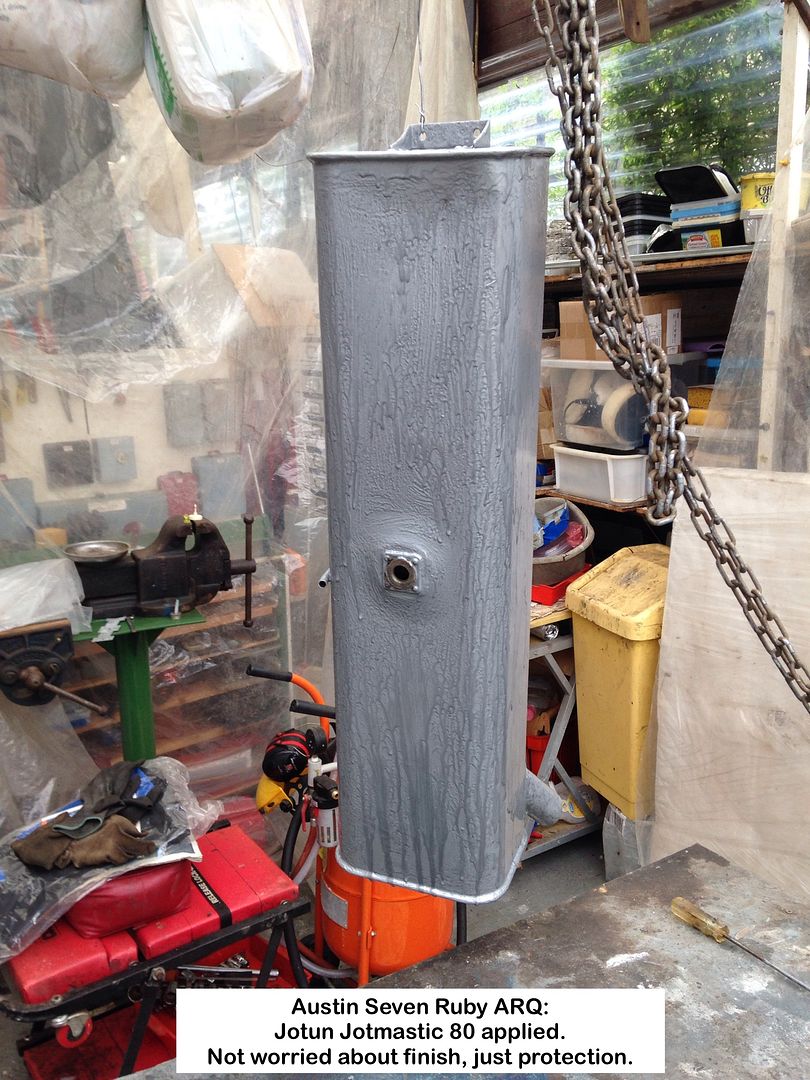
Everything I can think of has been sand/glassblasted and coated with Gibbs so now ready to repair the front Mud Wings and give them and small parts a trial coat of Zinga or zinc epoxy, then possibly Jotun Jotmastic 80 on the underside of the Mud Wings, but not sure.
Geoff - Small parts stored to make space for the Mud Wings? |
|
| Back to top |
|
|
MooiMeisie
Joined: 04 Jan 2010
Posts: 41
|
| Posted: Mon May 08, 2017 2:18 pm Post subject: I advise in metal bashing needed |
|
|
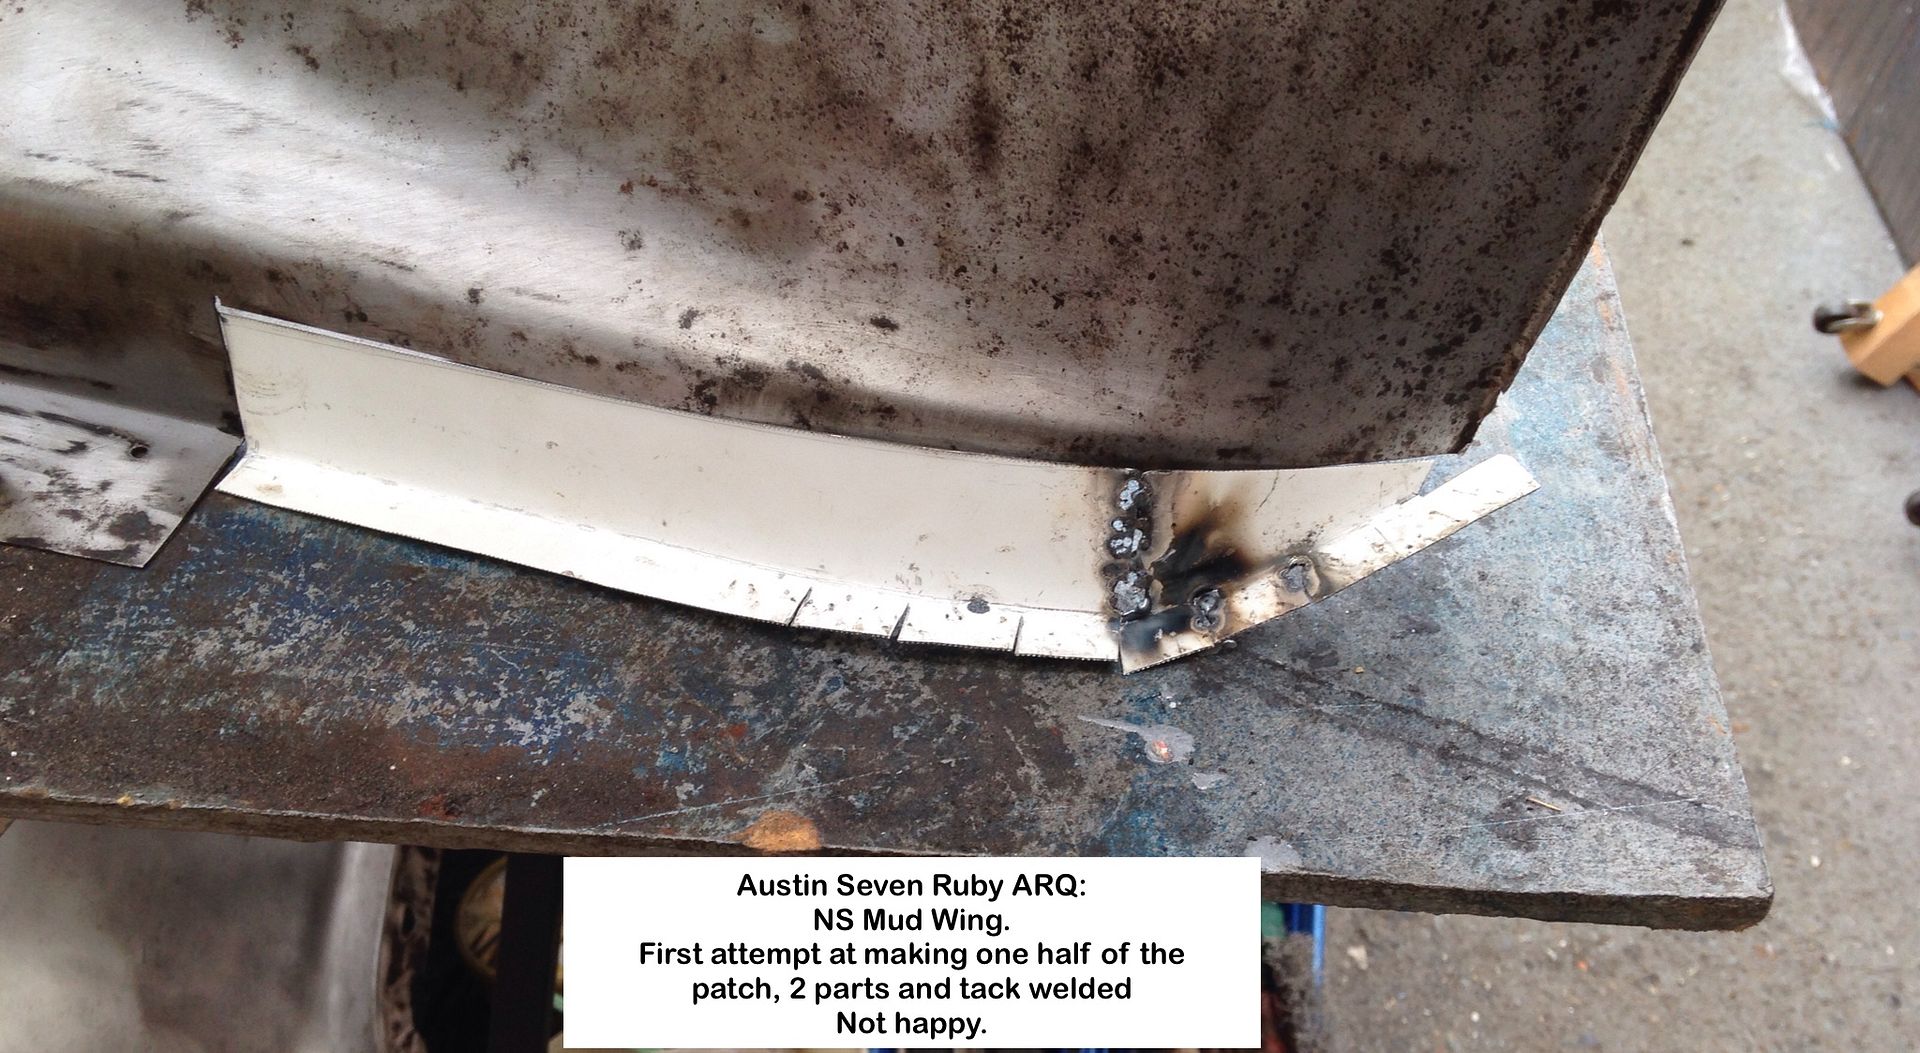
NS Mud Wing patch
Advise please on the best way to make this patch.
This is my first attempt at bodywork, and I experimented using 0.6mm sheet
Pretty pleased with it, BUT can/must do better.
A former and tin bashing?
Open to any suggestions.
Not sure where to split the part for easy welding.
My bender produces a bent very close to that from the Austin factory so don't need to make a new blade, with a different radius.
I am thinking of making short bends on the top curved section/s, split as per my experiment after a failed attempt to stretch the metal, and then welding the flat flange/s to them, but just had a thought, would 0.6mm sheet stretch enough?
I did mange to get a gentle curve only, after a few minutes with sharp end of hammer.
David Gardiner in his video Bodywork Restoration Tutorial makes stretching the metal look so frigging easy - Grrrr
Need to have another look at what he does, before I dive in again.
Trust me to start on this as a first attempt at tin bashing.
My late Dad is shaking his head right now, shouting "Get in with it, it's easy!"


Geoff - Spring!? |
|
| Back to top |
|
|
OuBallie
Joined: 02 Mar 2013
Posts: 225
Location: South Norfolk next to Suffolk
|
| Posted: Mon May 22, 2017 5:18 pm Post subject: MIG v TIG welds |
|
|
Been using the MIG to weld patches in the front Mud Shields (Wings) of the Seven.
Whenever I read about how hard MIG welds where in comparison to OA/TIG, I always thought 'How much harder can they be?'
It's 'Add your favourite AngloSaxon here' HARD that's what!
Couldn't believe it when I tried a file and it just skated over the blobs of MIG weld.
Used TIG to fill holes then ground the welds down and the difference in the quantity and type of spark produced was eye opening, with MIG winning hands down.
Photos to follow when done
Geoff - TIG from now on especially for panel work.
_________________
Too many hobbies, not enough time!
1935 Austin Seven Ruby ARQ
1957 Austin A35 2-door
1967 Morris Minor 2-door
2007 Fiat Doblò MultiJet (It carries the spares etc)
Model Engineering |
|
| Back to top |
|
|
Peter_L
Joined: 10 Apr 2008
Posts: 2680
Location: New Brunswick. Canada.
|
| Posted: Mon May 22, 2017 7:01 pm Post subject: |
|
|
Hi Geoff. This is comment is 100% after the horses have left, but it may be of use in future, or to others.
When I worked for the Water Authority (1970-80 UK) there were often times when maintenance was required to large tanks. Inspection plate bolts would sometimes shear off, as per your tank. If the bolts were not in blind holes, they would grind the bolt/stud level with the tank, drill and tap as large a thread as possible, but not all the way through, then screw in bolt and actually turn the seized bolt out the other side. The thinking behind this was that the threads on the inside of the tank were the ones preventing the stud from being removed. |
|
| Back to top |
|
|
OuBallie
Joined: 02 Mar 2013
Posts: 225
Location: South Norfolk next to Suffolk
|
| Posted: Tue May 23, 2017 10:33 am Post subject: |
|
|
Peter,
The bolts where too long and the ends had rusted as you suspected.
Not much room to do what you suggested with 3BA, but worth a try in the future if needed.
Geoff - TIG with hammer & dolly work today.
_________________
Too many hobbies, not enough time!
1935 Austin Seven Ruby ARQ
1957 Austin A35 2-door
1967 Morris Minor 2-door
2007 Fiat Doblò MultiJet (It carries the spares etc)
Model Engineering |
|
| Back to top |
|
|
OuBallie
Joined: 02 Mar 2013
Posts: 225
Location: South Norfolk next to Suffolk
|
| Posted: Mon Jul 03, 2017 12:50 pm Post subject: Been a while! |
|
|
Out of sequence, but had to post this before adding photos of the repairs to Mud Shields, modification to Running Boards to get the rubbers to fit, then giving them and other smaller parts a coat of 2k zinc primer.
Body rolled back into the Carport, only 4 months later than hoped for.
https://youtu.be/biPRxyVEV4M
Geoff - Can video be embedded into posts?
_________________
Too many hobbies, not enough time!
1935 Austin Seven Ruby ARQ
1957 Austin A35 2-door
1967 Morris Minor 2-door
2007 Fiat Doblò MultiJet (It carries the spares etc)
Model Engineering |
|
| Back to top |
|
|
OuBallie
Joined: 02 Mar 2013
Posts: 225
Location: South Norfolk next to Suffolk
|
| Posted: Tue Jul 04, 2017 1:39 pm Post subject: Update to my 3rd March 2017 post |
|
|
For some unknown reason I just could not get the video below to upload to either YouTube or Facebook and gave up after 5 attempts even using a different computer.
After the success with the body rolling into the Carport one, had another go last night and this morning found it was sipuccessful.
The AustinSevenCylinderBlockWhatsit in all its glory:
https://youtu.be/7r9bcJjc0b4
Geoff - Work started on the B-post.
_________________
Too many hobbies, not enough time!
1935 Austin Seven Ruby ARQ
1957 Austin A35 2-door
1967 Morris Minor 2-door
2007 Fiat Doblò MultiJet (It carries the spares etc)
Model Engineering |
|
| Back to top |
|
|
OuBallie
Joined: 02 Mar 2013
Posts: 225
Location: South Norfolk next to Suffolk
|
| Posted: Thu Aug 17, 2017 10:20 am Post subject: All work ground to a halt! |
|
|
On the 27th of last month, the bloody vice in the Workshop decided to attack me as I walked past it.
The handle was upright and my unzipped jumper snagged as I walked past.
My left foot had just touched the floor when my top half came to a sudden halt resulting in stretched tendons and sprained left foot as I tried to stop myself landing flat on my arse!
Doc said 4-6 weeks to recover.
A more serious problem with regards this Thread will be the inability of posting photos now that Photobucket has joined the Ransomware brigade.
Mine are only appearing now as I pay for extra storage and have been informed that it will cease when present contract ends.
http://www.austinsevenfriends.co.uk/forum/forumdisplay.php?fid=14
Austin Seven Friends have just launched their new forum that can load photos directly from computers.
Only one per post from iOS devices, however, due to ALL photos being stored with the same name, meaning multiple posts.
Geoff - Becoming thoroughly bored!
_________________
Too many hobbies, not enough time!
1935 Austin Seven Ruby ARQ
1957 Austin A35 2-door
1967 Morris Minor 2-door
2007 Fiat Doblò MultiJet (It carries the spares etc)
Model Engineering |
|
| Back to top |
|
|
OuBallie
Joined: 02 Mar 2013
Posts: 225
Location: South Norfolk next to Suffolk
|
| Posted: Fri Sep 29, 2017 11:57 am Post subject: Two months sitting on @arse most frustrating! |
|
|
AustinSevenCylinderBlockWhatItUpdate
Geoff - Body bolted to Tilter/Rotisserie ready for next video.[/url]
_________________
Too many hobbies, not enough time!
1935 Austin Seven Ruby ARQ
1957 Austin A35 2-door
1967 Morris Minor 2-door
2007 Fiat Doblò MultiJet (It carries the spares etc)
Model Engineering |
|
| Back to top |
|
|
OuBallie
Joined: 02 Mar 2013
Posts: 225
Location: South Norfolk next to Suffolk
|
| Posted: Wed Oct 11, 2017 9:59 am Post subject: Ruby body bolted to the rotisserie |
|
|
It's only two and a half months late due to my mishap that injured my left foot, but at least now have good access to do work on the body.
https://youtu.be/EMwehgSkRhc
Geoff - Now the heating boiler needs replacing!
_________________
Too many hobbies, not enough time!
1935 Austin Seven Ruby ARQ
1957 Austin A35 2-door
1967 Morris Minor 2-door
2007 Fiat Doblò MultiJet (It carries the spares etc)
Model Engineering |
|
| Back to top |
|
|
Andrew1954
Joined: 16 Nov 2017
Posts: 3
Location: North Yorkshire
|
| Posted: Thu Nov 16, 2017 9:10 pm Post subject: |
|
|
Hello Geoff, I've just joined this forum and who do I find but you, again. Today I've been shaping some of those odd patches to repair the wings, or are they mudguards.
_________________
1934 Austin seven
1955 Austin Cambridge |
|
| Back to top |
|
|
OuBallie
Joined: 02 Mar 2013
Posts: 225
Location: South Norfolk next to Suffolk
|
| Posted: Mon Nov 20, 2017 1:08 pm Post subject: I'm everywhere! |
|
|
Cannot get away from me Andrew1954.
I describe them as Mud Wings, having seen that term used in an old Austin publication I think.
Updates:
Work started on the NS B-post and inner wheel arch:
https://youtu.be/SmSvyRa-up4
Old cylinder block partly sliced to find out how much material there is, before I start grinding away on the Ruby's ports:
https://youtu.be/ZCuYpuxgVbo
I now have a later block to slice through, once I get the replacement 10/14blade, the 24tpi was too fine and took ages to cut through.
All work halted due to it being rather nippy in the Carport, and not helped with 20 year old central heating boiler on the blink and certifies too old to repair.
Trouble is it only works occasionally when the gas is ignited every other 3/4 days, but the fan working perfectly.
Geoff - Need to find a Keston 50 expert.
_________________
Too many hobbies, not enough time!
1935 Austin Seven Ruby ARQ
1957 Austin A35 2-door
1967 Morris Minor 2-door
2007 Fiat Doblò MultiJet (It carries the spares etc)
Model Engineering |
|
| Back to top |
|
|
OuBallie
Joined: 02 Mar 2013
Posts: 225
Location: South Norfolk next to Suffolk
|
| Posted: Sat Sep 22, 2018 12:45 pm Post subject: Where has the time gone! |
|
|
Cannot believe it's been nearly a year since my last post, thanks to Photobucket and then health problems.
Have now, with luck, uploaded all photos to Dlickr so will start preparing a post using the Notes App on the iPad, starting with the MudShields.
I use that App to save any suggestions and details on the cars for future reference.
Did use Dropbox until it 'lost' a lot when I synced between phone and pad so that is now history.
Notes syncing is seamless and automatic.
Just don't hold collective breathes!
Geoff - I will not be held responsible 
_________________
Too many hobbies, not enough time!
1935 Austin Seven Ruby ARQ
1957 Austin A35 2-door
1967 Morris Minor 2-door
2007 Fiat Doblò MultiJet (It carries the spares etc)
Model Engineering |
|
| Back to top |
|
|
OuBallie
Joined: 02 Mar 2013
Posts: 225
Location: South Norfolk next to Suffolk
|
| Posted: Sat Sep 22, 2018 2:14 pm Post subject: |
|
|
no luck using iPad as all I get is a single line link ala
https://www.flickr.com/gp/134244830@N02/Y33s6X
and Google no better either!
Geoff - Will try the desktop
_________________
Too many hobbies, not enough time!
1935 Austin Seven Ruby ARQ
1957 Austin A35 2-door
1967 Morris Minor 2-door
2007 Fiat Doblò MultiJet (It carries the spares etc)
Model Engineering |
|
| Back to top |
|
|
|
|
You cannot post new topics in this forum
You cannot reply to topics in this forum
You cannot edit your posts in this forum
You cannot delete your posts in this forum
You cannot vote in polls in this forum
|
php BB powered © php BB Grp.
|


