
Classic cars forum & vehicle restoration.
|
|
| Author |
Message |
D4B

Joined: 28 Dec 2010
Posts: 2083
Location: Hampshire UK
|
 Posted: Tue Aug 05, 2014 3:56 pm Post subject: Posted: Tue Aug 05, 2014 3:56 pm Post subject: |
 |
|
Still at it Peter, must be nearly there now though?
 |
|
| Back to top |
|
 |
colwyn500
Joined: 21 Oct 2012
Posts: 1745
Location: Nairn, Scotland
|
| Posted: Tue Aug 05, 2014 4:08 pm Post subject: |
|
|
| D4B wrote: | Still at it Peter, must be nearly there now though?
|
Nearly, nearly Steve but still not near enough.
After the foregoing regarding the door windows I referred to Tony's wisdom:
http://www.oldclassiccar.co.uk/forum/phpbb/phpBB2/viewtopic.php?t=14089&postdays=0&postorder=asc&start=210
and indeed he is right; the alloy trims need to be at least part fitted first.
Still, I managed it after loosening the quarterlight. The thing is that I find that item really hard to fit and the winding window obstructs it so it has to go in ASAP.
One door done anyway and another myriad of little jobs that go really slowly...  |
|
| Back to top |
|
|
D4B
Joined: 28 Dec 2010
Posts: 2083
Location: Hampshire UK
|
| Posted: Tue Aug 05, 2014 5:47 pm Post subject: |
|
|
Yes I remember refitting all the trims and glass in my splitscreen VW
Bus was the most tedious part..... |
|
| Back to top |
|
|
kevin2306
Joined: 01 Jul 2013
Posts: 1359
Location: nr Llangollen, north wales
|
| Posted: Tue Aug 05, 2014 5:54 pm Post subject: |
|
|
The new quarter light seals were the worst part to fit on my Singer!
Ended up fitting them as best I could then leaving them for a few months to 'relax' in the aperture with the glass shut tight. Took a good few months before they eventually popped into place!
Kev |
|
| Back to top |
|
|
vitesse
Joined: 03 Jun 2013
Posts: 561
|
| Posted: Tue Aug 05, 2014 8:44 pm Post subject: |
|
|
| colwyn500 wrote: | | D4B wrote: | Still at it Peter, must be nearly there now though?
|
Nearly, nearly Steve but still not near enough.
After the foregoing regarding the door windows I referred to Tony's wisdom:
http://www.oldclassiccar.co.uk/forum/phpbb/phpBB2/viewtopic.php?t=14089&postdays=0&postorder=asc&start=210
and indeed he is right; the alloy trims need to be at least part fitted first.
Still, I managed it after loosening the quarterlight. The thing is that I find that item really hard to fit and the winding window obstructs it so it has to go in ASAP.
One door done anyway and another myriad of little jobs that go really slowly... |
Yeah it is a pig of a job getting those alloy trims in. As I guess you have found out, you need to get the quarter light to angle backwards to allow the trim to fit behind the rivet and the bit where the latch locks onto the frame but the winding window gets in the way when trying to get the quarter light back far enough.
It is one of those jobs that frustrate you so much at times that you just have to walk away and have a break otherwise you will end up breaking something.
But Murphio is looking good not far off now.  |
|
| Back to top |
|
|
vitesse
Joined: 03 Jun 2013
Posts: 561
|
| Posted: Tue Aug 05, 2014 8:53 pm Post subject: |
|
|
| colwyn500 wrote: | I have stalled slightly on the electrics. Simple as they are on this car, there are several conflicting wiring diagrams and the the slight modifications that were needed to make them in right hand drive and to UK lighting regulations means that unravelling it all has been a puzzle.
I have actually removed a couple of "redundant"? wires that might never have been used.
This is the state of the front locker now as I have just about eliminated all the glitsches apart from the horn earthing.
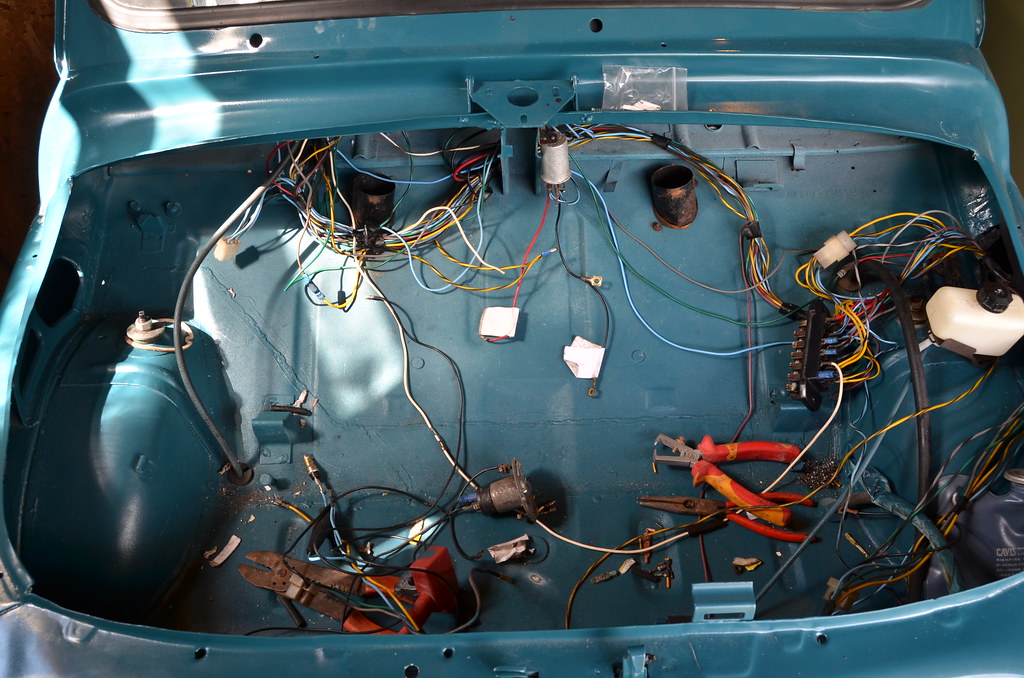 BRA_7510 by peterthompson, on Flickr BRA_7510 by peterthompson, on Flickr
Amazingly, the flasher unit, fusebox and switches all still work. Who said Italian electrics were naff?
I am still waiting for a few bits and pieces, ordered over a week ago, that should move things on quite quicky. |
In the centre of your picture Peter. The black wire the connects to the top of the fuel sender. Just up from the end of it is another eye connector, that connects to the screw that mounts the flasher unit to the bracket on the body. It took me ages to find out why my wipers wouldn't work and it is because that is also the wiper motor earth. It's not in any of the wiring diagrams I have.
Any other wiring probs you have. Just ask as I am sure I have come across them.
Tony |
|
| Back to top |
|
|
colwyn500
Joined: 21 Oct 2012
Posts: 1745
Location: Nairn, Scotland
|
| Posted: Tue Aug 05, 2014 10:08 pm Post subject: |
|
|
Thanks for that Tony. One thing I did wonder. Is yours wired up for parking lights? I get the impression you should be able to turn these on by putting sidelights on without first turning on the master switch.
Is that correct? |
|
| Back to top |
|
|
vitesse
Joined: 03 Jun 2013
Posts: 561
|
| Posted: Tue Aug 05, 2014 10:33 pm Post subject: |
|
|
| colwyn500 wrote: | Thanks for that Tony. One thing I did wonder. Is yours wired up for parking lights? I get the impression you should be able to turn these on by putting sidelights on without first turning on the master switch.
Is that correct? |
Just been to have a look. Sort of if I understand your question? If you try the master toggle switch on the dash with the ignition in the off position you get no lights. If you turn the ignition key one turn back anti-clockwise from the off position , so normally 12 o'clock, you can pull the ignition key out and switch your lights on from the toggle. In fact on mine I can have side lights, dipped or main. Don't know if that is normal.
I found this on a website someone mentioned on the Fiat forum. It appears to be the correct wiring diagram for both of our cars. It's in Italian but you can fathom out what's what.
http://www.passione500.it/download/schema%20impianto/Schema%20elettrico%20500%20F%202%20serie.pdf |
|
| Back to top |
|
|
colwyn500
Joined: 21 Oct 2012
Posts: 1745
Location: Nairn, Scotland
|
| Posted: Tue Aug 05, 2014 10:48 pm Post subject: |
|
|
| Excellent explanation and link. Thanks Tony. |
|
| Back to top |
|
|
colwyn500
Joined: 21 Oct 2012
Posts: 1745
Location: Nairn, Scotland
|
| Posted: Tue Aug 05, 2014 11:00 pm Post subject: |
|
|
| PS. That's the one! Brilliant wiring diagram all the right colours. |
|
| Back to top |
|
|
colwyn500
Joined: 21 Oct 2012
Posts: 1745
Location: Nairn, Scotland
|
| Posted: Tue Aug 12, 2014 8:53 pm Post subject: |
|
|
peterjthompson/14712842420/]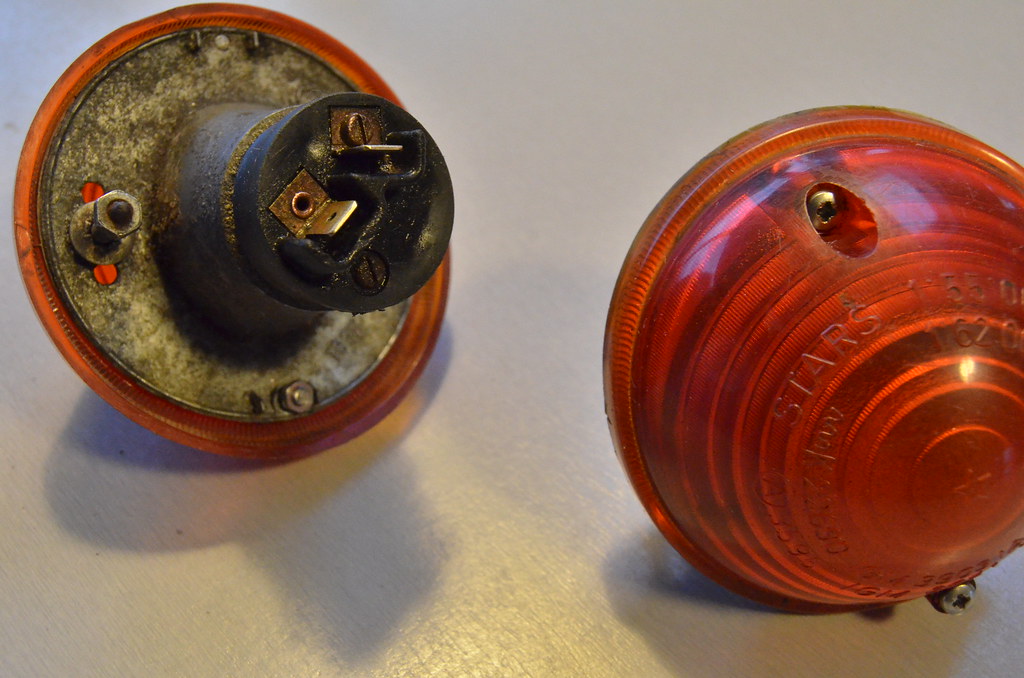 [/url] [/url]
BRA_7757 by peterthompson, on Flickr
We've been away with grandkids so I had to leave lots of little jobs hanging. The front indicators are like something off a Dalek and have a very complex profile to match the shape of the wing. One of the M3 screws snapped and I wanted to avoid the risk of buying modern replacements which are temptingly cheap. I bought some stainless screws and nuts from Halfords and cut down to length, drilling through the seized one and using the nut with the bolt. All the important parts and the visible bits got a quick shine-up and there we have it....more conservation. |
|
| Back to top |
|
|
colwyn500
Joined: 21 Oct 2012
Posts: 1745
Location: Nairn, Scotland
|
| Posted: Tue Aug 12, 2014 10:34 pm Post subject: |
|
|
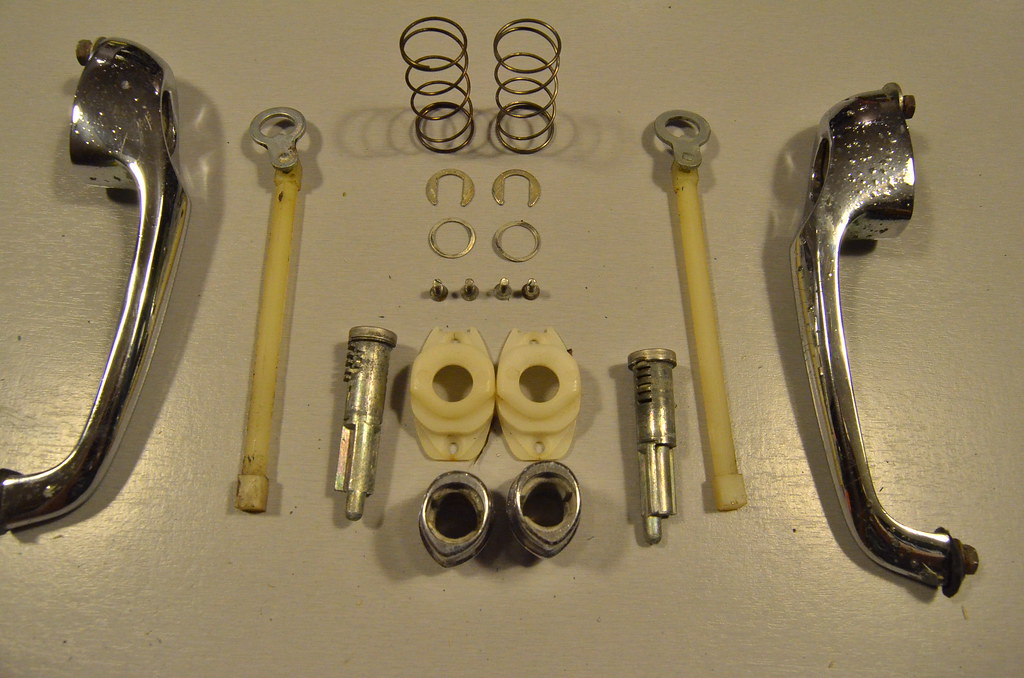
BRA_7758
I've sent off for some keys for the door locks as none came with the car. To do this I needed the lock number from the barrel. This is what you find inside the handle. A dip in degreaser and clean grease makes them operate smoothly; but the keys haven"t arrived yet. |
|
| Back to top |
|
|
colwyn500
Joined: 21 Oct 2012
Posts: 1745
Location: Nairn, Scotland
|
| Posted: Wed Aug 13, 2014 5:20 pm Post subject: |
|
|

Last edited by colwyn500 on Wed Aug 13, 2014 5:25 pm; edited 2 times in total |
|
| Back to top |
|
|
colwyn500
Joined: 21 Oct 2012
Posts: 1745
Location: Nairn, Scotland
|
| Posted: Wed Aug 13, 2014 5:23 pm Post subject: |
|
|
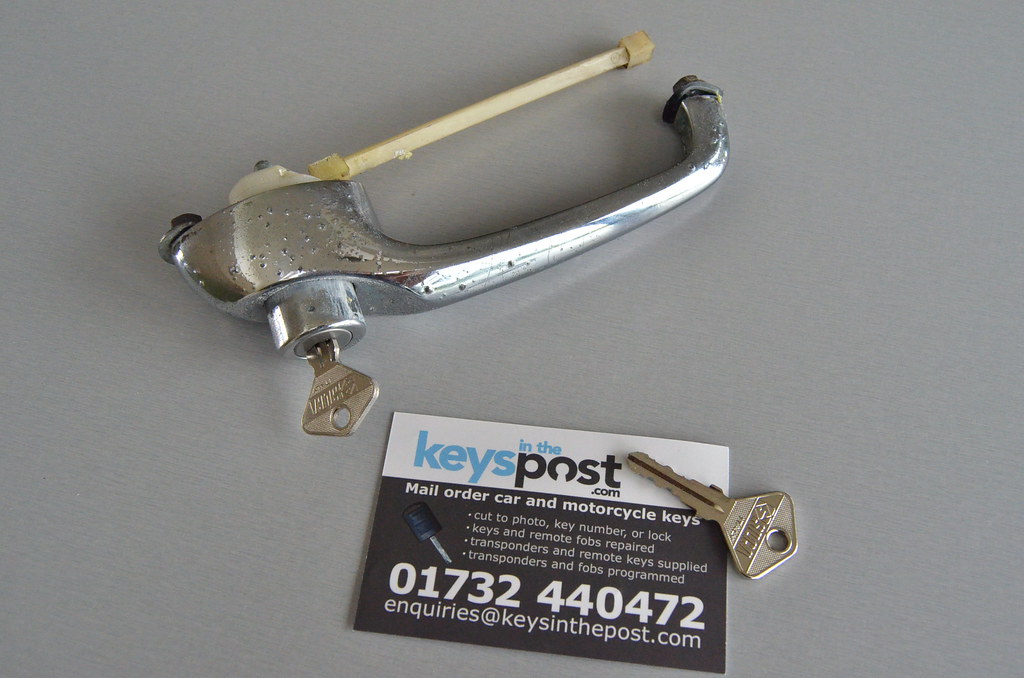
BRA_7759 by peterthompson, on Flickr
New keys arrived. Perfect fit. Delighted.
Rick, feel free to delete but I have no link with the supplier but think it might be very useful to others, whether keys lost, missing or worn. |
|
| Back to top |
|
|
colwyn500
Joined: 21 Oct 2012
Posts: 1745
Location: Nairn, Scotland
|
| Posted: Sat Aug 16, 2014 8:53 pm Post subject: |
|
|
No photos but just an update for anyone still looking. Been a bit busy with family commitments so things are tantalisingly close but progress is slow.
I dismantled and rebuilt the wiper assembly and fitted it nervously since the entire bodywork into which it fits has been rebuilt, including me drilling the wiper holes; it worked first time.
I had planned to get new wheel discs which are old fashioned shiny things, but as they are made of stainless steel they are coming up a treat with just soap and water.
The whole car is starting to look, like a reality to be ready for September.  |
|
| Back to top |
|
|
|
|
You cannot post new topics in this forum
You cannot reply to topics in this forum
You cannot edit your posts in this forum
You cannot delete your posts in this forum
You cannot vote in polls in this forum
|
php BB powered © php BB Grp.
|


