|
|

|
| See Homepage. | This page: Checking the spark plugs in a car engine |
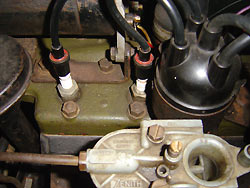
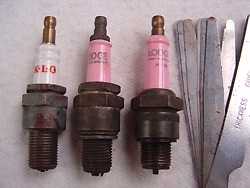
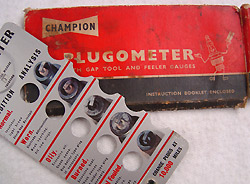
Checking the sparkplugs.How to remove and check the spark plugs.Please note: All advice on Old Classic Car is just that, advice. If you have any doubts about your own abilities when it comes to working on your car, I'd recommend getting hands-on advice & help from someone who is used to working on old cars. I can't accept any responsibility for mistakes you make, or things being damaged as a result of your working on a car after having read articles on this site. If in doubt, check with a marque expert first. You can find contacts for owners clubs in the club directory (see homepage).Checking an engine's spark plugs is a straightforward task, so long as a little care is exercised and the correct tools used. Accessibility can be a problem on some cars, so a certain amount of dismantling may be required in order to access the sparking plugs. A correct plug spanner, usually found in a quality socket set, is the best choice when removing a plug, its rubber internals protecting the vulnerable white insulator of the plug body. If you haven't got a decent plug socket, next best is a traditional box spanner, although these don't usually have the rubber insert. Adjustable spanners or open ended spanners are not really suitable, and could damage the plug. You can also damage yourself if an open-ended spanner slips while you're heaving on it. Before removing the plug, you'll need to disconnect the HT (High Tension) lead that runs from the top of the distributor. Don't grab this lead with the engine running, or do anything else with your spark plugs until the engine has been switched off, and allowed to cool down. I'd recommend removing just one plug at a time, checking it, then re-fitting before moving on to the next one, so that there is no chance of the leads being re-fitted in the wrong order! When loosening the plug always keep the socket square onto it, never go in at an angle as again, the insulation could easily be cracked, rendering the spark plug useless. Most classics of recent times have non-detachable plugs - ie they cannot be stripped and cleaned once removed from the engine. Some vintage machines however were fitted with detachable plugs, that could be disassembled once removed and cleaned thoroughly. Once loose, the plug can be unscrewed by hand, don't forget to keep the washer if there is one! The plug can now be assessed (it can tell you a lot about the tune of the engine in general) and cleaned. The best way to clean a plug is by gently blasting it with a fine grit in a purpose-built spark plug cleaning machine. However most of us don't have such a machine, so a reasonable result can be obtained with careful and sparing use of a wire brush, and fine emery paper. Before cleaning, take a look at the plug electrode. The colour will tell you a lot about the tune of the engine. A sooty black (dry) plug suggests a rich mixture, whereas black and wet with fuel suggests that the plug isn't firing. An overly grey/white appearance would suggest that the mixture is a little lean. A rusty plug suggests that no fuel is entering that cylinder, and there could be a hint of water in there somewhere. The ideal colour is a mid grey/brown hue. With the plug on the workbench, now is the time to check and adjust the gap if required. Feeler gauges are available in both imperial and metric measurements so there's no reason why this cannot be done with some level of accuracy. A factory handbook or manual will advise on what the gap should be, usually measured in thousandths of an inch. Plug electrodes can vary slightly between different makes of plug, and some have more than one electrode, as with those in the photo alongside. For simplicity I'll assume that the plug has a single central electrode. With the correct feeler gauge selected, it should slide into the plug gap with a slight interference fit - ie rubbing either electrode closely, but not enough to deny entry of the feeler gauge. If the gap needs adjusting, the outer electrode will need bending out, or pressing closer in to the central electrode, although great care must be taken not to damage either contact. Make very slight adjustments to the gap, and re-measure. Better to do lots of small adjustments, than try to do it in one go and damage something. I find mounting the plug in the jaws of a vice (don't grip onto the insulator - only clamp to the hexagonal metal section used to tighten and loosen the plug) makes this job easier. If you don't have a feeler gauge, an accurate job can be done using fine wire. Wire gauges are measured thus: 25 SWG = 20 thou, 24 SWG = 22 thou, 23 SWG = 24 thou, 22 SWG = 28 thou, 21 SWG = 32 thou, 20 SWG = 36 thou, 19 SWG = 40 thou, 18 SWG = 48 thousandths. When re-fitting the plugs (don't forget the washer if it has one!), start them off by hand rather than in the socket spanner, as this reduces the chance of crossing a thread in the engine. If the washer is flattened, best get a fresh one. Tighten up by hand as much as possible, then tweak up using the correct spanner. Your handbook may contain details of what torque to tighten the plugs up to - especially important if you have an alloy cylinder head, so you might want to have a torque wrench to hand. Re-connect the HT lead, and move onto the next spark plug. The HT lead should be a firm close fit to the top of the plug. If it is a loose fit, a gentle crimp with some pliers may just improve the connector's fit, although if the plug cap is a solid plastic job, you'll need to tweak the brass contact inside using long nose pliers, taking care not to damage the plastic outer cap. As ever, If you're not confident in what you're doing, seek advice from a competent mechanic before venturing under the bonnet of your car. I also recommend that you have a look at the factory issued manual or handbook for your car before starting work, in case there are any peculiarities specific to your car that need to be taken into account when working on it. Go back to the looking after your car section of oldclassiccar.co.uk |

|
|

Custom Search
|
 |
| Old Classic Car (C) R. Jones 2026. Content not to be reproduced elsewhere. |
| Website by ableweb. |
| Privacy Policy, Cookies & Disclaimers |