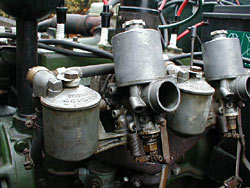
Original twin MC2 SU carburettors fitted to a Ford special, with the earlier type of mechanical linkages.
|
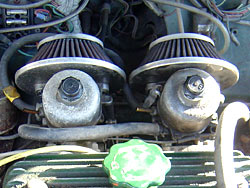
This shot shows a pair of late 1.75" carbs fitted to an MG Metro engine, fitted under a Mini's bonnet. The mixture adjustment is different on these carbs when compared to the earlier type with brass adjusting nut underneath.
|
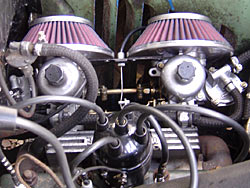
Re-manufactured twin SU carbs fitted to a new Aquaplane manifold on this sidevalve Ford
|
Advice on tuning twin SU carburettor setups from scratch.
Please note: All advice on Old Classic Car is just that, advice. If you have any doubts about your own abilities when it comes to working on your car, I'd recommend getting hands-on advice & help from someone who is used to working on old cars. I can't accept any responsibility for mistakes you make, or things being damaged as a result of your working on a car after having read articles on this site. If in doubt, check with a marque expert first. You can find contacts for owners clubs in the club directory (see homepage).
The advice on this page first appeared in a forum thread that I started on the subject of setting up a new pair of SU carbs from scratch. If you have any further comments on tuning SU carburettors, by all means join in on the site forum.
Tips on setting up these popular carb installations
The car I owned at the time had recently been fitted with a brand spanking new pair of SU carburettors. Annoyingly the engine was a pig to start, and a peek through at the pistons after I'd removed the air cleaners suggested that they were way out of balance, and needed a good looking at. I posted a question on the forum about how to initially set up the mixtures and idle on both new carbs. The replies are summarised below:
SU H and HS carburettors.
- 1: Unscrew throttle adjusting screw until the face just clears the stop. Open by screwing in 1 1/2 turns.
- 2: Remove Piston and Suction Chamber, disconnect mixture control wire, and screw jet adjusting screw until jet is flush with carburettor bridge (or full up if you cant). Replace parts, and check Piston falls freely on the bridge (by using piston lift pin). Turn jet adjusting screw 2 complete turns (or 12 flats if accessibility and visibility is restricted, eg on Minis!).
- 3: Start engine, and adjust to desired idling speed (eg, warning light glowing).
- 4: Turn jet adjusting screw to obtain fastest idling speed WITH EVEN FIRING.
- 5: As the engine speed may have increased, readjust Throttle Adjusting Screw.
- 6: Check mixture strength. Use Lifting Pin to lift piston about 1/32".
- A) If the engine speed increases, and continues to increase, the mixture is to RICH.
- B) If engine speed decreases, the mixture is to WEAK.
- C) If engine speed momentarily increases slightly, the mixture is CORRECT.
- 7: The exhaust note should be regular and even. If it sounds splashy, the mixture is too weak. If there is a rhythmical misfire, together with blackish smoke, it's too rich.
- 8: Re-connect mixture control wire with about 1/16 inch free movement before it starts to pull on the cam lever.
- 9: Set Choke knob (on dash) to max. movement (about 5/8 inch) without moving the carburettor jet, and adjust the fast idle cam to give a fast tickover, about 1000RPM.
Thanks to UJ & UKD for the information given above, which is a useful starting point when setting up carbs, perhaps after a rebuild. If anyone would like to chime in with corrections, or additional information, then please do so, ideally via the thread on the forum (link above). Perhaps you are a master of balancing twin carbs using a length of tubing pressed to your ear, comparing the intake hiss of both carbies? If dealing with twin carbs, it is also essential that the cross linkage that actuates the throttle butterfly on each carb is spot-on, actuating each carb in sync with the other.
As ever, If you're not confident in what you're doing under a car's bonnet, seek advice from a competent mechanic before venturing under there and dismantling or altering anything.
I also recommend that you have a look at the factory issued manual or handbook for your car before starting work, in case there are any peculiarities specific to your car that need to be taken into account when working on it.
Go back to the looking after your car section of oldclassiccar.co.uk
|