
Classic cars forum & vehicle restoration.
|
|
| Author |
Message |
norustplease

Joined: 11 Apr 2011
Posts: 779
Location: Lancashire
|
 Posted: Thu Dec 11, 2014 12:40 pm Post subject: Posted: Thu Dec 11, 2014 12:40 pm Post subject: |
 |
|
| Ray White wrote: | ..... I have no indicators on the car but I am considering fitting them. I put some on the dodge this year and glad I did but with the Swallow it's less obvious where to locate them. I could convert the front sidelights to flashers as the headlamps already have additional bulb holders to take some side lights. One thought I had was to combine the brake lights to work as flashers (I have the wiring diagram for this) like on '50's Jags and Fords but although the law allows for original equipment, apparently it would be illegal to retro fit. C&U Regs. I think. Also, people are looking for orange flashers so they might be ineffective.
When they were new these cars only had one very small tail light and no brake lights. The twin rear 'D' lamps are side and brake lights that I have fitted.
Ray. |
You can get a conversion kit that puts an extra (orange) bulb into your front sidelight pod. Its quite simple and you could probably concoct your own using modern compact bulbs and holders. My 10/4 has these and they are effective.
The rears are a problem. You can get a relay setup that uses your brake light as an indicator as well, although I am not sure that this might confuse following traffic. I use a couple of motorcycle indicator pods on the rear, mounted on brackets that attach to the bumper bolts, so that they can be removed if required for originality without creating any holes, etc.
Wonderful car, but as I am 6' 5", probably a no go area for me.
_________________
1953 Citroen Traction
1964 Volvo PV544
1957 Austin A55 Mk 1
Boring Tucson SUV |
|
| Back to top |
|
 |
Ray White

Joined: 02 Dec 2014
Posts: 6313
Location: Derby
|
| Posted: Thu Jan 04, 2018 2:31 pm Post subject: |
|
|
One of the most satisfying (if back breaking) jobs was replacing the fabric roof lining. Unfortunately while the car was left standing outside for several years by the previous owner, water had penetrated and destroyed it. I was able to retrieve enough to use as a pattern so the replacement is an exact copy. I discovered that the impecunious William Lyons had eschewed West of England cloth for a much cheaper alternative; brushed cotton! Over time the fluffy surface has disappeared but while restoring the door cappings I discovered the original finish. I purchased a brushed cotton bed sheet and dyed it in tea to give it the appearance of some age.
(From memory,) the lining is suspended by strips of material tacked to the timber sections of the roof which is itself part of the body frame. To achieve the shape in the rear corners, the material is carefully stretched and tacked to the frame. Getting the fit around the windows was made easier by using hardboard instead of thin plywood.
 |
|
| Back to top |
|
|
peter scott

Joined: 18 Dec 2007
Posts: 7118
Location: Edinburgh
|
| Posted: Thu Jan 04, 2018 7:32 pm Post subject: |
|
|
Ray,
Thanks for updating the thread. It's great to see your car again.
Peter
_________________
http://www.nostalgiatech.co.uk
1939 SS Jaguar 2 1/2 litre saloon |
|
| Back to top |
|
|
Tinworm
Joined: 03 Aug 2010
Posts: 8
|
| Posted: Tue Jan 09, 2018 5:44 pm Post subject: |
|
|
| Wow, that is absolutely lovely! |
|
| Back to top |
|
|
Ray White
Joined: 02 Dec 2014
Posts: 6313
Location: Derby
|
| Posted: Tue Jan 09, 2018 6:10 pm Post subject: |
|
|
| Tinworm wrote: | | Wow, that is absolutely lovely! |
Thanks, she is my "baby". Actually, I think you know if a car is loved when the owner gives it a name. This is Trundles. First registered in September 1930, 'Trundles' is an early type of Austin Swallow saloon with a traditional coach built (aluminium over Ash frame) body on a basic Austin Seven chassis and running gear. She was sold new by Gaunt's Garage in Outram Street, Sutton in Ashfield, Notts and the original dealer's brass plaque is still on the dash board. The funny thing is that after moving South, after many years, she eventually ended up with me and just by chance we moved to Little Eaton, Derby, which is just down the road from Sutton in Ashfield. !
Of course 'Trundles' has not always looked quite as smart as she does now. When I bought her, she has been neglected and I had to carry out a lot of work to repair the Ash frame; especially the floor area. The area under the rear window had rotted badly and I needed to let in new timber. Same with the running boards which I made from scratch; the ribbed aluminium is quite hard to come by but is correct for the car.
I could write a book on the restoration of Swallow coachwork but it has already been done by Practical Classics with a Standard Swallow. |
|
| Back to top |
|
|
Ray White
Joined: 02 Dec 2014
Posts: 6313
Location: Derby
|
| Posted: Sun Mar 31, 2019 3:52 pm Post subject: |
|
|
Trundles is feeling quite lonely being all alone in the garage now that the Dodge Brothers has gone. 
Now that I have finished restoring the n/s front wing, I thought I should take the Swallow out for an airing in the fine weather... but I have noticed that the ignition warning light is not coming on at low revs. and I suspect the cut-out may be faulty. This early form of voltage regulation is standard equipment on Austin Sevens of the period.(1930). The unit on my car is referred to as a CF1 and is a single bobbin affair with the series winding ( a few turns of heavy wire) super imposed over the shunt winding (lots of turns of thin wire). A set of contacts are operated by the coils to maintain stable battery charging.
If I switch on the ignition the warning light comes on and goes out when the revs are increased. The problem is that the light fails to come on again when the revs are dropped to tick over. The series winding is failing to open the contacts automatically and they stay shut until the ignition is switched off; when a helper spring opens them.
This cut out has been professionally restored (at some expense) in the interests of originality. However, I suspect that corners may have been cut and I may need to take the unit elsewhere. |
|
| Back to top |
|
|
Ray White
Joined: 02 Dec 2014
Posts: 6313
Location: Derby
|
| Posted: Mon Apr 01, 2019 5:25 pm Post subject: |
|
|
The cut out (early form of voltage regulator) has contacts (like points) which should open at low revs and disconnect the dynamo from the battery so that the reverse current from the battery doesn't try to 'motor' the dynamo.
There was a problem with the contacts failing to open at tick over and this showed up as the ignition warning light failing to come on. In addition to the series winding in the cut out using residual reverse current, there is also a spring which pulls the contacts apart. This spring was incorrect and too weak for the task - so I replaced it with a slightly heavier one and the problem was fixed.
It's nice when a problem is simply solved. |
|
| Back to top |
|
|
peter scott
Joined: 18 Dec 2007
Posts: 7118
Location: Edinburgh
|
|
| Back to top |
|
|
lowdrag
Joined: 10 Apr 2009
Posts: 1585
Location: Le Mans
|
| Posted: Thu May 21, 2020 9:57 am Post subject: |
|
|
| Such a wonderful thread to follow people! I suppose that in all car clubs there are people dedicated enough to have small runs of long-gone parts made. Certainly in the Jaguar field there are a number of early parts for the E-type being reproduced, and far cheaper than the odd NOS but of equal quality. For example, the rear number plate lights; an NOS pair in their box sold on Ebay for over £400. A new pair now costs but £100. |
|
| Back to top |
|
|
Ray White
Joined: 02 Dec 2014
Posts: 6313
Location: Derby
|
| Posted: Mon Jul 18, 2022 12:19 am Post subject: |
|
|
Having decided that 'Trundles' had been neglected for too long (not used since the Pandemic), I reported - in another thread - the difficulty I had in getting the car to start. With that issue resolved I then discovered that the dynamo was not charging. A loss of residual magnetism within the dynamo had been caused by the long period of inactivity and was remedied by flashing the field coils with a charge of 6 volts direct from the battery. With the ignition warning light now going out and the ammeter showing signs of life I felt as if I was getting somewhere.!
One job that needed attending to sooner rather than later was the glove box which had become riddled with woodworm; as witnessed by the line of wood dust on the carpet.!!
One might imagine this would be an easy enough job but it has taken all day! 
Removal of the box from behind the dashboard was simple enough; it was only held in place by a few wood screws. Once on the bench, I completely dismantled the box - which was only tacked together - then cut out new pieces of plywood to exactly match and replace the most badly affected areas. I also replaced the felt lining then glued the pieces together. The fully assembled glovebox was clamped and left to dry; it was then nailed and screwed.


Throughout my ownership, the glove box has never been adequately secured behind the dashboard; a previous owner having made some rather feeble little brackets out of thin aluminium which evidently had not given enough support as it would shake about when on the move. I have greatly improved on this by making new brackets from brass and securing the box with more appropriate slot screws.
The impossibly limited amount of space meant returning the glovebox could only be achieved by removing the speedometer.
Everything on the Swallow is small and fiddly... but you get used to it.  |
|
| Back to top |
|
|
Ray White
Joined: 02 Dec 2014
Posts: 6313
Location: Derby
|
| Posted: Mon Aug 01, 2022 11:22 am Post subject: |
|
|
The rebuilt glovebox was re screwed to the back of the dashboard with new brass (stronger) brackets and is now secure for the first time in many years.! It was not easy working upside down with painful fingers but I was determined to see it through.
As I mentioned in a post elsewhere I had resolved an ignition problem. I then discovered that the dynamo was not charging and the ignition warning light stayed on.
The problem was with the car left standing through the whole of the Pandemic the dynamo had lost it's residual magnetism. The answer to that was to "flash" the field coils directly from the 6 volt battery. That did the trick and the dynamo is now charging as it should.
----------------------------------------------------------------------------------------------------------------------------------------------------
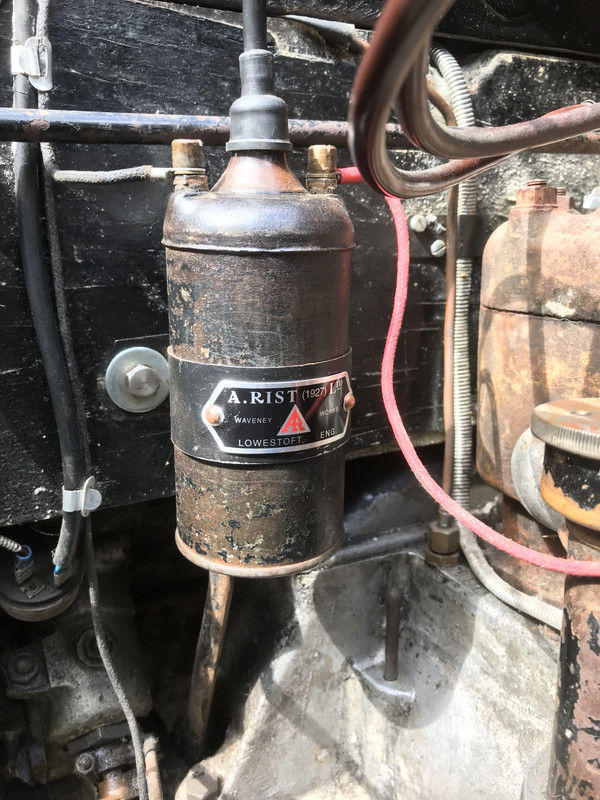
I couldn't resist attaching a new decal to the coil. The detail of the original plaque had worn away to such an extent it had become illegible. This may be just a reproduction - and originally intended for the 'A Rist' horn - but it is identical to the one on the coil. It was an easy enough job to rivet to the holding strap.
Of course, I have no means of knowing if the clamp and the coil are contemporary but they look pretty original. I have been careful not to spoil the patina and I am very pleased with the result.
I would think these "A Rist" coils must be pretty rare now?
 |
|
| Back to top |
|
|
peter scott
Joined: 18 Dec 2007
Posts: 7118
Location: Edinburgh
|
| Posted: Mon Aug 01, 2022 12:55 pm Post subject: |
|
|
I agree the new label looks the part. Unfortunately the fresh bolt head and washer holding the coil to bulkhead doesn't.
Peter
_________________
http://www.nostalgiatech.co.uk
1939 SS Jaguar 2 1/2 litre saloon |
|
| Back to top |
|
|
Ray White
Joined: 02 Dec 2014
Posts: 6313
Location: Derby
|
| Posted: Mon Aug 01, 2022 1:49 pm Post subject: |
|
|
| peter scott wrote: | I agree the new label looks the part. Unfortunately the fresh bolt head and washer holding the coil to bulkhead doesn't.
Peter |
You are right about that, Peter. The original bolts had "stripped" and I haven't had time to 'age' the replacements.
On the plus side, they do have BSF threads. 
EDIT:
Better?

Last edited by Ray White on Thu Aug 11, 2022 2:09 pm; edited 1 time in total |
|
| Back to top |
|
|
Ray White
Joined: 02 Dec 2014
Posts: 6313
Location: Derby
|
| Posted: Thu Aug 11, 2022 1:58 pm Post subject: |
|
|
You just can't win sometimes!
I put the Swallow outside to make space for the TC painting job and this is what has happened!

The Sun must have got on the car and caused the aluminium to expand; causing the paint to crack and come away.
I am gutted. I now must give the car a re spray.
I must obviously not have enough to do!!!  |
|
| Back to top |
|
|
ukdave2002
Joined: 23 Nov 2007
Posts: 4105
Location: South Cheshire
|
| Posted: Tue Aug 16, 2022 4:51 pm Post subject: |
|
|
| The sun may have been the catalyst for this problem, but I suspect the real culprit is the thickness of the primer, the visible peeled section of the paint looks awfully thick? |
|
| Back to top |
|
|
|
|
You cannot post new topics in this forum
You cannot reply to topics in this forum
You cannot edit your posts in this forum
You cannot delete your posts in this forum
You cannot vote in polls in this forum
|
php BB powered © php BB Grp.
|


