|
|
| Do you like or dislike the new dashboard ? |
| Yes I do like the new dashboard |
|
100% |
[ 7 ] |
| No I do not like the new dashboard |
|
0% |
[ 0 ] |
|
| Total Votes : 7 |
|
| Author |
Message |
ukdave2002
Joined: 23 Nov 2007
Posts: 4105
Location: South Cheshire
|
 Posted: Sat Mar 23, 2024 8:51 am Post subject: Posted: Sat Mar 23, 2024 8:51 am Post subject: |
 |
|
| Could you turn the taper on your lathe? |
|
| Back to top |
|
 |
ukdave2002
Joined: 23 Nov 2007
Posts: 4105
Location: South Cheshire
|
| Posted: Sat Mar 23, 2024 9:01 am Post subject: |
|
|
| Could you turn the taper on your lathe? |
|
| Back to top |
|
|
Ray White

Joined: 02 Dec 2014
Posts: 6316
Location: Derby
|
| Posted: Sat Mar 23, 2024 9:23 pm Post subject: |
|
|
It certainly looks like a possibility, doesn't it?
I was able to open out the other end but getting to the inside of the spinner might be more tricky.  |
|
| Back to top |
|
|
Miken
Joined: 24 Dec 2012
Posts: 544
|
| Posted: Mon Mar 25, 2024 11:47 am Post subject: |
|
|
| Ray White wrote: | It certainly looks like a possibility, doesn't it?
I was able to open out the other end but getting to the inside of the spinner might be more tricky. |
If you are struggling to find a way to hold the spinner on the lathe without damaging the chrome, I would do something like this: From a bit of plastic bar a bit larger diameter than the round part of the spinner, turn a sort of cup to receive the round part of the spinner. You would have to saw/file/carve 2 notches in the plastic to clear the wings. support the outer end with the tailstock (preferably with a revolving centre). My favourite plastic for turning is Acetal. You can (almost) turn it with a rusty nail and still get a good finish.
 |
|
| Back to top |
|
|
Ray White
Joined: 02 Dec 2014
Posts: 6316
Location: Derby
|
| Posted: Mon Mar 25, 2024 12:39 pm Post subject: |
|
|
Yes, that would work fine. Thank you for doing all that for me.
Another option I considered would be to turn a stepped ring with a taper on the outside that could be pinned/stuck to the existing flat surface.
After all, it's not going anywhere...  |
|
| Back to top |
|
|
Ray White
Joined: 02 Dec 2014
Posts: 6316
Location: Derby
|
| Posted: Mon Mar 25, 2024 7:18 pm Post subject: |
|
|
Today I carried on trying to fit the D lamps to the number plate backing panel. The holes in the back plate do not quite line up with my D lamps so I have had to open them up with a round file.
Yesterday I had the frustration of a bulb holder breaking as I tried to get a reasonable fit so today I have made another one from scratch.
Here is my new bulb holder alongside the one to which it will be attached.
 . . 
Here it is fitted to the lamp.

The trouble is not over yet. The design is quite poor and it was obvious that with the other lamp a short circuit would happen...
but in trying to correct the contact point, the insulation snapped. This is poor quality material but fortunately I have some old but very good quality thin insulation material.

This lamp is different in that the bulb holders are rivetted together rather than screwed. I shall use screws and nuts.
There seems to be a problem with the page size. |
|
| Back to top |
|
|
bjacko
Joined: 28 Oct 2013
Posts: 362
Location: Melbourne Australia
|
| Posted: Tue Mar 26, 2024 5:59 am Post subject: D Lamps |
|
|
Why not fit a LED kit. They work very well and are brighter too.
_________________
1938 Morris 8 Ser II Coupe Utility (Pickup)
1985 Rover SD1 VDP |
|
| Back to top |
|
|
Ray White
Joined: 02 Dec 2014
Posts: 6316
Location: Derby
|
| Posted: Tue Mar 26, 2024 10:48 am Post subject: Re: D Lamps |
|
|
| bjacko wrote: | | Why not fit a LED kit. They work very well and are brighter too. |
They also cost a lot. |
|
| Back to top |
|
|
badhuis

Joined: 20 Aug 2008
Posts: 1391
Location: Netherlands
|
| Posted: Tue Mar 26, 2024 1:17 pm Post subject: Re: D Lamps |
|
|
| Ray White wrote: | | bjacko wrote: | | Why not fit a LED kit. They work very well and are brighter too. |
They also cost a lot. |
What is another few hundred pounds for a thorough restoration like this? 
_________________
a car stops being fun when it becomes an investment |
|
| Back to top |
|
|
Ray White
Joined: 02 Dec 2014
Posts: 6316
Location: Derby
|
| Posted: Tue Mar 26, 2024 2:53 pm Post subject: Re: D Lamps |
|
|
| badhuis wrote: | | Ray White wrote: | | bjacko wrote: | | Why not fit a LED kit. They work very well and are brighter too. |
They also cost a lot. |
What is another few hundred pounds for a thorough restoration like this? |
I don't have bottomless pockets. |
|
| Back to top |
|
|
Ray White
Joined: 02 Dec 2014
Posts: 6316
Location: Derby
|
| Posted: Tue Mar 26, 2024 4:16 pm Post subject: |
|
|
I have had a stroke of luck with the 'loose' spare wheel mounting. Having thought about it overnight, it has occurred to me that
the problem is not with the spinner but with the wheel and the way it fits on the mounting hub.
All I did was wrap some fabric insulating tape several times around the shoulder of the hub and replaced the wheel.
BINGO!!. It now fits tight as a bug in a rug.
Aside from the hood, the outside back of the car is now finished.
 |
|
| Back to top |
|
|
Ray White
Joined: 02 Dec 2014
Posts: 6316
Location: Derby
|
| Posted: Sun Mar 31, 2024 5:48 pm Post subject: |
|
|
I have spent some time trying to figure out the best route for the capillary tube that goes between the radiator and the water temperature
gauge. The car would not originally have had a gauge so there is no provision for one. This is where my ideas conflict with originality as
- much to my angst - I have had to make a hole in the footwell. It will be grommeted and will match the existing arrangements for wiring
and oil pressure gauge pipework. The gauge, which was made to match the other British Jaeger instruments, will be sited on the instrument
panel in place of the horn button (which is now located on the far right of the dash) and will be located next to the oil pressure gauge.
I will fit the gauge when the dashboard is ready to be screwed on as too much bending about is not good for a capillary tube.
Another job that needed doing was fixing the odometer drive which, on this car, is a cable driven via a neat little gearbox off the back of
the dynamo...or in my case the Dynamator. One thing that other owners have reported is that the drive assembly can come loose even with
the brass clamp done up tight...and that was the case with my car.
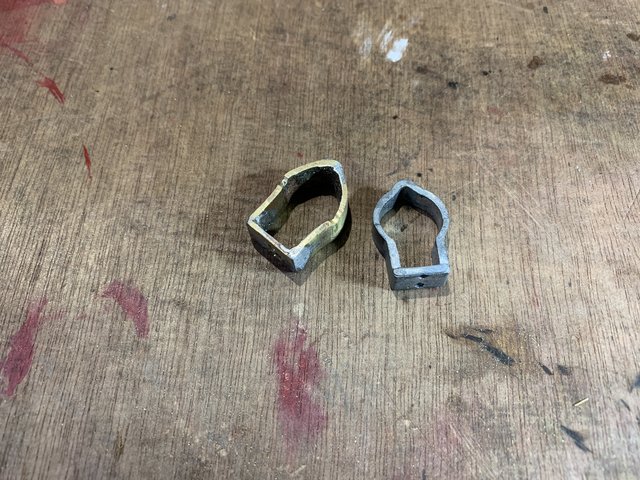
After disconnecting the cable, I unscrewed the brass collar and removed the gearbox from the alternator. I then undid the screw and
removed the brass clamp from the short extension. Fortunately, it was a simple fix. With my Dremel, I removed some material from the
faces of the brass clamp thus allowing it to tighten further.
The photo shows what the outcome looks like.
 |
|
| Back to top |
|
|
bjacko
Joined: 28 Oct 2013
Posts: 362
Location: Melbourne Australia
|
| Posted: Mon Apr 01, 2024 4:02 am Post subject: Odometer Drive |
|
|
Does that mean every time you run the engine it adds miles to the gauge?
_________________
1938 Morris 8 Ser II Coupe Utility (Pickup)
1985 Rover SD1 VDP |
|
| Back to top |
|
|
Ray White
Joined: 02 Dec 2014
Posts: 6316
Location: Derby
|
| Posted: Mon Apr 01, 2024 10:02 am Post subject: Re: Odometer Drive |
|
|
| bjacko wrote: | | Does that mean every time you run the engine it adds miles to the gauge? |
Not at all. The tach drive from the dynamo (or in this case the alternator) only gives you RPM.
The odometer (mileometer) is incorporated in the speedo, which is driven off the gearbox. |
|
| Back to top |
|
|
peter scott

Joined: 18 Dec 2007
Posts: 7118
Location: Edinburgh
|
| Posted: Mon Apr 01, 2024 12:15 pm Post subject: |
|
|
Rear end is looking very nice indeed Ray. If you have enough length in the temperature gauge capillary then create a "springy" section where it connects at the engine.

Peter
_________________
http://www.nostalgiatech.co.uk
1939 SS Jaguar 2 1/2 litre saloon |
|
| Back to top |
|
|
|


