
Classic cars forum & vehicle restoration.
|
|
| Author |
Message |
websnail

Joined: 26 Oct 2010
Posts: 78
Location: West Sussex
|
 Posted: Wed Sep 19, 2012 10:03 pm Post subject: Spray Guns-Which type? Posted: Wed Sep 19, 2012 10:03 pm Post subject: Spray Guns-Which type? |
 |
|
If I wanted to spray enamel paint, say a wing or door at a time, what type of gun would I need?
I think I would prefer an air powered one and not an electric one.
For enamel paint, do I need a high volume/low pressure one?
DIY use only.
Thanks in advance
Dave |
|
| Back to top |
|
 |
welshrover
Joined: 09 Aug 2011
Posts: 326
|
| Posted: Wed Sep 19, 2012 10:40 pm Post subject: |
|
|
i would go for the high volume low pressure ,i painted a wolseley 1500 a few years back at home in my yard, it did a good job on that  |
|
| Back to top |
|
|
ukdave2002
Joined: 23 Nov 2007
Posts: 4276
Location: South Cheshire
|
| Posted: Thu Sep 20, 2012 12:43 pm Post subject: |
|
|
Hi Dave
You can use a HVLP gun or a more traditional gun. HVLP reduces overspray , but do check the air requirement of an HVLP gun as they can be very high and beyond the spec of many DIY compressors.
I use a traditional DeVilbiss GTI gun, but also have a cheap Chinese copy (from Machine Mart it was about £30) and it does produce very good results, its just not made as well, and wouldn't last to long in a pro shop. Both guns have a 1.4 tip , I spray both 2 pack and Cellulose with them, you can spray high build primer, but it needs a bit more thinning than usual, I bough a cheap gun with a 1.8 tip for priming.
I have never seen an electric spray gun that would be adequate for vehicle paints...not to say there isn't one !!
Dave |
|
| Back to top |
|
|
Polypedates
Joined: 24 Sep 2012
Posts: 16
|
| Posted: Sun Sep 30, 2012 11:16 am Post subject: |
|
|
I have a Devilbiss FLG5 that I am very happy with. Excellent quality and able to work with small compressors. I am using it for Cellulose and have a 1.4mm tip. Even in my amateur hands it gives a good finish.
My set up is limited to this at the moment:

I have since added a pressure gauge at the gun inlet and would recommend you do this from the start as it makes set up so much easier.
Good luck. |
|
| Back to top |
|
|
Greg
Joined: 03 Dec 2007
Posts: 445
Location: Dreamland Margate
|
| Posted: Sun Sep 30, 2012 1:07 pm Post subject: |
|
|
I too use a DeVilbiss GTi gun every day and must say it is a superb Gun
I use it for car paintwork but it can be pressured right down so I can do modelwork with it too!
Highly recommended, but as mentioned above depending on budget and useage. |
|
| Back to top |
|
|
ukdave2002
Joined: 23 Nov 2007
Posts: 4276
Location: South Cheshire
|
| Posted: Thu Oct 04, 2012 3:38 pm Post subject: |
|
|
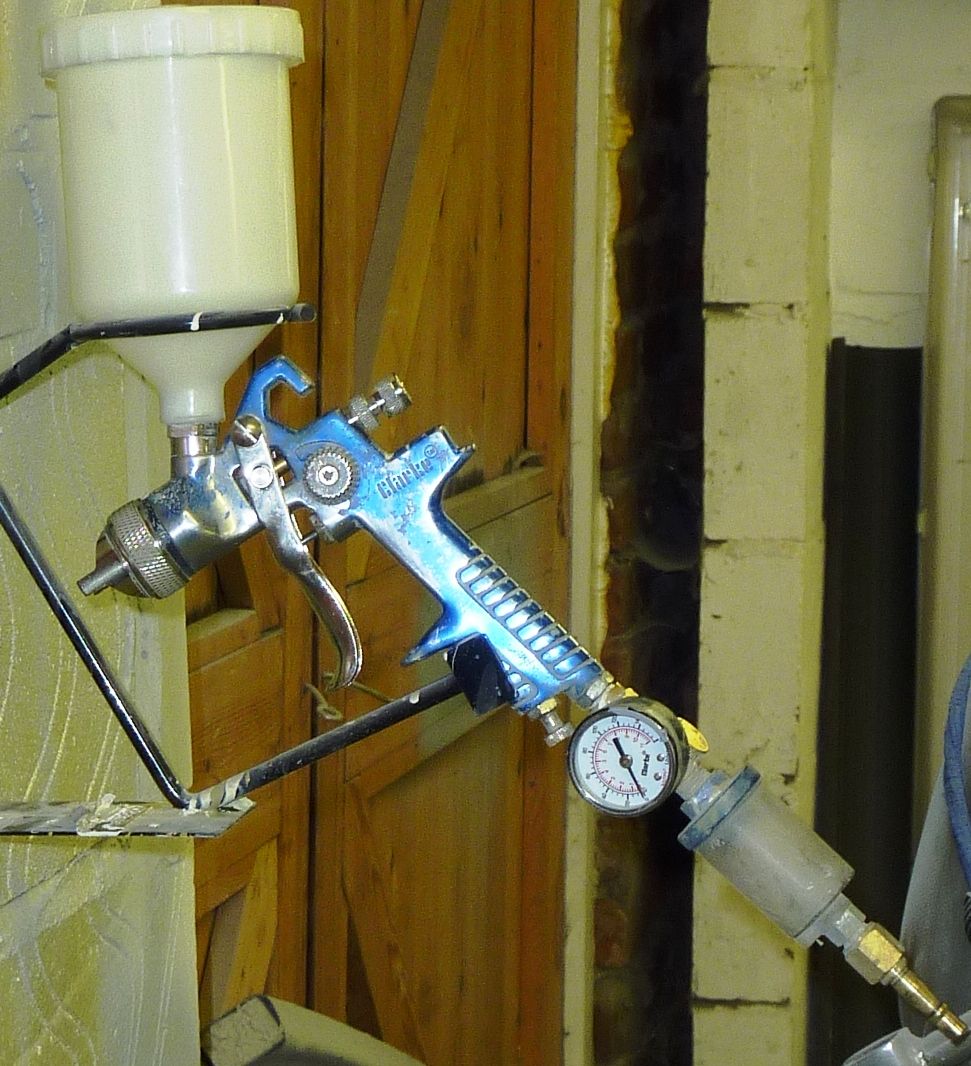
This is my Cheaper (£30) gun, it delivers excellent results, but as I mentioned would not last very long in a busy paint shop.
There are a couple of additions that I think are essential, firstly a final filter, water does condense in hoses, this filters the moisture out, also there is a pressure gauge, if the air pressure at the gun is wrong it creates problems, for this type of gun the pressure needs to be measured with the trigger open, you will find the gun gauge reading very different to the tank reading.
Most beginners (me included) have the gun pressure too low and the paint doesn't atomise properly, so they stick more thinners in, the paint then atomises but runs like Usain Bolt!!
Finally, whatever gun you end up with, expect to spend as much time cleaning it as you do spraying! a quick blast with some thinners after spraying, will not clean it!
Dave |
|
| Back to top |
|
|
mid
Joined: 10 Jun 2008
Posts: 136
Location: Northampton
|
| Posted: Thu Oct 04, 2012 5:40 pm Post subject: |
|
|
a little bit off topic but might be useful... i used to work in a prototype model shop for a design company and did a lot of spraying, when i was learning i could never get the paint/thinner consistency right, one of the more experienced guys walked in, saw me struggling and just said "it runs then it drips"
we used to mix the paint in a cup with a plastic mixing stick, basically give it a good mix, then lift the stick out of the cup, say to yourself "it runs then it drips" and the paint should do this off the mixing stick at the same time.
if it runs for longer then its too thick, if it drips to soon then its too thin.
you still had to mess with the gun a little to suit what we were spraying but it was definitely a good place to start from. |
|
| Back to top |
|
|
ukdave2002
Joined: 23 Nov 2007
Posts: 4276
Location: South Cheshire
|
| Posted: Fri Oct 05, 2012 6:39 pm Post subject: |
|
|
| mid wrote: | a little bit off topic but might be useful... i used to work in a prototype model shop for a design company and did a lot of spraying, when i was learning i could never get the paint/thinner consistency right, one of the more experienced guys walked in, saw me struggling and just said "it runs then it drips"
we used to mix the paint in a cup with a plastic mixing stick, basically give it a good mix, then lift the stick out of the cup, say to yourself "it runs then it drips" and the paint should do this off the mixing stick at the same time.
if it runs for longer then its too thick, if it drips to soon then its too thin.
you still had to mess with the gun a little to suit what we were spraying but it was definitely a good place to start from. |
Mid, you have just invented the verbal viscosity cup!! 
Websnail I don't know if any of the reply's have helped you, my knowledge of painting has been gained mainly by making loads of mistakes and talking to "Pros ?" at our local paint supplier; I make a point especially if there are a number of people in the shop of asking the "dumb paint related question" 9 times out of 10 this prompts an argument  as different painters have their own ways of tackling jobs and preferences to their own make of gun, paint or filler! however they can all turn out great paint jobs as can us amateurs without spending a fortune on equipment. as different painters have their own ways of tackling jobs and preferences to their own make of gun, paint or filler! however they can all turn out great paint jobs as can us amateurs without spending a fortune on equipment.
Asking a pro what gun is best; some will swear by Devilbiss others Sata; the gun in the photo is a Clarke branded Chinese copy of a Sata NR-92 (lots of cheap guns based on this) no pro will tell you to use a Chinese copy, However if you don't plan to spray a car each week, buy a cheap gun, then ask your paint supplier for paint that they will sell cheap (paint where they have mixed the colour incorrectly) practice on some scrap panels, play around with the gun, pressure and thinner ratio, then paint your car. Remembering that as we head toward winter the paint wont flow as well in the cold.
Finally don't despair if you end up with runs, orange peel, fish eyes they can normally be corrected after the paint has gone hard (as pro's do all the time!!).
Dave |
|
| Back to top |
|
|
websnail
Joined: 26 Oct 2010
Posts: 78
Location: West Sussex
|
| Posted: Fri Oct 05, 2012 9:09 pm Post subject: |
|
|
Thanks guys.
Got my little HVLP gun in the post today. A few things I need, inline water trap and air gauge are a must.
Quick question. On the front of the gun where you can turn the air nozzle round ( the bit with the horns on). Is there an advantage as to the position, i.e. vertical or horzontal?  |
|
| Back to top |
|
|
Polypedates
Joined: 24 Sep 2012
Posts: 16
|
| Posted: Fri Oct 05, 2012 10:07 pm Post subject: |
|
|
| The position of the 'wings' determines whether you get a horizontal or vertical spray pattern. If I remember correctly having the wings at 12 and 6 o'clock gives a horizontal pattern and vice versa (but don't quote me on that!). |
|
| Back to top |
|
|
Roger-hatchy

Joined: 07 Dec 2007
Posts: 2135
Location: Tiptree, Essex
|
| Posted: Fri Oct 05, 2012 10:37 pm Post subject: |
|
|
Talking of temperature
The old chap who was employed in the body shop at my last place of employment, he had been in the spray trade since he was at school and retired while I was there.
I noticed a tin of paint in a bucket of simmering hot water on a gas ring.
he told me that he always heats the paint as it flows and 'works' better.
Anyone else heard of this trick of the trade. |
|
| Back to top |
|
|
websnail
Joined: 26 Oct 2010
Posts: 78
Location: West Sussex
|
| Posted: Fri Oct 05, 2012 11:39 pm Post subject: |
|
|
| Polypedates wrote: | | The position of the 'wings' determines whether you get a horizontal or vertical spray pattern. If I remember correctly having the wings at 12 and 6 o'clock gives a horizontal pattern and vice versa (but don't quote me on that!). |
So if I was to paint a panel from top to bottom moving the gun left to right etc, which way would be best to set the wings/horns?
ukdave2002. My gun has the control/plug that you have next to the air intake conector, what's it for? I'm guessing a filter? |
|
| Back to top |
|
|
Polypedates
Joined: 24 Sep 2012
Posts: 16
|
| Posted: Sat Oct 06, 2012 2:02 am Post subject: |
|
|
| You would want the spray pattern to be perpendicular to the movement of the gun to avoid spraying over fresh paint so for left to right go with a vertical spray pattern, i.e with the wings at 3 and 9 o'clock. |
|
| Back to top |
|
|
ukdave2002
Joined: 23 Nov 2007
Posts: 4276
Location: South Cheshire
|
| Posted: Sat Oct 06, 2012 7:14 am Post subject: |
|
|
| websnail wrote: | | Polypedates wrote: | | The position of the 'wings' determines whether you get a horizontal or vertical spray pattern. If I remember correctly having the wings at 12 and 6 o'clock gives a horizontal pattern and vice versa (but don't quote me on that!). |
So if I was to paint a panel from top to bottom moving the gun left to right etc, which way would be best to set the wings/horns?
ukdave2002. My gun has the control/plug that you have next to the air intake conector, what's it for? I'm guessing a filter? |
Hi websnail
The normal spray pattern is an elongated oval; so with the gun about 7" away from the panel, the spray pattern should be about 7" x 2.5". The normal aircap position (the thing with the horns) is as Polypedates indicated; 3 and 9 o'clock to give a vertical pattern.
The other controls you will have will be:
Air inlet: this adjusts the gun pressure, if you are adding a gauge leave this fully open as the gauge will have a pressure control.
Fluid control: This determines how much paint is released with the air.
Spray pattern: This alters the spray pattern from the elongated oval to a small circle, if you reduce the pattern to a small circle remember you will need less air pressure and less paint, so pressure and fluid control will need to be reduced.
To set the gun up, as a starter open the fluid control to about 80% max, open the trigger and adjust the pressure to what ever the gun's instruction state for the type of paint, set the aircap to paint a horizontal pattern, then with a piece paper on a wall , adjust the Spray Pattern so that you get an even 7" x 2.5" (approx will vary with different guns) wide elongated oval, with the gun 7" away, then spray again for about 4 seconds without moving the gun, the paint should run fairly evenly across the pattern, if it doesn't adjust the fluid control.
Try a test spray; if the paint has an orange peel look, either increase the air pressure, thin the paint more or move the gun slower. If it runs do the reverse.
When painting, keep the gun at 90 degrees to the panel and 7" away at all times, spray with a 50% overlap on the previous coat, paint all the edges and tricky bits first.
Simples
Let us know how you get on
Dave |
|
| Back to top |
|
|
websnail
Joined: 26 Oct 2010
Posts: 78
Location: West Sussex
|
| Posted: Sun Oct 07, 2012 9:55 pm Post subject: |
|
|
Hi guys. Just had some fun.
You can learn a lot from just playing i.e.
Compressor too small (it's only 12"long), I knew that already. It had to run non stop. 
I need paint strainers and vinyl gloves.
Getting quite good at cleaning the gun out, even if I still don't know what all the knobs do yet 
More pratice required but I'm happy with what I've done
Just chatting with my brother latter in the day and guess what, he has a 150 litre compresser that I can have. That will be one less excuse for me though |
|
| Back to top |
|
|
|
|
You cannot post new topics in this forum
You cannot reply to topics in this forum
You cannot edit your posts in this forum
You cannot delete your posts in this forum
You cannot vote in polls in this forum
|
php BB powered © php BB Grp.
|


