
Classic cars forum & vehicle restoration.
|
|
| Author |
Message |
DanH
Joined: 31 Mar 2015
Posts: 61
Location: Auckland, New Zealand
|
 Posted: Thu May 07, 2015 10:30 am Post subject: Morris 8 SE leaking rear axle Posted: Thu May 07, 2015 10:30 am Post subject: Morris 8 SE leaking rear axle |
 |
|
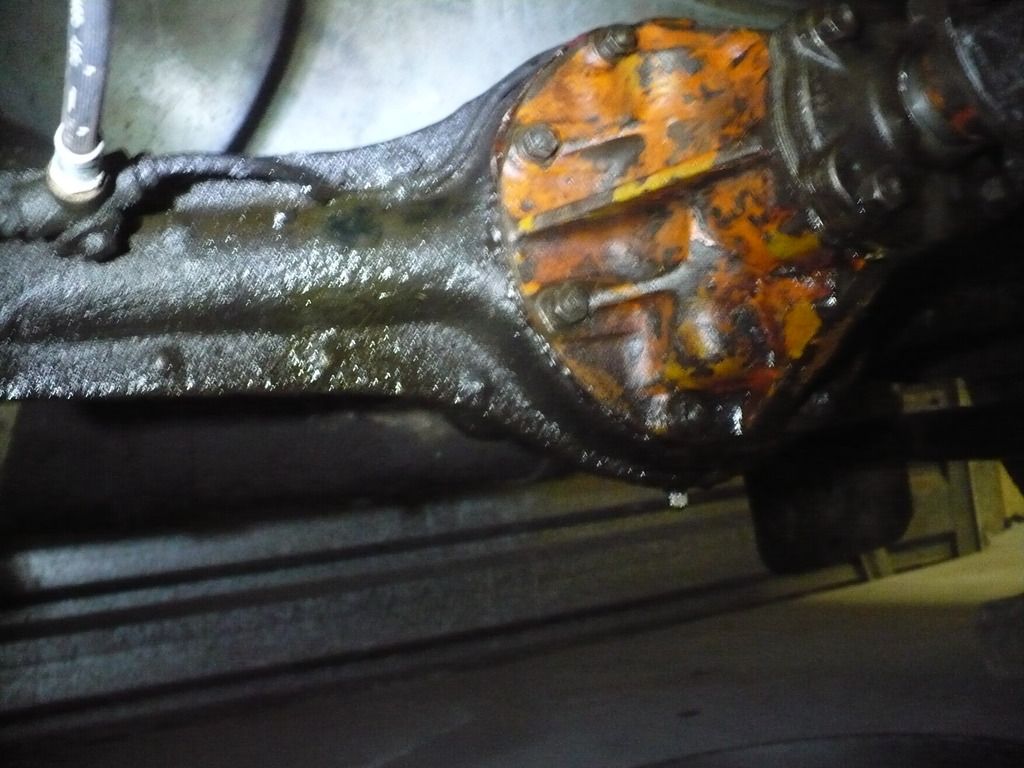
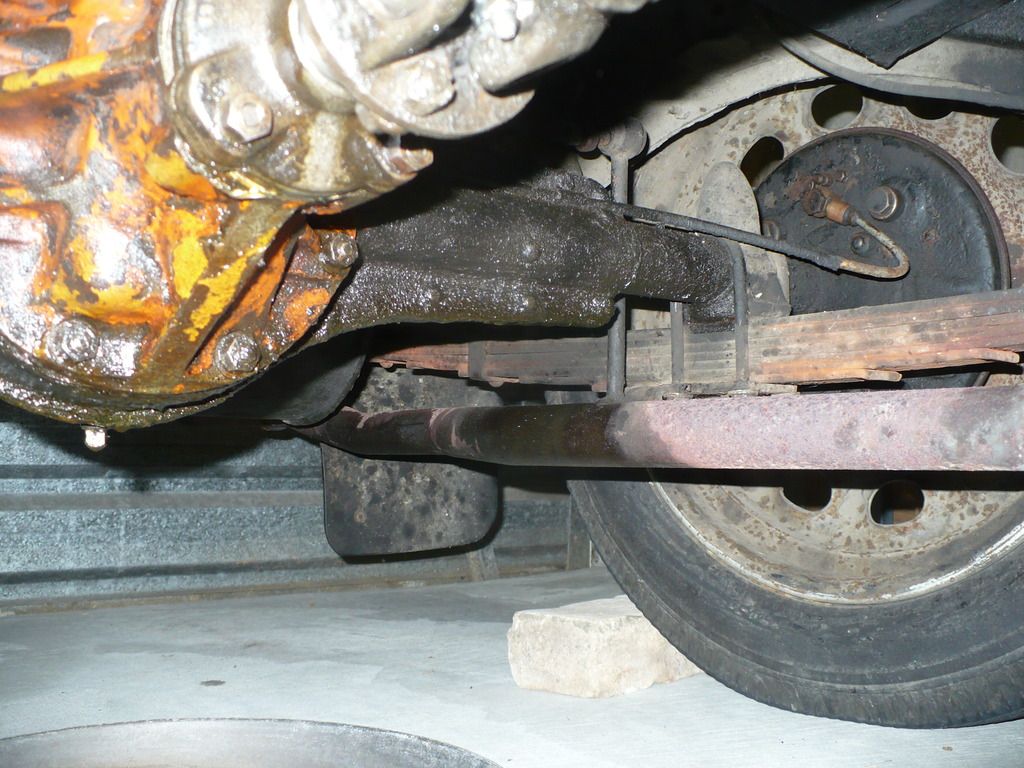
I wonder if anyone can offer any suggestions on how to resolve the oily mess that is my rear axle at present? From what I can tell, it seems that the oil is leaking from the joint between the diff head and the axle housing. As you can see from the photo oil is getting thrown around the rear underside of the car and onto the exhaust and suspension rubbers. At this stage I'm thinking that removing the diff and installing a new gasket would be the best course of action, any other suggestions?
Fortunately, my half shaft oil seals seem good and no oil is making its way into the rear brakes.
Thanks, Dan
Last edited by DanH on Sun Jul 12, 2015 7:21 am; edited 1 time in total |
|
| Back to top |
|
 |
ukdave2002
Joined: 23 Nov 2007
Posts: 4105
Location: South Cheshire
|
| Posted: Thu May 07, 2015 1:10 pm Post subject: |
|
|
Dan
I think a new gasket is called for ! looking at the pics the gasket looks a bit crude (the bit sticking out of the top) and there seems to have been an attempt to apply sealer after the diff was bolted on.
Check the diff and axle casing are clean and without scores, use proper gasket paper, punch the holes out( the punches are dirt cheap) and grease the faces on the axle and diff prior to reassembly.
If the faces are damage you may have to use a sealent as well, I have in the past filled scores with a silicon sealent, let it go off and then planned the excess off with a razor blade, rather than applying a load of selent and hoping it fills the score!.
Dave |
|
| Back to top |
|
|
Dipster
Joined: 06 Jan 2015
Posts: 408
Location: UK, France and Portugal - unless I am travelling....
|
| Posted: Thu May 07, 2015 3:15 pm Post subject: |
|
|
I fear you must get under and get a new gasket on there.
If does appear that someone has tried to stem the flow by smothering it in goo!
I would run a straight edge around the two mating surfaces (once they are thoroughly cleaned up) to ensure that there is not any distortion. If there is you may find that your gasket and goo (if you use any. I would.) will not manage to hold what becomes very hot oil in. |
|
| Back to top |
|
|
ukdave2002
Joined: 23 Nov 2007
Posts: 4105
Location: South Cheshire
|
| Posted: Thu May 07, 2015 4:06 pm Post subject: |
|
|
It could of course be leaking from the pinion end; there is no seal just a scroll, which of course chucks oil out of you spend a lot of time in reverse 
Folk have fitted lip seals on these...
Dave |
|
| Back to top |
|
|
DanH
Joined: 31 Mar 2015
Posts: 61
Location: Auckland, New Zealand
|
| Posted: Thu May 07, 2015 9:24 pm Post subject: |
|
|
Thanks chaps I thought a new gasket would be the go. I'll let you know how I get on with the fix.
Red gasket sealant makes appearances elsewhere on the car like the gearbox, sump and tappet cover which are all doing a great job of leaking. I think old gaskets may have been re-used and attempts made to stop leaks with sealant after reassembly as Dave suggests. |
|
| Back to top |
|
|
Rosco663

Joined: 17 Dec 2012
Posts: 257
Location: South Australia
|
| Posted: Fri May 08, 2015 12:45 am Post subject: |
|
|
Gentlemen I concur,
It will be a great opportunity to clean and relubricate the moving parts. Definitely not a five minute job though 
If you take it very easy removing/reinstalling the half shafts you may save the oil scrolls in the axle housing it - you can make these but a little fiddly - best to replace with Nylatron replacements if required. It would also pay to get your hands on some spare bearing adjusting nut lock washers as these become very brittle as the lugs can easily snap off if un/folded repeatedly.
The gasket itself is very easy to make once the diff centre is out.
Good luck I'm sure you'll get the result you're after - a clean driveway 
Cheers
_________________
Rosco |
|
| Back to top |
|
|
goneps
Joined: 18 Jun 2013
Posts: 601
Location: Auckland, New Zealand
|
| Posted: Fri May 08, 2015 3:47 am Post subject: |
|
|
| ukdave2002 wrote: | It could of course be leaking from the pinion end; there is no seal just a scroll, which of course chucks oil out of you spend a lot of time in reverse
Folk have fitted lip seals on these...
Dave |
Doesn't look like it, Dave. I'd expect the diff head casting to be oily if that were the case. I'm with the general consensus of poor sealing between diff head and axle. That gasket looks distinctly ropey.
The dry appearance of the diff head also argues against leaks emanating from engine and gearbox.
Richard |
|
| Back to top |
|
|
Farmer John
Joined: 18 Feb 2010
Posts: 181
Location: Manawatu NZ
|
| Posted: Fri May 08, 2015 4:09 am Post subject: E-Type Morris |
|
|
Hello Dan, that is a fine looking Morris you have there!
Rear axles have an absolute need to have a breather, or some other orifice to perform the same function. If it cannot breathe it will leak. I hope someone can tell you where the breather is or how it breathes otherwise. It can be as simple as just a drilling through which a wire can be poked at service time.
If the oil level is too high it will leak. The spiral seal that Dave talked of will not hold back the tide.
To check the oil level straighten a split pin and bend 20mm of one end through 90deg. This short leg becomes the dipstick when you poke it through the level plug hole. As long as the oil touches the pin I am happy, but it really does need to be lower than 10mm from the bottom of the hole.
Now , the oil leak. To diagnose an oil leak, as with most other liquids, it is necessary to clean the affected area thoroughly. The cleaner the better and consequently easier to see from where the oil is coming.If you clean it and let it sit overnight without having been driven you will be able to see the "track" the oil has made.
However, while the leak may well be from the gasket, your photos show all the signs of oil getting past the pinion seal. Over full might be causing that.
The driveshaft will spray oil everywhere from the back of the gearbox as well, it is a proper spraygun!
Removing the diff assembly is not to be taken lightly, for this reason.
Most of our vehicles of this era have been driven on metal roads a lot and all of the metal fasteners underneath will have taken a pounding with the diff getting more than it's share of a beating. If the threads are damaged the studs will come out and will need dressing to remove the nuts and then the studs loctited back in if they are still serviceable.
The two faces may be damaged and might need filing straight while the studs are out. Check for cracks.
Put your lab coat on and do the diagnosis, see if you can be certain of where the problem is before getting the overalls on.
John |
|
| Back to top |
|
|
DanH
Joined: 31 Mar 2015
Posts: 61
Location: Auckland, New Zealand
|
| Posted: Thu May 14, 2015 5:55 am Post subject: |
|
|
Well I have bitten the bullet and removed the diff head from the car. Had no major hassles getting it out. Although it is not a pleasant job, that diff head is a heavy little sod!
It appears the old gasket had been leaking around the bottom, I could see oil tracks through the gasket. On cleaning everything up I discovered the following; The bottom right bolt on the axle housing is cross-threaded in the housing, therefore it would be very difficult to get it tight enough to get a good seal at this point, I think this has contributed to the leak. There was also one other bolt that was cross-threaded in the housing.
I found a spring washer from one of the diff bolts floating around in the bottom of the housing, don't want that finding its way into the works!
I also cleaned out a lot of gasket goo that had made its way into the axle housing and was clinging to the diff and other components.
Anyway, everything is cleaned up now and I am in the process of carefully making a new gasket. I think the best plan for the cross-threaded bolts will be to tap out the holes and fit new ones. |
|
| Back to top |
|
|
goneps
Joined: 18 Jun 2013
Posts: 601
Location: Auckland, New Zealand
|
| Posted: Thu May 14, 2015 6:14 am Post subject: |
|
|
Dan,
Hmm... Not an ideal state of affairs, but perhaps not the end of the world. You might be able to get away with welding up the cross-threaded holes with a MIG or TIG, but definitely not other welding methods as the heat will distort the axle casing.
If the bolts can get enough 'bite' to stay in the housing while you replace the diff head, you could get a pair of longer bolts and file flats on the ends to take a small spanner. By this means you can prevent them from turning while you tighten the nuts (as we discussed re. the slotted ends), and it should then be possible to tighten them fully. After all, the only function of the threads in the housing is to hold the bolts in place when the diff head's removed. As you say, carefully running a tap through the holes might be just enough to save the day.
Unfortunately there's far too little 'meat' there for rethreading with Helicoils.
Good luck!
Richard |
|
| Back to top |
|
|
DanH
Joined: 31 Mar 2015
Posts: 61
Location: Auckland, New Zealand
|
| Posted: Thu May 14, 2015 6:29 am Post subject: |
|
|
| Yes its not the best. A couple of bolts with flats filed on the ends would probably be a good idea. I do have another axle housing that is in better condition, but swapping these over is not a job I want to get into right now. |
|
| Back to top |
|
|
peter scott

Joined: 18 Dec 2007
Posts: 7118
Location: Edinburgh
|
| Posted: Thu May 14, 2015 8:01 am Post subject: |
|
|
Hi Dan,
Apart from the gasketed areas another weak point on these Nuffield axles is leakage from the joint between the front and rear halves of the bango casing. If so you may be able to seal it with petrol tank sealer.
Peter
_________________
http://www.nostalgiatech.co.uk
1939 SS Jaguar 2 1/2 litre saloon |
|
| Back to top |
|
|
ukdave2002
Joined: 23 Nov 2007
Posts: 4105
Location: South Cheshire
|
| Posted: Thu May 14, 2015 8:14 am Post subject: |
|
|
A couple of bodges that may help
1) You may consider changing the thread to one that is slightly larger, ideally with a similar pitch, I don't know what the thread is, but 8mm is slightly larger than 5/16" 10mm slightly larger than 3/8"
2) Loctite do an amazing range of retention adhesives, you may be able to glue the stud in the thread after cleaning up the thread.
3) Lightly knurling the studs (need a lathe to do this) has the effect of making them slighly larger with a bit of added knurl bite.
4) I dont know if there is room for a nut on the inside of the axle case, if so using slightly longer studs with a nut on the inside, or even a bolt and screwing it through the casing from the inside?
Or a combination of the above...
Hopfully you will be lucky and the threads will clean up ok with a tap.
Dave |
|
| Back to top |
|
|
goneps
Joined: 18 Jun 2013
Posts: 601
Location: Auckland, New Zealand
|
| Posted: Thu May 14, 2015 8:33 am Post subject: |
|
|
| ukdave2002 wrote: | A couple of bodges that may help
1) You may consider changing the thread to one that is slightly larger, ideally with a similar pitch, I don't know what the thread is, but 8mm is slightly larger than 5/16" 10mm slightly larger than 3/8"
2) Loctite do an amazing range of retention adhesives, you may be able to glue the stud in the thread after cleaning up the thread.
3) Lightly knurling the studs (need a lathe to do this) has the effect of making them slighly larger with a bit of added knurl bite.
4) I dont know if there is room for a nut on the inside of the axle case, if so using slightly longer studs with a nut on the inside, or even a bolt and screwing it through the casing from the inside?
Or a combination of the above...
Hopfully you will be lucky and the threads will clean up ok with a tap.
Dave |
They're bolts, Dave, not studs—inserted from the inside. The casing is only thick enough for a couple of threads, so consequently the bolts tend to unscrew towards the back of the car as the nuts are tightened. Thus the need to hold them during that operation. Pathetically weak engineering, if "engineering" isn't too kind a term. At the very least the heads should have been secured by paired tab washers.
As long as the bolts can be held still while the nuts are fully tightened there will be no issues of consequence. Some ingenious suggestions there, nonetheless.
Richard |
|
| Back to top |
|
|
DanH
Joined: 31 Mar 2015
Posts: 61
Location: Auckland, New Zealand
|
| Posted: Tue May 19, 2015 6:48 am Post subject: |
|
|
Well it is all back together now and we are leak free so far
I ran a tap through the damaged holes and fitted different bolts taken from the spare axle housing I have. I added Loctite to the bolts when fitting them in the housing. Once the Loctite had set I was able to do all the nuts up nice and tight.
I took the car for a bit of a test drive and everything seems OK. Looking forwards to taking it out on more of an extended run when the weather is better. |
|
| Back to top |
|
|
|
|
You cannot post new topics in this forum
You cannot reply to topics in this forum
You cannot edit your posts in this forum
You cannot delete your posts in this forum
You cannot vote in polls in this forum
|
php BB powered © php BB Grp.
|


