
Classic cars forum & vehicle restoration.
|
|
| Author |
Message |
Rick
Site Admin

Joined: 27 Apr 2005
Posts: 22784
Location: UK
|
|
| Back to top |
|
 |
MikeEdwards
Joined: 25 May 2011
Posts: 2707
Location: South Cheshire
|
 Posted: Wed Jan 20, 2016 11:44 am Post subject: Posted: Wed Jan 20, 2016 11:44 am Post subject: |
 |
|
I'm planning to make the headlining for my project, based on a recent Practical Classics article. Might be easier on a seventies car as it's just a flat piece of vinyl with some loops sewn into it. My thought is that while I can buy one ready-made (for a slight discount because I'm supplying the pattern which they can use then to sell them 'off the shelf'), headlining material (for my car, black vinyl) is about £8 per metre, I need two metres at the most, so I can do a lot of experimenting before I get to the price of having someone "proper" do one for me.
I made a new carpet set for the Firenza a few years ago, and was surprised at how long it took me. In particular the transmission tunnel is quite uneven in shape, and has no console or anything to "lose" any tucks or cuts. It's still not great. I can buy a carpet, but the original was moulded to fit the floor and the bought one is just flat carpet cut to shape (and supplied slightly oversize), so I can do that myself. Again, cost of the material plus some time trimming it is way less than the cost of a pre-made carpet set.
When it comes to seats and so on, I've stripped one down to fit a replacement cover (I had a badly worn drivers seat, so found a decent passenger seat and swapped the covers) but I wouldn't know where to start on actually doing a repair. Luckily I know someone who does. |
|
| Back to top |
|
|
ukdave2002
Joined: 23 Nov 2007
Posts: 4236
Location: South Cheshire
|
| Posted: Wed Jan 20, 2016 1:36 pm Post subject: Re: Do you do your own trimming? |
|
|
| Rick wrote: | It's always struck me as being a particularly tricky-looking task, re-trimming a car's interior. The thought of tackling a headlining for instance would fill me with dread.
Have you had any successes with renovating a car's interior, either with self-made replacement sections, or shop-bought trim?
RJ |
Its the one job I shy away from! when I restored the MGA the only jobs I paid anyone labour for were:
Engine machining
Chrome plating
Acid bath body dip
Trimming the seats
I did fit all the other trim with a kit from the same supplier, but thats not particularly complicated with the absence of a roof!
I gave the trimmers a couple of simple steel frames and they turned them into this:
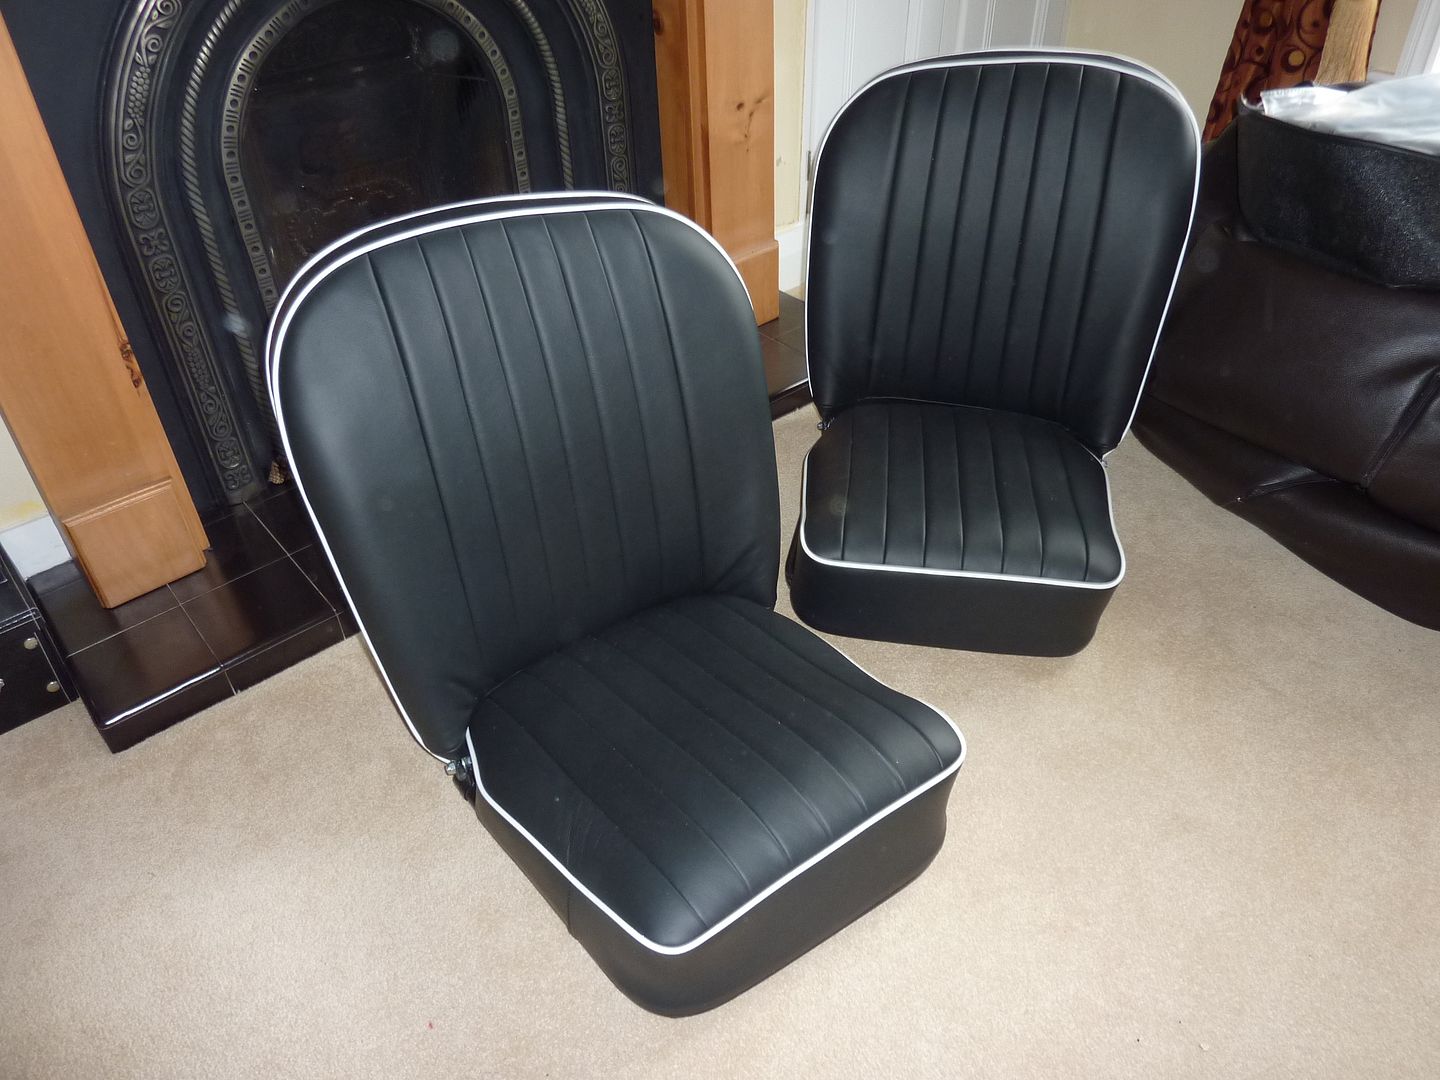
I have since recovered and filled the Stags drivers seat, that was from a kit and its ok, but I didnt enjoy doing it!
Dave |
|
| Back to top |
|
|
peter scott

Joined: 18 Dec 2007
Posts: 7215
Location: Edinburgh
|
| Posted: Wed Jan 20, 2016 7:37 pm Post subject: |
|
|
I made my own headlining and cut and edged my carpets. I also made a new leather door skin from scratch (see insert) copying the original on the opposite door. I got through a lot of needles using my wife's sewing machine!
Peter

_________________
https://www.nostalgiatech.co.uk
1939 SS Jaguar 2 1/2 litre saloon
Last edited by peter scott on Fri Jul 07, 2017 12:01 pm; edited 1 time in total |
|
| Back to top |
|
|
Ray White

Joined: 02 Dec 2014
Posts: 7112
Location: Derby
|
| Posted: Wed Jan 20, 2016 10:08 pm Post subject: |
|
|
| peter scott wrote: | I made my own headlining and cut and edged my carpets. I also made a new leather door skin from scratch (see insert) copying the original on the opposite door. I got through a lot of needles using my wife's sewing machine!
Peter
 |
That looks lovely, Peter. This kind of work is what I enjoy doing. You have sewn your door cards with a machine... I stitched my bench seat - including piping - by hand. It's not as hard as it sounds as I was reusing most of the original holes. That said, it took me 80 hours!!
I did my own head lining and copied the original exactly. Doing this established a previously unknown fact; that the material William Lyons used was nothing more than brushed cotton. This meant that I was able to source a bed sheet for the purpose. I soaked it in tea to give it some "age"!
I am happy to spend however long it takes to reproduce door cards, carpets etc. I am also able to source the correct pasting lace (made locally on the original Jacquard loom) in whatever pattern and colour combination is required. This type of gimp braid is used extensively on Swallow saloons; 25 yards in fact! It comes both single and double sided (to make draught excluders).
I have built my own seat bases and backs from rusted and rotten patterns so it only seemed right that I did the leather work. If I had given it to a trimmer, he would have started with new leather as mine had some 30 holes and rips so restoring it would have been very expensive. When I needed to replace a complete pleated section, I sourced it from the back of the seat base which is hidden from view.
I could go on at length but it might get a bit boring!
[img]/Users/raywhite750/Pictures/Photos Library.photoslibrary/Thumbnails/2015/01/27/20150127-151111/hhEydhxgSlCnSJt8J34UnQ/233_1024.jpg[/img] |
|
| Back to top |
|
|
peter scott
Joined: 18 Dec 2007
Posts: 7215
Location: Edinburgh
|
| Posted: Thu Jan 21, 2016 11:27 am Post subject: |
|
|
| Ray White wrote: |
I could go on at length but it might get a bit boring!
[img]/Users/raywhite750/Pictures/Photos Library.photoslibrary/Thumbnails/2015/01/27/20150127-151111/hhEydhxgSlCnSJt8J34UnQ/233_1024.jpg[/img] |
Not at all boring Ray.
(You need to upload your images to a website like Photobucket.)
Peter
_________________
https://www.nostalgiatech.co.uk
1939 SS Jaguar 2 1/2 litre saloon |
|
| Back to top |
|
|
Ray White
Joined: 02 Dec 2014
Posts: 7112
Location: Derby
|
| Posted: Thu Jan 21, 2016 3:02 pm Post subject: |
|
|
I had been unable to access Photobucket as it was down but it is O.K. now [img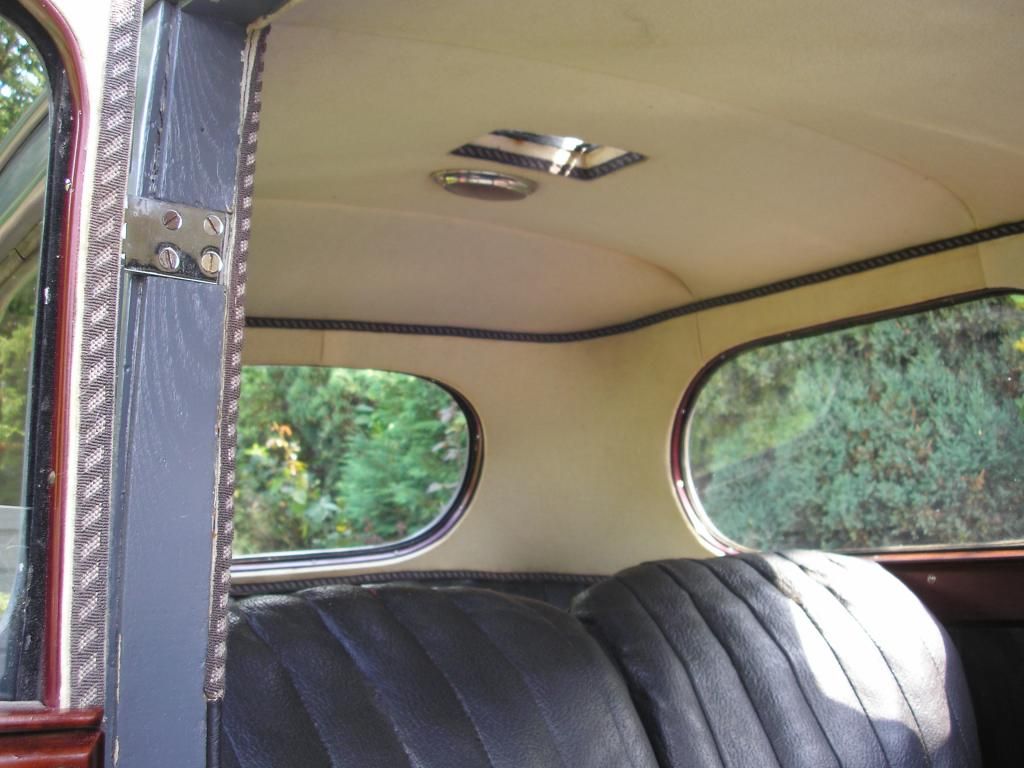 [/img] [/img]
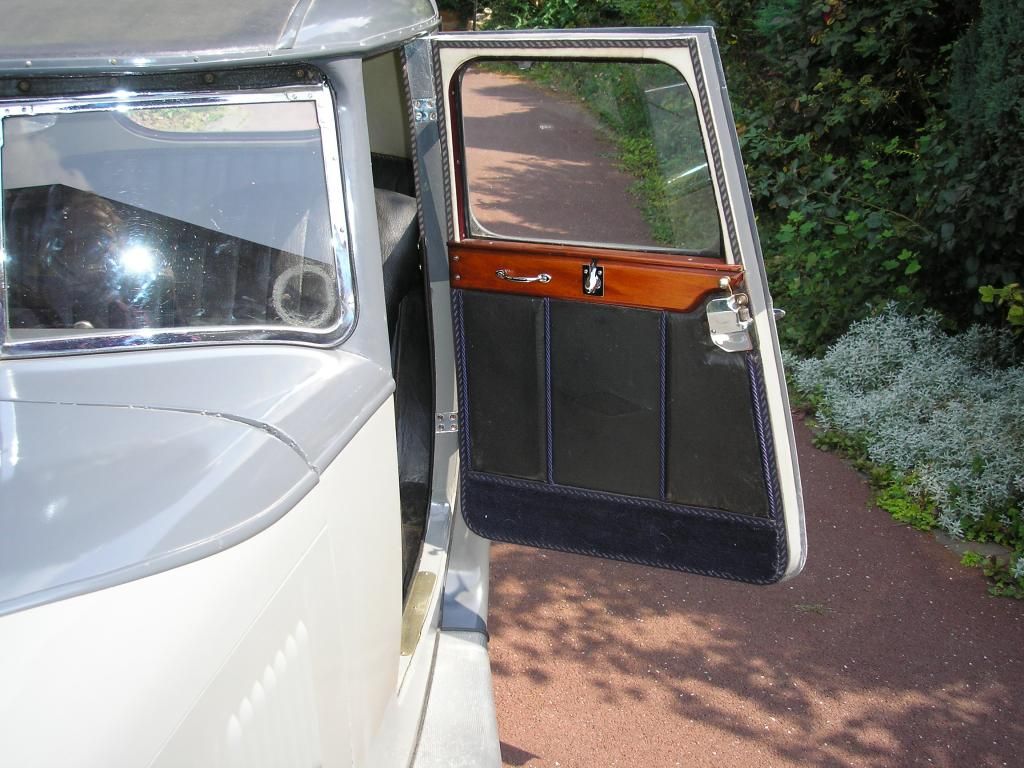
The smoker's hatch required a fair bit of fiddly repair and the back window frame had rotted away but I was able to salvage some of it using a wood hardener. The maroon trim around the windows is an aluminium extrusion. Originally it screwed into thin, steam bent plywood but I found it much easier to fashion strips of hard board with better results. In the corners, the brushed cotton liner is just tacked at the edges and miraculously forms a nice shape just by being under tension.!
I believe I have mentioned before how I "rescued" the door cards. One little improvement that I made was screwing the plywood door cards to the wooden (Ash) door frame with small brass screws rather than nailing it with tacks. This means I can access the window mechanism should a cable or spring fail. The screws are hidden under the braiding.
When it came to carpeting, I was in two minds because the wonderfully original floor looked too good to hide; the body number is etched into it - but in the end, the practical benefits of carpeting in terms of sound deadening and draught proofing won the day. The area is so small, I opted for wall to wall carpet which saved on leather edging. This is an area which needs more investigation because the small piece of original carpet that is still in the back of the car has fabric edging not leather. Knowing how William Lyons took every opportunity to save a shilling or two, I imagine the rest of the carpet should be finished the same way. |
|
| Back to top |
|
|
peter scott
Joined: 18 Dec 2007
Posts: 7215
Location: Edinburgh
|
| Posted: Thu Jan 21, 2016 4:52 pm Post subject: |
|
|
Looks very neat Ray. I hadn't been aware of the use of braids in cars until quite recently trying to find the correct one for a friend's MG SA.
In my car the separation of the upper parts of the headlining from the "walls" is filled with a Rexine covered cord. I modeled my headlining on an old black and white factory photo in which this cord appeared to be covered in the head cloth so I got that wrong but I think it looks ok.
Binding the straight edges of the carpets wasn't too difficult but I found binding the boxed gearbox carpet was a nightmare.
Peter
_________________
https://www.nostalgiatech.co.uk
1939 SS Jaguar 2 1/2 litre saloon |
|
| Back to top |
|
|
Ray White
Joined: 02 Dec 2014
Posts: 7112
Location: Derby
|
| Posted: Thu Jan 21, 2016 6:26 pm Post subject: |
|
|
Thank you for your compliment, Peter. My gimp braid is held on with tacks. These are a right old pain if they have rusted.
You hope they will come out cleanly but half the time the heads snap right off. Getting the pin out of the wood is either a doddle or not possible without gouging. It all has to come out or rust will show up through the new material.
As to your head lining fillet that would have been rexine; I think it is just par for the course that you find out things AFTER you have done them!! As it happens, I would imagine what you have done actually looks better than the original.
As you have probably found with your friend's MG, one of the difficult to find things for the older cars has been the correct type braiding. This was tacked in place through the edge and the patterned side then folded over to hide the heads of the tacks. I assume it is called "pasting lace" because it needs to be "pasted" down but this is purely supposition on my part. The double edge braid is needed to make draught excluders to fit around the doors. For these I needed to source a supply of cane. After searching high and low I found a chair maker (or more correctly, "bodger") in High Wycombe who had some he could spare. It would be used in making traditional cane furniture.
From the same place I came away with an armful of genuine horse hair for covering the seat springs. He had acquired tons of the stuff from British Rail when they were retiring some of their older rolling stock! The leather seat is pleated onto ordinary heavy cotton material and stuffed with a kind of cotton wool. The finished seat covering is then insulated from the coil springs by a layer of hessian sacking type material. I found this at an old Nursury; they use it to keep frost off plants.
The main seat springs are coils. Fortunately, I had an old single iron bedstead with the same size springs to replace the ones that had broken. I had been told to take this to the 'tip' by you know who but I knew it would come in handy one day!
Binding the springs was a kind of chain mail. This was made up of hundreds of wire links. Making repair sections was a bit of a challenge and took ages!!
I find that most of the time consuming work in trimming is hidden from view so only someone who has done it themselves can truly appreciate the commitment involved.
I fully rebuilt my Triumph GT6 and found every aspect of it interesting but the restoration of a vintage car has a different dimension - especially the interior trim. I love it.  |
|
| Back to top |
|
|
|
|
You cannot post new topics in this forum
You cannot reply to topics in this forum
You cannot edit your posts in this forum
You cannot delete your posts in this forum
You cannot vote in polls in this forum
|
php BB powered © php BB Grp.
|


