|
|
| Author |
Message |
Riley Blue
Joined: 18 Jun 2008
Posts: 1751
Location: Derbyshire
|
 Posted: Tue May 30, 2017 1:33 pm Post subject: Today's silly question: battery earth lead screw removal Posted: Tue May 30, 2017 1:33 pm Post subject: Today's silly question: battery earth lead screw removal |
 |
|
I know I'm going to regret asking this but...
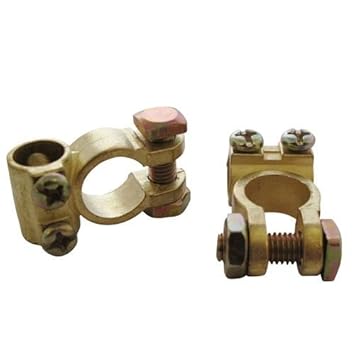
The cross-head screw holding on the positive earth lead to the post on my Riley's battery has rounded off and I don't want to resort to brute force in case I damage the battery itself.
I can easily undo the other end of the earth lead to remove the battery from the car but short of drilling out the screw, any other bright ideas for its removal? It's not a clamp, it screws down into the post - somebody please put me out of my misery and remind me what it's called, I'm having a bit of a senior moment...!
_________________
David
1963 Riley 1.5
1965 Riley 1.5 |
|
| Back to top |
|
 |
Bitumen Boy
Joined: 26 Jan 2012
Posts: 1763
Location: Above the snow line in old Monmouthshire
|
| Posted: Tue May 30, 2017 2:02 pm Post subject: |
|
|
| I know the type you mean, it's an old Lucas design I think. I forget now if the screw is a countersunk or pan head type - of course it could have been changed anway - but if it's the pan head variety you may be able to clamp some mole grips onto the head and turn it out that way. |
|
| Back to top |
|
|
Keith D
Joined: 16 Oct 2008
Posts: 1173
Location: Upper Swan, Western Australia
|
| Posted: Tue May 30, 2017 2:03 pm Post subject: |
|
|
Is there enough of the screw head remaining to grip with a Mole wrench? If not, perhaps you can carefully cut away the battery lead cup that the screw holds over and onto the post.
Keith
_________________
1926 Chrysler 60 tourer
1932 Austin Seven RN long wheelbase box sedan
1950 Austin A40 tourer
1999 BMW Z3
Its weird being the same age as old people.
You are either part of the problem or part of the solution |
|
| Back to top |
|
|
petelang
Joined: 21 May 2009
Posts: 475
Location: Nottingham
|
| Posted: Tue May 30, 2017 2:19 pm Post subject: |
|
|
Take the battery out, with cable attached. Boil your kettle. Gently pour hot water over the terminal. This will expand the lead and allow it to free from the post as in all probability it is seized on, then you should be able to apply some upward force with a screwdriver as you undo the screw.
These were never a great idea as sulphate builds up beneath them and they get well firmly stuck. Better to replace it with the clamp type.
Peter |
|
| Back to top |
|
|
Penman
Joined: 23 Nov 2007
Posts: 4880
Location: Swindon, Wilts.
|
| Posted: Tue May 30, 2017 3:04 pm Post subject: |
|
|
Hi
I have a feeling that they are Countersunk Panheads which I have also seen described as Oval headed.
_________________
Bristols should always come in pairs.
Any 2 from:-
Straight 6
V8 V10 |
|
| Back to top |
|
|
Riley Blue
Joined: 18 Jun 2008
Posts: 1751
Location: Derbyshire
|
| Posted: Tue May 30, 2017 4:06 pm Post subject: |
|
|
| petelang wrote: | Take the battery out, with cable attached. Boil your kettle. Gently pour hot water over the terminal. This will expand the lead and allow it to free from the post as in all probability it is seized on, then you should be able to apply some upward force with a screwdriver as you undo the screw.
These were never a great idea as sulphate builds up beneath them and they get well firmly stuck. Better to replace it with the clamp type.
Peter |
A good suggestion which I've just tried but no joy so I think it's drill time.
That's why I want to remove it, to fit a clamp so I won't have this problem again in the future.
_________________
David
1963 Riley 1.5
1965 Riley 1.5 |
|
| Back to top |
|
|
petelang
Joined: 21 May 2009
Posts: 475
Location: Nottingham
|
| Posted: Tue May 30, 2017 4:11 pm Post subject: |
|
|
David, there used to be a puller for these but if you cancel a small two leg on it that might work. Otherwise you could saw the top off horizontally.
Peter |
|
| Back to top |
|
|
Riley Blue
Joined: 18 Jun 2008
Posts: 1751
Location: Derbyshire
|
| Posted: Tue May 30, 2017 5:04 pm Post subject: |
|
|
Done it!!
Drilled out most of the screw and gradually prised it off with a screwdriver then managed to remove the rest of the screw - and all before SWMBO arrived home!
As you were, gentlemen...!
_________________
David
1963 Riley 1.5
1965 Riley 1.5 |
|
| Back to top |
|
|
Bitumen Boy
Joined: 26 Jan 2012
Posts: 1763
Location: Above the snow line in old Monmouthshire
|
| Posted: Tue May 30, 2017 8:15 pm Post subject: |
|
|
Glad you got it sorted 
As Peter says earlier in the thread, they were never a great idea, but they did give me a useful idea once. A couple of cars we had - same model - had an odd problem where the ordinary clamp-type terminals would slowly work their way up the battery post, eventually falling off the top. Obviously this was a reliability issue, and one that we initially thought would be an easy fix, just a clean up and retighten job. Not a bit of it! Nothing we tried worked, nor could we figure out just why it was happening. Then one day I remembered these old type terminals, and thought something along the same line may solve the problem. I took some odd brass strip that was kicking about in the garage and cut some lengths about as long as the clamp terminals were broad, drilled a wee hole off centre and then knocked one edge over vice jaws to form a rough angle. Next I gingerly drilled holes down the middle of the battery posts and used self tappers to secure the brass angles over the top. Those terminals never gave trouble again, and as the angles didn't cover everything any corrosion starting up would have been easily spotted. |
|
| Back to top |
|
|
Peter_L
Joined: 10 Apr 2008
Posts: 2680
Location: New Brunswick. Canada.
|
| Posted: Tue May 30, 2017 9:29 pm Post subject: |
|
|
| I did something similar. But with a large plastic disc cut from a kitchen cutting board and held in place with a nylon screw. This helped protect the terminals from electrical shorting and kept the clamps on the posts, which were slightly tapered . |
|
| Back to top |
|
|
Ray White

Joined: 02 Dec 2014
Posts: 7277
Location: Derby
|
| Posted: Tue May 30, 2017 11:32 pm Post subject: |
|
|
My Triumph GT6 had those battery terminals with the screw in the middle and they were always giving trouble - coming loose and causing a misfire or worse. I put up with it for years until one day I decided to change the cables and buy a different battery. It was probably the best thing I did.
One would have thought modern vehicles would have finally resolved battery connection issues but not a bit of it. The connectors on my Range Rover P38 have been trouble ever since I got it. They have a set up whereby you have to slacken off the tapered clamp, fit the connector firmly to the post and then tighten the clamp again. The problem is that the clamp is slightly too big for the battery post so try as you might you can never get a tight fit. I found the best way of securing the clamp was to cut and fit a small piece of brass shim stock... I could then get a nice tight connection on the battery post. |
|
| Back to top |
|
|
PAUL BEAUMONT
Joined: 27 Nov 2007
Posts: 1281
Location: Barnsley S. Yorks
|
| Posted: Wed May 31, 2017 8:59 am Post subject: |
|
|
It is for jobs like this that I like my Dremel. You decide which part you need to keep (in this case the battery) and carefully cut away the sacrificial part. I guess, in this case there would have been no detriment in part of the screw remaining in the post.
I have successfully salvaged badges that were retained with nuts, by carefully cutting the nut away and leaving the male threaded part unscathed.
It can be expensive in Dremel discs if you are not very steady!
As far as I am concerned, this type of battery clamp should have been consigned to the bin 40 years ago! |
|
| Back to top |
|
|
Bitumen Boy
Joined: 26 Jan 2012
Posts: 1763
Location: Above the snow line in old Monmouthshire
|
| Posted: Wed May 31, 2017 11:57 am Post subject: |
|
|
| peterwpg wrote: | | I did something similar. But with a large plastic disc cut from a kitchen cutting board and held in place with a nylon screw. This helped protect the terminals from electrical shorting and kept the clamps on the posts, which were slightly tapered . |
I'm guessing you had to tap the battery post to use a nylon screw? Good idea though. Our application had nothing handy to cause shorting so brass was fine. |
|
| Back to top |
|
|
Penman
Joined: 23 Nov 2007
Posts: 4880
Location: Swindon, Wilts.
|
| Posted: Wed May 31, 2017 12:55 pm Post subject: |
|
|
Hi
I found that the problem with the traditional clamp
was that they have a tendency to bend so that when tightend the jaws eventually meet each other, and possibly the posts lose material as well.
It is probably caused by over tightening, but it can at least be allowed for by using shimming to increase the size of the post.
Most moderns have an insulator cover on the Pos and I think that would be a sensible mod for anything even if, as bitumen boy said there is nothing handy to cause shorting, after all in an accident metal gets bent and bits of it can get thrown around.
That was why classic minis had that big cover over the whole battery in the boot next to the petrol (bomb) tank.
_________________
Bristols should always come in pairs.
Any 2 from:-
Straight 6
V8 V10 |
|
| Back to top |
|
|
Ray White
Joined: 02 Dec 2014
Posts: 7277
Location: Derby
|
| Posted: Wed May 31, 2017 9:26 pm Post subject: |
|
|
| One other feature of the above type of clamp is the method of cable attachment. I don't rely on the screws. A better job is to solder the cable to the clamp. |
|
| Back to top |
|
|
|


