
Classic cars forum & vehicle restoration.
|
|
| Author |
Message |
roverdriver

Joined: 18 Oct 2008
Posts: 1210
Location: 100 miles from Melbourne, Victoria, Australia
|
 Posted: Fri Jan 26, 2018 7:30 am Post subject: Clutch Replacement, Rover P4. (Part 1) Posted: Fri Jan 26, 2018 7:30 am Post subject: Clutch Replacement, Rover P4. (Part 1) |
 |
|
Here is another 'How To' tale re-told with photos from Postimage instead of
Photobucket. Original story is from Mid-2008.
Even though this is specific to the Rover P4, I hope that it inspires members to tackle some similar jobs themselves.
Note- the P4 is a little unusual in that the gearbox is removed from inside the car, whereas with many vehicles the gearbox is lowered away from the engine from underneath.
My 1954 Rover 90 was suffering from a slipping clutch. I reasoned that I
was getting a bit too old to do the job myself, so I had intended
putting the job in the hands of a mechanic, but the local ones were not
interested and more distant ones too inconvenient. I was told that it is
probably the most difficult job to do on a P4, so I was left with the
choice of paying out a lot more than the car is worth to have it done,
or settling for doing it myself. Ergo, I had nothing to lose by doing it
myself.
After studying the Workshop Manual, I started on the job. First was to remove the front carpets. Next came the gear-change lever and supports, held in place by four small bolts.
Next to be taken out was the front seat to gain access to the whole transmission tunnel. I decided to undo the runners as the easiest way to get the seat out.
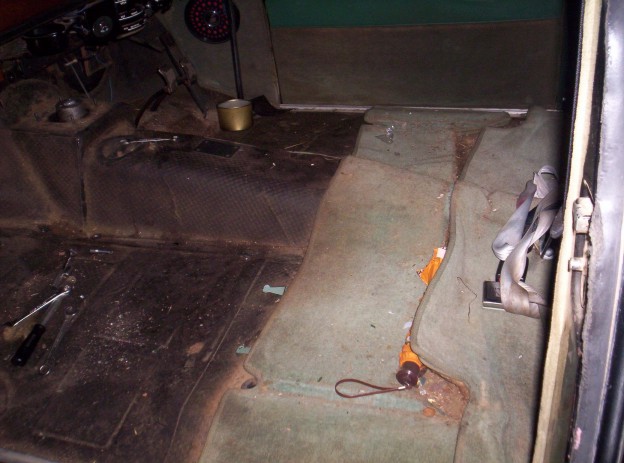
The tunnel is held by many small bolts and captive nuts. Fortunately most came undone fairly easily, only a couple were difficult, but an overnight soak in a mixture of AT and Acetone freed them up. Here the tunnel has now been removed-
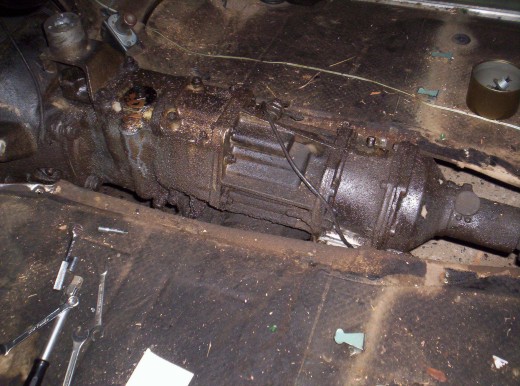
I decided to do some cleaning up before removing the gearbox, partly to help me to locate items that required disconnecting that might be hidden under the oily mess.
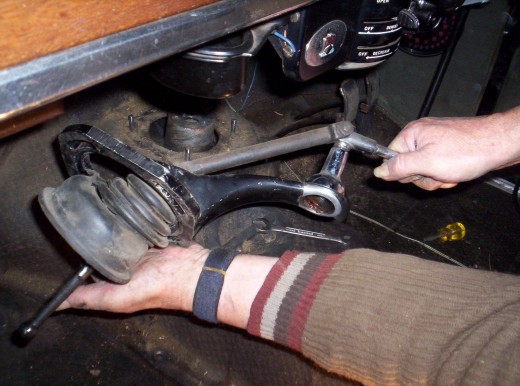
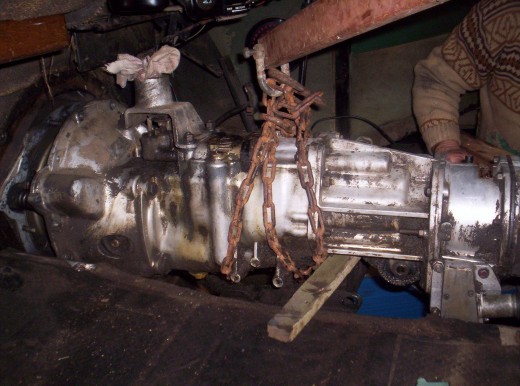
Apart from the obvious bolts holding the bell housing to the rear of the engine (Flywheel housing) there are bolts in a universal joint at the rear, the single-bolt gearbox mount itself, clutch levers and wiring for the Laycock overdrive and for the reversing light.
I supported the rear of the engine with a jack because the gearbox mount doubles as the rear engine mount. With everything undone, except for a few nuts to prevent the risk of unwanted movement, I went into our nearest town to visit the one and only hire service. They had an engine crane there, but the mast was so high that there was no possibility of it reaching inside the car., What could I do?
I have always kept a reasonable supply of useful odds and ends, so hunted through that Junk pile for ideas. I selected two timbers that had started life as the supports for the wire-wove of a double bed. I located four casters on a steel stand, sawed them off and bolted them onto the timbers. Other scraps of steel allowed be to complete the home-made crane, but I did have to buy some nuts and bolts along the way. The activation of the crane was by utilising a truck hydraulic jack. After construction, I needed something to test it with, and used a P6 diff assembly.
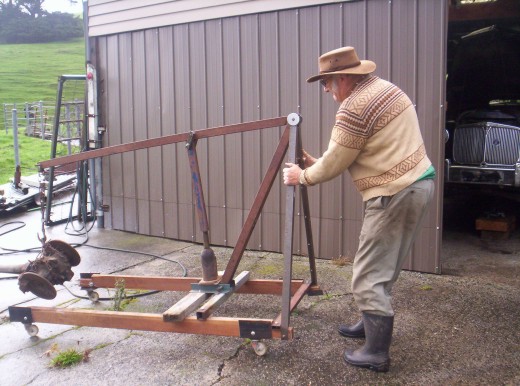
It is an optical illusion that the crane boom appears to bend in this picture.
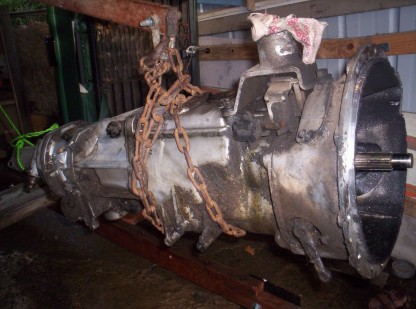
I tried to guess where the center of gravity of the box might be, and wrapped a chain around it then fasted the crane. The final nuts holding the box were removed and lifting commenced.
After some adjusting for balance, the crane took the full weight all right.
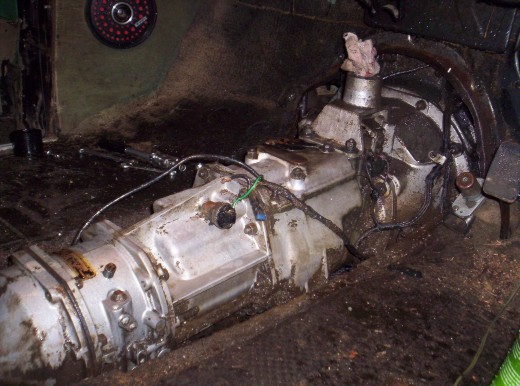
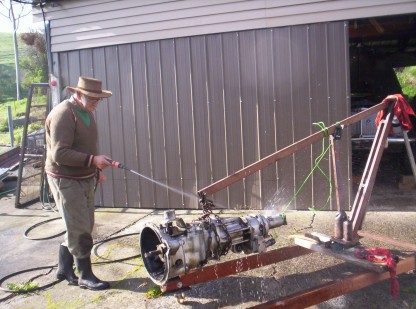
With the gearbox now outside, I could use copious amounts of degreaser, plus lots of water to clean things up properly
The next step was to check everything over and start fitting the new bits, but I'll put that into Part 2 of the tale.
Part 2 can be found here-
http://www.oldclassiccar.co.uk/forum/phpbb/phpBB2/viewtopic.php?p=157823#157823
_________________
Dane- roverdriver but not a Viking.
Last edited by roverdriver on Sun May 27, 2018 11:39 am; edited 2 times in total |
|
| Back to top |
|
 |
troutrunner

Joined: 03 Dec 2012
Posts: 185
Location: South Lincolnshire
|
| Posted: Fri Jan 26, 2018 10:00 am Post subject: |
|
|
Very interesting story with nice pictures, thanks for posting this.
The gearbox looks rather large and heavy, well done on making the crane, it was very ingenious of you 
_________________
Paul
.
1937 Ford Model Y.
1939 Austin 10.
1955 Austin A30.
1958 Ford 300E van.
1961 Austin A40.
1964 Wolseley Hornet.
1965 Series2a Land Rover.
1968 Wolseley Hornet.
1994 Peugeot 405 Est. 2of.
Nil illegitimi Carborundum |
|
| Back to top |
|
|
COMMAD
Joined: 12 Dec 2011
Posts: 177
Location: Gold Coast. Australia
|
| Posted: Fri Jan 26, 2018 10:32 am Post subject: |
|
|
Great piece of ingenuity there, keeps ones brain from seizing up, plus saves a small fortune in workshop labour charges...  |
|
| Back to top |
|
|
peter scott

Joined: 18 Dec 2007
Posts: 7216
Location: Edinburgh
|
| Posted: Fri Jan 26, 2018 12:20 pm Post subject: |
|
|
Excellent work on creating your own crane. The combination of gearbox and overdrive is certainly not easy to deal with without some mechanical assistance.
Peter
_________________
https://www.nostalgiatech.co.uk
1939 SS Jaguar 2 1/2 litre saloon |
|
| Back to top |
|
|
47Jag
Joined: 26 Jun 2008
Posts: 1480
Location: Bothwell, Scotland
|
| Posted: Fri Jan 26, 2018 4:53 pm Post subject: |
|
|
Dane,
You are ‘ the man ‘
Art |
|
| Back to top |
|
|
Rick
Site Admin

Joined: 27 Apr 2005
Posts: 22812
Location: UK
|
|
| Back to top |
|
|
|
|
You cannot post new topics in this forum
You cannot reply to topics in this forum
You cannot edit your posts in this forum
You cannot delete your posts in this forum
You cannot vote in polls in this forum
|
php BB powered © php BB Grp.
|


