|
|
| Do you like or dislike the new dashboard ? |
| Yes I do like the new dashboard |
|
100% |
[ 7 ] |
| No I do not like the new dashboard |
|
0% |
[ 0 ] |
|
| Total Votes : 7 |
|
| Author |
Message |
Ray White

Joined: 02 Dec 2014
Posts: 6319
Location: Derby
|
 Posted: Thu Feb 03, 2022 12:21 pm Post subject: Posted: Thu Feb 03, 2022 12:21 pm Post subject: |
 |
|
My new dashboard warning light arrived in the post this morning. It came from MG Octagon Club spares but was not the same as the ones I have had before. I suspect it is inferior but only time will tell.
I have made the hole in the dash and the frame behind to which it will be fixed but there is much more work to do on the dash board before I need worry about fitting the oil pressure warning system.
One thing I have just noticed is that the bezels for the choke and starter cables are much smaller than the others on the instrument panel. Having gone to the trouble of making it more symmetrical it would be a pity to spoil the effect so I will need to think of a workable solution. Perhaps fit the small bezels inside larger ones? Then the holes in the panel will need opening up. Can I be sure the cables will be secure and not flop about?
Never easy is it? |
|
| Back to top |
|
 |
Ray White
Joined: 02 Dec 2014
Posts: 6319
Location: Derby
|
| Posted: Mon Feb 07, 2022 10:15 am Post subject: |
|
|
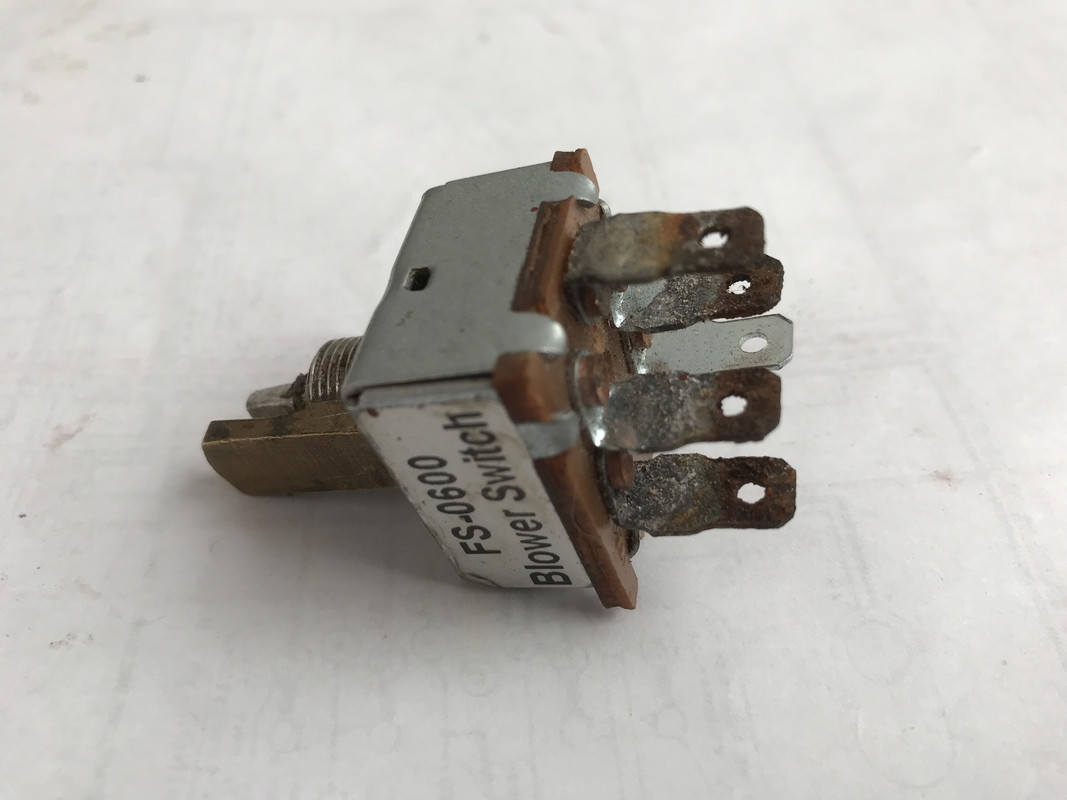
I think there must have been a lot of complaints about this particular switch (FS0600) because they used to be everywhere but now seem to have all but disappeared from sale.!!
I have ordered a replacement from 'Car Builder Solutions' from whom I bought the heater originally but will not be using brass connectors again!
I haven't raised the corrosion issue with CBS because they would only ask me to return it ...and I have modified the shaft by filing it down to take a brass terminal block to which I have fitted my own matching control knob.
I am very pleased with the way this modification has come together utilising a scrap Morris Minor dashboard mounted cable bezel and backing nut. Behind the instrument panel, the assembly is neatly concealed inside a discreet chromed tube... (which is actually a plastic domestic radiator valve cover!). The brass bezel securing nut is actually a perfect hexagonal fit in one end and the other end neatly threads onto the switch.
Importantly, it is not in the least bit floppy and feels every bit as good as the original.
Wink
This little job is not quite finished but when it is I will post some photos. |
|
| Back to top |
|
|
Ray White
Joined: 02 Dec 2014
Posts: 6319
Location: Derby
|
| Posted: Thu Feb 10, 2022 8:16 pm Post subject: |
|
|
One of the complaints I hear about the TC is the poor back lighting of the instruments. I raised this issue with an instrument restorer who suggested better illumination could be achieved by relieving the plywood area next to the instrument "window". I did this and was feeling quite pleased with my efforts until it came to offering up the speedo.
What I hadn't allowed for was the securing bracket that would normally rest on the wooden edge next to the side of the instrument. Unfortunately, I had removed some of that material making it impossible to securely mount the bracket.
What I need to do now is to extend the brackets so they can be screwed to the board. There are a number of ways this can be done but I will probably fabricate a couple of right angle pieces and fix them to the instrument brackets. They will act as "feet" giving me something solid on which to mount the instruments.
I must like making work for myself!  |
|
| Back to top |
|
|
Ray White
Joined: 02 Dec 2014
Posts: 6319
Location: Derby
|
| Posted: Sat Feb 12, 2022 5:58 pm Post subject: |
|
|
Having finished the heater switch and sorted out the mounting points for the speedo and taco I thought I was done with fettling the dash and could get on with covering it ready for wiring...but then I noticed the starter knob looked wonky.

The join where the cable outer passes through the bezel was loose and the only solution I could think of was to sweat some soft solder around the join. I took time to clean and burnish the brass and with a temporary support holding the cable in the best place I applied the solder. It's now firmly fixed.
At least there will be nothing obviously out of alignment... or wonky! |
|
| Back to top |
|
|
alastairq
Joined: 14 Oct 2016
Posts: 1954
Location: East Yorkshire
|
| Posted: Sat Feb 12, 2022 7:41 pm Post subject: |
|
|
| Quote: | | At least there will be nothing obviously out of alignment... or wonky! |
A Morrison's MG, then?
_________________
Dellow Mk2, 1951 built, reg 1952.
Fiat 126 BIS
Cannon special [1996 registered. Built in 1950's]
----------------------------------------------
Ford Pop chassis, Ashley 1172 bodyshell, in pieces. |
|
| Back to top |
|
|
Ray White
Joined: 02 Dec 2014
Posts: 6319
Location: Derby
|
| Posted: Sat Feb 12, 2022 8:21 pm Post subject: |
|
|
| alastairq wrote: | | Quote: | | At least there will be nothing obviously out of alignment... or wonky! |
A Morrison's MG, then? |
...or NOT wonky as the case may be.
 |
|
| Back to top |
|
|
Bitumen Boy
Joined: 26 Jan 2012
Posts: 1735
Location: Above the snow line in old Monmouthshire
|
| Posted: Sun Feb 13, 2022 2:25 am Post subject: |
|
|
| Ray White wrote: | | alastairq wrote: | | Quote: | | At least there will be nothing obviously out of alignment... or wonky! |
A Morrison's MG, then? |
...or NOT wonky as the case may be.
|
I bet these cars had plenty of wonky bits from new... |
|
| Back to top |
|
|
Ray White
Joined: 02 Dec 2014
Posts: 6319
Location: Derby
|
| Posted: Sun Feb 13, 2022 9:55 am Post subject: |
|
|
| Bitumen Boy wrote: |
I bet these cars had plenty of wonky bits from new... |
..ice...very thin... |
|
| Back to top |
|
|
Miken
Joined: 24 Dec 2012
Posts: 544
|
|
| Back to top |
|
|
Ray White
Joined: 02 Dec 2014
Posts: 6319
Location: Derby
|
| Posted: Sun Feb 13, 2022 6:53 pm Post subject: |
|
|
Mike. I have replied to your PM.
I think I will be O.K. now thanks to your recommendation.
Cheers,
Ray. |
|
| Back to top |
|
|
Ray White
Joined: 02 Dec 2014
Posts: 6319
Location: Derby
|
| Posted: Thu Feb 24, 2022 12:47 am Post subject: |
|
|
It never ceases to amaze me just how long all the small jobs take!
One problem is that space needs to be made for additional dashboard fittings. Any extra back lighting or switches need space behind them for wiring and this means enlarging the original openings in the plywood support behind the dash; a seemingly endless process of offering up, marking and cutting.!
Another issue has been that of warning lights and their bulbs. For example, the euphemistically named 'ignition warning light' originally had a 2 volt 0.5 watt bulb with a wire wound resistor to the housing; these bulbs are now obsolete (although torch bulbs may work?) and the repro lights come with 12V 2.2 W bulbs. The resistor winding is still present but now apparently only for cosmetic reasons... so if I fit the 2 volt torch bulbs I may include a separate 2 Watt 68. ohm resistor.
The risk of running 12 volt bulbs is that depending on the wattage they can generate sufficient heat to melt the plastic "jewel" lens. This is what seems to have happened to one of my original warning lights. I have managed to restore the lens enough for it to be used but although replacements are available they are quite expensive for what they are; especially considering the new replica bezels have different threads to the originals!
I am nearly at the point of applying the leather covering. By experimenting with where the leather wraps round the openings for instruments etc. I have established that care needs to be taken or there will not be enough clearance for them. Never having done anything like this before, it is quite a steep learning curve.
I need to mark on the back of the leather where the instrument panel and other openings in the dashboard are...and avoid those areas when then applying the adhesive. I intend to use PVA (slightly diluted) to both surfaces as experiments show this to offer the best outcome. |
|
| Back to top |
|
|
Ray White
Joined: 02 Dec 2014
Posts: 6319
Location: Derby
|
| Posted: Thu Feb 24, 2022 5:31 pm Post subject: |
|
|
Long suffering followers of this saga may recall how the body tub arrived with a reinforcing bracket directly in line with the steering column support bracket. I moved the scuttle bracket to a new position ...only to find later that it got in the way of where I wanted an instrument, so it had to be moved again.!
Now I am finding the same bracket fouls another bracket; the U shaped one that secures the speedo to the dashboard.!
I now need to decide on a plan of action. If I move the heavy duty support bracket to the left of the steering column support it may no longer sufficiently support the right hand side of the scuttle frame as it was designed to do. On the other hand the speedo bracket only needs some plywood to be removed for it to fit.
If I leave the heavy duty bracket where it is I will need to make a plate with four holes. Two holes will allow it to fit on the back of the speedo. The other two holes will allow me to bolt the "U" bracket in a different position so as to avoid the heavy duty scuttle bracket.
Another unexpected development has been the trip set adjuster. Not having anything original to compare it with, I am annoyed to find that a 3/4" slot needs to be cut into the dashboard support timber. The wood is only 1" thick so this will significantly weaken it. All I can do is screw a metal plate to the back for support.
Should any purists question my swapping over the position of the speedo and the tacho; it is not a mistake. I have done it deliberately because in this day and age I believe checking one's speed is more important than worrying about the engine revs.
AS it happens, this modification has nothing to do with the trouble I am having in fitting the dashboard. Both instruments have mounting studs in the same place and use the same U brackets.
In fact; with the original arrangement, the clock that is incorporated with the tacho should be easier to set as the adjuster is no longer directly in line with the steering column.
In these pictures, the slot cut for the trip set adjuster can clearly be seen. Also the corner of the heavy duty scuttle bracket is visible. The second photo shows the back of the speedo with it's "U" shaped support bracket.

 |
|
| Back to top |
|
|
Ray White
Joined: 02 Dec 2014
Posts: 6319
Location: Derby
|
| Posted: Thu Feb 24, 2022 7:03 pm Post subject: |
|
|
An update.
It would seem the idea of having a plate on the back of the speedo won't work. The U bracket will really only fit on one way.
I am a bit stuck really. 
Perhaps I might be able to bend the U bracket so it has a 'dog leg'; thus avoiding the other bracket? |
|
| Back to top |
|
|
Bitumen Boy
Joined: 26 Jan 2012
Posts: 1735
Location: Above the snow line in old Monmouthshire
|
| Posted: Thu Feb 24, 2022 10:00 pm Post subject: |
|
|
| Those U brackets are about as basic is it's possible to be. I would be thinking of fabricating "specials" to fit wherever it's possible to get them in, rather than worrying about making the standard brackets fit somehow. Nobody is going to see them so you can be as creative as you need to be! |
|
| Back to top |
|
|
Ray White
Joined: 02 Dec 2014
Posts: 6319
Location: Derby
|
| Posted: Thu Feb 24, 2022 10:27 pm Post subject: |
|
|
| Bitumen Boy wrote: | | Those U brackets are about as basic is it's possible to be. I would be thinking of fabricating "specials" to fit wherever it's possible to get them in, rather than worrying about making the standard brackets fit somehow. Nobody is going to see them so you can be as creative as you need to be! |
Yes, it seems like the easiest route. I think the "dog leg" shape would resolve the problem. I think I have mentioned that I don't have anything original to use as a pattern or even study, so I am making it up as I go along. |
|
| Back to top |
|
|
|


