|
|
| Do you like or dislike the new dashboard ? |
| Yes I do like the new dashboard |
|
100% |
[ 7 ] |
| No I do not like the new dashboard |
|
0% |
[ 0 ] |
|
| Total Votes : 7 |
|
| Author |
Message |
alastairq
Joined: 14 Oct 2016
Posts: 1954
Location: East Yorkshire
|
 Posted: Wed May 04, 2022 9:14 am Post subject: Posted: Wed May 04, 2022 9:14 am Post subject: |
 |
|
Blue Hylomar?
_________________
Dellow Mk2, 1951 built, reg 1952.
Fiat 126 BIS
Cannon special [1996 registered. Built in 1950's]
----------------------------------------------
Ford Pop chassis, Ashley 1172 bodyshell, in pieces. |
|
| Back to top |
|
 |
Ray White

Joined: 02 Dec 2014
Posts: 6316
Location: Derby
|
| Posted: Wed May 04, 2022 9:36 am Post subject: |
|
|
| alastairq wrote: | | Blue Hylomar? |
I prefer Wellseal. I suppose it depends on what you are used to, doesn't it.? I have used blue Hylomar in the past and have to admit it is far less messy but nothing gets past Wellseal...so far!
I do wonder if any of the traditional sealants are ethanol proof???
Talking about ethanol; will the float be O.K.?
Perhaps an ethanol proof float would be a nice idea but I am not about to spend £32 on a float. Maybe consider it if the light stays on??
Last edited by Ray White on Fri May 06, 2022 10:10 pm; edited 1 time in total |
|
| Back to top |
|
|
Ray White
Joined: 02 Dec 2014
Posts: 6316
Location: Derby
|
| Posted: Wed May 04, 2022 6:58 pm Post subject: |
|
|
I am feeling more relaxed about buying a new petrol tank when I saw what came out of the old one.
This is just a fraction of what I have collected.
 |
|
| Back to top |
|
|
bjacko
Joined: 28 Oct 2013
Posts: 360
Location: Melbourne Australia
|
| Posted: Thu May 05, 2022 8:07 am Post subject: MG TC |
|
|
| Yes, Hylomar was the one I was trying to recall. I find the aerosol is easier to use as it produces a fine mist. It is also easy to take apart in the future. |
|
| Back to top |
|
|
Bitumen Boy
Joined: 26 Jan 2012
Posts: 1735
Location: Above the snow line in old Monmouthshire
|
| Posted: Thu May 05, 2022 1:15 pm Post subject: Re: MG TC |
|
|
| bjacko wrote: | | Yes, Hylomar was the one I was trying to recall. I find the aerosol is easier to use as it produces a fine mist. It is also easy to take apart in the future. |
I didn't know it came in an aerosol, it sounds like a better idea than the tubes. |
|
| Back to top |
|
|
Ray White
Joined: 02 Dec 2014
Posts: 6316
Location: Derby
|
| Posted: Thu May 05, 2022 10:01 pm Post subject: |
|
|
One of the historically interesting things about the jointing compound that I use; Wellseal, is that it was developed by Rolls Royce
for use on their Merlin engines. I understand it is manufactured under licence by a company called Kommerling in Preston.
These days Wellseal goes by the trade name Stag but it used to be made by Kenilworth Manufacturing Company or KMC.

I still have one of the original tubes in it's box.

The product is quite runny and you only need a thin layer on close fitting surfaces which is why it lasts so long.
It will probably last indefinitely but I would not trust a sealant that is over 20 years old!
Last edited by Ray White on Fri May 06, 2022 10:12 pm; edited 3 times in total |
|
| Back to top |
|
|
Ray White
Joined: 02 Dec 2014
Posts: 6316
Location: Derby
|
| Posted: Thu May 05, 2022 11:33 pm Post subject: |
|
|
As previously reported, the new petrol tank seems to be a little bit narrower than the original.
This has meant the special bolts that come with a rubber bush kit (that goes between the wings and the tank)
are a bit too short to screw into the captive nuts in the brackets on each side of the tank.
Forcing the bolts to meet the brackets just pulls the wings inwards.
The bolts, which are made to pass through round rubber bushes are 7/16" dia. with a 3/8" BSF thread.
 
I have numerous 3/8" BSF bolts...and several at 7/16" but none with this combination so I have had to make some.
I mounted a 7/16" dia bolt of sufficient length in the lathe and turned the threads down to 3/8". I then cut a 3/8"BSF thread.
The new bolt then needed to be cut down to the required length and the oversize head reduced in thickness to match the original.
 
 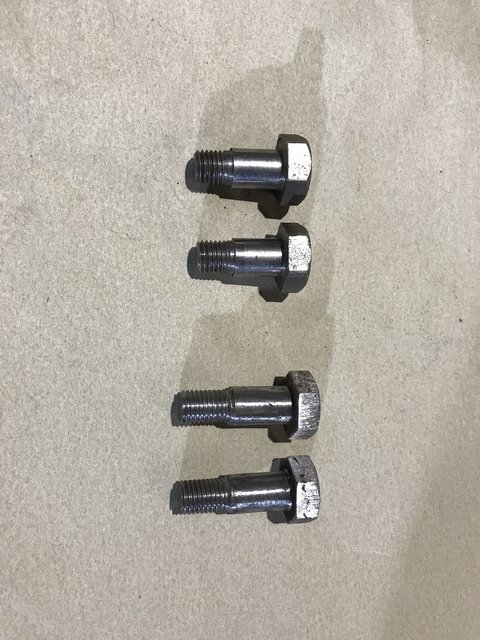
The result is as expected and with a 1/8" thick washer of the same size and placed next to the rubber bush a good secure fix
has been achieved without distorting the wings. This photo shows why I needed more threads...

Another time consuming job has been to make gaskets for the low level fuel light sender unit.
Getting the holes in exactly the right place is essential if the sender unit is not to leak.
The float was leaking so that has required soldering. Now the refurbished sender unit is fitted into the tank
and is one more job ticked off the list.
Another hour or so has been spent tidying up the off side rear wing where it joins the aforementioned bush kit. It was in a mess but
I think looks O.K. and I have now finalised the position of the screws that fix the rear wings to the body. This has taken a lot of trial
and error (mostly error!)...
but is necessary in order that the rest of the body falls into line.
There is much more work involved with the petrol tank than I had expected. The tank came without a cap but owing to the
poor quality of replicas being made these days, I have decided to rebuild the original and have had the outer cover chrome plated.
One of the nice features is a little release clip with an MG logo . This was removed from the original tank by grinding off the end of
the little pivot. I have been lucky in finding a bolt small enough to pass through the the clip and pivot holes and with the
correct thread to screw into the other side where it is further secured with a nut; possibly 6BA.
The worn appearance of the clip will be retained as I fear the detail would be lost in the plating process.
 |
|
| Back to top |
|
|
bjacko
Joined: 28 Oct 2013
Posts: 360
Location: Melbourne Australia
|
| Posted: Sat May 07, 2022 7:54 am Post subject: MG TC Fuel Tank Sender |
|
|
| It is important to have a good earth for the sender to make it work. Most people use one of the mounting screws with a made up lead to the chassis, (on Morris's). |
|
| Back to top |
|
|
Ray White
Joined: 02 Dec 2014
Posts: 6316
Location: Derby
|
| Posted: Sat May 07, 2022 10:28 am Post subject: Re: MG TC Fuel Tank Sender |
|
|
| bjacko wrote: | | It is important to have a good earth for the sender to make it work. Most people use one of the mounting screws with a made up lead to the chassis, (on Morris's). |
Yes, I had planned on earthing from under the insulation where the supply is connected. This worked O.K. when I tested it before installation.
It may not be possible to use a mounting screw as they are coated with sealer to prevent leaks. |
|
| Back to top |
|
|
Ray White
Joined: 02 Dec 2014
Posts: 6316
Location: Derby
|
| Posted: Sat May 07, 2022 2:38 pm Post subject: |
|
|
Not being inclined to cut corners, I am fitting 1/2" thick rubber packing strips to the back board (behind the tank) as per original.
There are two vertical strips and a single horizontal one.
Also, the tank sits on two short strips which are held onto the chassis with bifurcated rivets. The ones that came with the kit are too short. When I find my tin of split rivets I will improve on them.
I have placed 3/4" (slotted) wood screws at about 5" intervals with countersunk pilot holes. It may not be exactly as manufactured but I have added a few more screws to make a better job of it.
Not a difficult task...but it all takes time.!

 |
|
| Back to top |
|
|
Ray White
Joined: 02 Dec 2014
Posts: 6316
Location: Derby
|
| Posted: Wed May 11, 2022 9:48 pm Post subject: |
|
|
I wish people would use the correct tool for the job. This petrol tank drain plug required a 7/16 Whitworth spanner or socket. Clearly,
by the way the corners have suffered, it has seen something less than ideal.
I can't decide whether I should replace it... or just leave it as is. 
Next to the plug is this petrol pipe connector. What can be seen are the remains of a filter. I could, I suppose , create a new one from
fine gauze but my new petrol gauge sender unit has a filter so it would probably be unnecessary duplication.
 |
|
| Back to top |
|
|
kevin2306
Joined: 01 Jul 2013
Posts: 1359
Location: nr Llangollen, north wales
|
| Posted: Thu May 12, 2022 5:57 pm Post subject: |
|
|
If you want to replace the mesh filter on the connector, you could get one from a classic bike petrol tap, they are soldered on so would be an easy fix.
Kev |
|
| Back to top |
|
|
Ray White
Joined: 02 Dec 2014
Posts: 6316
Location: Derby
|
| Posted: Thu May 12, 2022 6:41 pm Post subject: |
|
|
| kevin2306 wrote: | If you want to replace the mesh filter on the connector, you could get one from a classic bike petrol tap, they are soldered on so would be an easy fix.
Kev |
I have some fine brass gauze left over from when I made a petrol filter for the Dodge... but the more I think about it there seems no point in duplication. The hydrostatic gauge sender unit that I got from Declan Burns (Germany) has an in line filter so that should suffice.
I have a good number of red fibre washers but nothing with an internal diameter of 5/8" so I selected a couple of fibre washers with plenty of spare material - 7/8" wide - and stamped out a 5/8" ID.
(One of the many useful things that I inherited from my engineer Dad was a comprehensive selection selection of sharp circular cutters in metric and imperial sizes.)
I have sanded down the surfaces and tidied up the edges. My next job is to paint the fittings and attach them to the tank ensuring a good seal.
 |
|
| Back to top |
|
|
Ray White
Joined: 02 Dec 2014
Posts: 6316
Location: Derby
|
| Posted: Wed May 18, 2022 8:32 pm Post subject: |
|
|
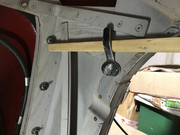
Having had enough of working on the rear wings for a while, I thought I would return to the job of sorting out the dash board.
One thing that I find frustrating is not having a solid surface to work on. I resolved to provide my own temporary bench and utilising various bits and pieces I think I can now work in relative comfort.
The photos show how simply made brackets hold two lengths of wooden trim in tension sufficient to support a padded trestle.

 |
|
| Back to top |
|
|
ukdave2002
Joined: 23 Nov 2007
Posts: 4105
Location: South Cheshire
|
| Posted: Thu May 19, 2022 7:08 am Post subject: |
|
|
Are you going to fit an OBD2 port to the back of the dash? 
Dave |
|
| Back to top |
|
|
|


