
Classic cars forum & vehicle restoration.
|
|
| Author |
Message |
1935Hillman
Joined: 06 Apr 2010
Posts: 257
Location: Hampshire
|
 Posted: Thu Sep 26, 2013 8:14 pm Post subject: Posted: Thu Sep 26, 2013 8:14 pm Post subject: |
 |
|
Some progress has been made on the ash frame and it is beginning to look like the car I had intended. I do need to roll her out of the workshop to be able to stand back and see how she looks properly before I get too far. Once you have a basic shape it is so much easier to proceed. It is like any other craft in that respect. I have to confess that the laminating is the stuff I have enjoyed most, it is so satisfying when you take the clamps off and you have the curve you were after and the piece is so strong


You can see the reclaimed wheel cover very roughly in place ( it will not impede the window hopefully when it is finished) It is from a Vauxhall. I may also be able to use the Vauxhall wings although they may take a bit more work. When she goes outside I will prop the various reclaimed parts in place to see how she will look overall. A slight distraction was fitting the newly rebuilt steering box and linkage. I thought that if she has got to be pushed outside she might as well be steerable - and it gets another job done. |
|
| Back to top |
|
 |
Rick
Site Admin

Joined: 27 Apr 2005
Posts: 22454
Location: UK
|
|
| Back to top |
|
|
1935Hillman
Joined: 06 Apr 2010
Posts: 257
Location: Hampshire
|
| Posted: Tue Oct 01, 2013 12:19 pm Post subject: |
|
|
| Thanks RJ. There are times when we garage hermits need a bit of encouragement. Things are a bit slow right now as I cut my little finger with the jig saw while cutting out that oval rear window! It is taking its time to heal and it is amazing how one can catch it on almost everything all day!! We all have accidents but a timely reminder to take greater care in future. |
|
| Back to top |
|
|
rjt10/4
Joined: 26 Nov 2012
Posts: 214
Location: Minions Cornwall
|
| Posted: Tue Oct 01, 2013 5:50 pm Post subject: |
|
|
| fantastic looking framework and its good to follow the progress im not looking forward to doing the framework on my Armstrong and maybe asking for some advice keep up the good work |
|
| Back to top |
|
|
1935Hillman
Joined: 06 Apr 2010
Posts: 257
Location: Hampshire
|
| Posted: Wed Oct 02, 2013 10:18 am Post subject: |
|
|
| No problem at all. If I can help anyone avoid some of the initial trial and error stage I will be happy to. first piece of advice for anyone doing any amount of such work, buy a small bandsaw. Absolutely invaluable. Not hugely expensive, doesn't take up much space, not a noisy piece of kit and really, really useful. |
|
| Back to top |
|
|
1935Hillman
Joined: 06 Apr 2010
Posts: 257
Location: Hampshire
|
| Posted: Sat Apr 26, 2014 8:29 pm Post subject: |
|
|
Main frame pretty much finished now save one or two bits to tidy up (probably quite a few bits to tidy up if I start to count them) Making some headway with the doors and although not easy they have gone reasonably well if really very time consuming. I tend to spend an awful lot of time standing and looking at them without actually doing anything constructive. A crowded workshop means that getting a really good perspective view of the shape of the frame is very hard to achieve. This means a 'roll out' is overdue to take a look in the daylight so I may do that this week weather permitting.
Swallows having moved in is the reason for the sheeting over. I love seeing them arrive and they can be great company in the workshop but by golly they do produce a lot of guano for little ones!
A slight diversion but not far. I remembered that I still had an outstanding problem with the radiator and shell in that the holes for the machine screws on the shell did not line up particularly well with the captive nuts on the rad itself. This was going to make fitting the shell extremely difficult when the time came to start making and fitting body panels. A quick trawl on the web and a few requests sent out brought a very positive response from Steve at Coolex Ltd in Nottingham. He offered to refit the shell to the rad, pressure test the rad and repaint it all while I waited. A few days later I set off early and arriving at about 9am in Nottingham dropped the rad and shell off with Steve and his team. To be brutally honest I didn't hold out a huge amount of hope that the city would keep me particularly well entertained but I found enough to divert me in the centre for the two hours until Steve called me to say it was ready. They had done exactly as they said they would and made a very nice job of it too. Coolex handle all kinds of radiator problems including building replica rads for hard to find models and specials. Call Steve on 0115 9423344 or find them at http://www.coolexperts.co.uk/

 |
|
| Back to top |
|
|
kevin2306
Joined: 01 Jul 2013
Posts: 1359
Location: nr Llangollen, north wales
|
| Posted: Sat Apr 26, 2014 9:06 pm Post subject: |
|
|
Some lovely work there, seems a shame to skin it!
Kev |
|
| Back to top |
|
|
1935Hillman
Joined: 06 Apr 2010
Posts: 257
Location: Hampshire
|
| Posted: Sun Apr 27, 2014 1:56 pm Post subject: |
|
|
| Thank you Kev. Be back again soon hopefully |
|
| Back to top |
|
|
1935Hillman
Joined: 06 Apr 2010
Posts: 257
Location: Hampshire
|
| Posted: Sun May 11, 2014 9:08 pm Post subject: |
|
|
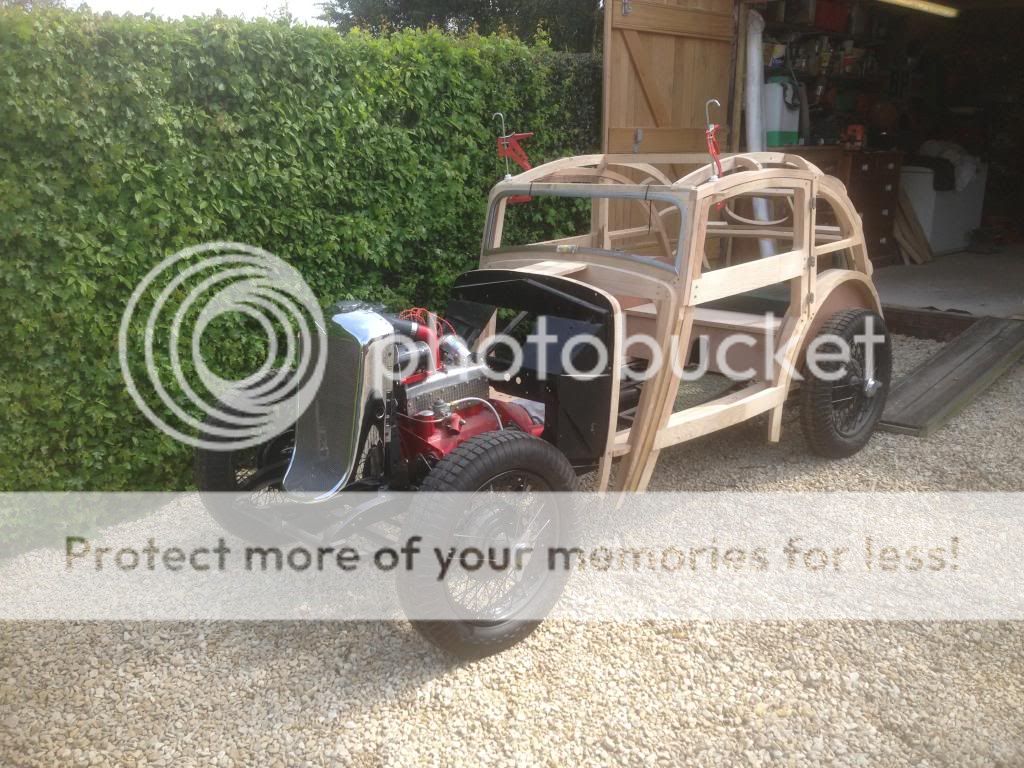
Out in the sunshine to see how she is shaping up and take a good look round her. Only seeing the frame up close in the confines of the workshop means that one never really knows how it looks so this was a bit overdue. Not too bad, one or two areas that could be better but generally pretty good. The advantage of building a version of a car of which no examples exist is that no-one can tell you you've got it wrong!! Doors still to complete and the sliding roof to tackle but am consulting the metal fabricators soon to check that I am doing everything that they need in order to get the skin on.
 |
|
| Back to top |
|
|
1935Hillman
Joined: 06 Apr 2010
Posts: 257
Location: Hampshire
|
| Posted: Wed Sep 03, 2014 10:30 pm Post subject: |
|
|
Hard to believe that so much time has gone by since I last posted and slightly more alarming is that I have been working constantly on the car but so little appears to have been done. The problem has been that I have passed over small tasks planning to 'get back to them later' and they have now come back to haunt me. A little lesson there for me and any others with a tendency to plough on with step after step without COMPLETELY finishing them. I finally agreed a date that the frame would go off for skinning and then began to make a list of things to get finished. This list was originally about ten items long but was replaced by another ten items at least four times!! This was of course a very good thing and I felt a huge sense of satisfaction as each list was completed - even if it was immediately replaced with another. I decided that although aesthetically it would not be necessary to paint the frame, it would be a good idea to soak it in a timber preservative at least. Being in the building trade I know first hand that modern regulations have stripped all of the truly effective ingredients out of preservatives and therefore painting would provide a further level of protection. Choice of paint was not easy but it occurred to me that any time one sprays a small component with an aerosol paint sitting on a plywood offcut or up against a shed wall, the paint on said plywood or timber wall is there for ever and never seems to flake off. I concluded therefore that acrylic spray primer and top colour would do the job nicely enough. My son James came over one evening and helped me to lift the frame off of the chassis which was a piece of cake and very light.

So light that he was able to hold it off the ground while I strapped it to the roof trusses. This done I set about spraying the frame which there is not much of so it didn't take long and after a few days we were bolting the frame back on. (lots) More detail work followed and finally the point of no return was reached and the day of delivery to the fabricators arrived. Typically after weeks of dry sunny weather I awoke to light drizzle and so the operation was delayed for a few hours while the skies cleared as I have had experience of trying to keep a waterproof cover on a trailered car - it did not go well and the cover was reduced to tatters after about half an hour of driving.

As any eagle eyed viewers might have spotted, the wheels have also changed and do not look like the usual Aero Minx type. This is for one very good reason. The first 1932/3 Aeros had standard Rudge hubs to their wheels, the large hub type coming in in 1934. I had a perfectly good set of the 34/35 wheels but the more I looked at them the less happy I became. I was going to an awful lot of trouble in so many ways and to end up with the 'wrong' wheels would have been irritating and inauthentic. I made some enquiries with the excellent wheel builder James Wieldon who put me in tough with a Gentleman with a set of Rudge hub 18" wheels to dispose of. He had recently bought a P type MG with such wheels and he was replacing them with a new set of 19's. The hubs were given a clean bill of health ( a wise move when buying old wire wheels as the splines can wear out ) and the deal was done. The downside to this tale is that the resulting new wheels now reveal the too-small 8" brake hubs which will also have to be replaced at some stage with the correct 10" jobs!!!
Fortunately the trip is a short one as the workshop is only about twelve miles away in Andover. All went well and we arrived safely with proprietor Jimmy and fabricator Gary were waiting for me.

The length of time that I have been looking at the frame largely unchanged has meant that although I have been enjoying the work I think I have taken my eye off the prize, i.e. the finished car. Taking the car to Jimmy's totally reignited my excitement about the finished piece and now I simply cannot wait to see the frame covered in the aluminium skin in a couple of month's time. |
|
| Back to top |
|
|
Rick
Site Admin
Joined: 27 Apr 2005
Posts: 22454
Location: UK
|
|
| Back to top |
|
|
kevin2306
Joined: 01 Jul 2013
Posts: 1359
Location: nr Llangollen, north wales
|
| Posted: Thu Sep 04, 2014 8:17 am Post subject: |
|
|
This is going to be a superb car when done..cant wait
are the fabricators taking stage pics of the construction?
Kev |
|
| Back to top |
|
|
colwyn500
Joined: 21 Oct 2012
Posts: 1745
Location: Nairn, Scotland
|
| Posted: Thu Sep 04, 2014 9:58 am Post subject: |
|
|
| Genius work building that body. I am very envious of your skills. |
|
| Back to top |
|
|
1935Hillman
Joined: 06 Apr 2010
Posts: 257
Location: Hampshire
|
| Posted: Thu Sep 04, 2014 5:14 pm Post subject: |
|
|
| Thank you everyone. Yes, the guys will be taking stage pictures plus I will be visiting regularly (not too regularly) to record progress and discuss details. Because we have so little to go on all details will be the subject of much discussion I am sure. |
|
| Back to top |
|
|
Rootes75
Joined: 30 Apr 2013
Posts: 3828
Location: The Somerset Levels
|
| Posted: Fri Sep 05, 2014 11:15 am Post subject: |
|
|
| Great work, and lovely to see the photos. |
|
| Back to top |
|
|
|
  |
Classic cars forum & vehicle restoration. Forum Index
-> All our old cars, vans, lorries etc |
All times are GMT + 1 Hour
Goto page Previous 1, 2, 3, 4, 5, 6, 7, 8, 9, 10 Next
|
| Page 5 of 10 |
|
You cannot post new topics in this forum
You cannot reply to topics in this forum
You cannot edit your posts in this forum
You cannot delete your posts in this forum
You cannot vote in polls in this forum
|
php BB powered © php BB Grp.
|


