
Classic cars forum & vehicle restoration.
|
|
| Author |
Message |
Franko500
Joined: 14 Apr 2014
Posts: 24
|
 Posted: Tue Jun 17, 2014 7:56 pm Post subject: Posted: Tue Jun 17, 2014 7:56 pm Post subject: |
 |
|
Looking good Peter,
I bet you are glad that's finished!javascript:emoticon(' ') ') |
|
| Back to top |
|
 |
vitesse
Joined: 03 Jun 2013
Posts: 561
|
| Posted: Tue Jun 17, 2014 9:24 pm Post subject: |
|
|
| Looks like a good finish Peter. Are you not going to spray a little bit of blue up into the top of the bonnet area below the front screen? |
|
| Back to top |
|
|
colwyn500
Joined: 21 Oct 2012
Posts: 1745
Location: Nairn, Scotland
|
| Posted: Tue Jun 17, 2014 9:53 pm Post subject: |
|
|
| vitesse wrote: | | Looks like a good finish Peter. Are you not going to spray a little bit of blue up into the top of the bonnet area below the front screen? |
Yes Tony, whatever is left in the spraygun after I finish the dash and passenger door tomorrow wil be chucked under the bonnet. I'm not bothered what that area looks like and I know it was built up with loads of undercoat when I originally repaired it. Same in the engine bay. It has had one coat of paint over the original goo which is still in good condition.
I have just started digging out the bits and pieces such as the speedo, sunvisors and number plate. Also I will get the windows in ASAP.
PS. Thanks everyone for the positive comments, and yes, delighted to get that stage behind me and looking forward to reassembly. |
|
| Back to top |
|
|
colwyn500
Joined: 21 Oct 2012
Posts: 1745
Location: Nairn, Scotland
|
| Posted: Sun Jun 22, 2014 8:04 pm Post subject: |
|
|
 KNO_5640 by peterthompson, on Flickr KNO_5640 by peterthompson, on Flickr
I have decided to wait for more really hot weather before Waxoyling.
Meantime I need to go through all the hundreds of items that wlll make the shell into a car.
Tony, with his 1966 car has already gone through the various stages that I will have to tackle and I am in awe of how quickly and thoroughly he did it. I think that I will have fewer new parts and have to clean up more bits.
It might be a shock to some people that I will be considering re-using so much. But the speedo reads 32,000 miles and I don't think these bits saw much sunshine or rain in their life. The number plates are a good example; a quick clean and they immediately add patina to the car. The rear lights are perfectly acceptable and even the corrugated heater tubes are like new.
I will only be rubbing the paint with Farecla G3 followed by wax and will now wait until fully assembled to give maximum hardening time, to let minor flaws come to the surface and so that any unfortunate scratches can be moderated.
For the moment it's all soft cloths and mild washing-up liquid. |
|
| Back to top |
|
|
colwyn500
Joined: 21 Oct 2012
Posts: 1745
Location: Nairn, Scotland
|
| Posted: Sun Jun 22, 2014 11:31 pm Post subject: |
|
|
I used rubbing compound on the plastic cowling of the speedo to remove a few marks and some sun burning. It came up well. The chrome ring is a bit pockmarked but I can live with that.
 KNO_5641 by peterthompson, on Flickr KNO_5641 by peterthompson, on Flickr
The visors were destined for the bin but a single gentle wipe removed forty years' dirt. Since this photo and after ten minutes bleachy spray and they're new again.
 KNO_5642 by peterthompson, on Flickr KNO_5642 by peterthompson, on Flickr
The washer bag is also like new but still next to useless!
 KNO_5645 by peterthompson, on Flickr KNO_5645 by peterthompson, on Flickr
The rear lights are also amazingly good after a deep clean with soapy water.
 KNO_5643 by peterthompson, on Flickr KNO_5643 by peterthompson, on Flickr |
|
| Back to top |
|
|
kevin2306
Joined: 01 Jul 2013
Posts: 1359
Location: nr Llangollen, north wales
|
| Posted: Mon Jun 23, 2014 7:46 am Post subject: |
|
|
well done on re-using old parts, you cant buy origionality in my view.
Kev |
|
| Back to top |
|
|
vitesse
Joined: 03 Jun 2013
Posts: 561
|
| Posted: Mon Jun 23, 2014 8:52 pm Post subject: |
|
|
I think that parts you managed to salvage Peter were in much better condition than a lot of mine. Which is probably reflected in the fact that it has spent a lot of time in storage, so things like the interior on your car still look like new, where as mine was just rotten.
The parts inside that I replaced were seat covers, sun visors, door cards, interior mirror (it had a big hole in it)' carpets, the rest is original or refurbished. Oh and knee bolsters.
On the outside the door handles, rear light lenses, (as one was cracked), new bumpers, headlight rings and sunroof. The quarter lights do have some surface rust on, so there is a bit of patina.
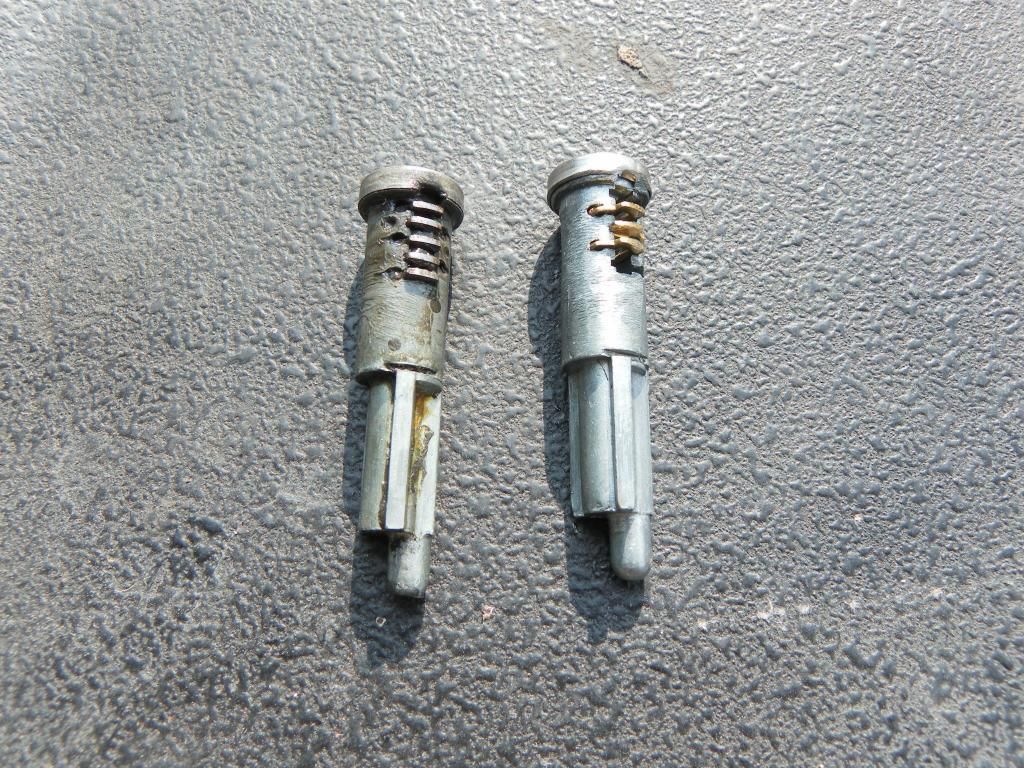
I changed the locks barrels on the door handles today as I wanted to use the original Fiat keys. It highlights how poor some of the remanufactured parts are. The one on the right has 5 parts for the key to match up to and the new one on the left has only 3 and was really poorly machined. Mind you, you could probably whack a screwdriver in there and open the lock in a few minutes or alternatively cut a big hole in the sunroof and climb in.
 |
|
| Back to top |
|
|
colwyn500
Joined: 21 Oct 2012
Posts: 1745
Location: Nairn, Scotland
|
| Posted: Mon Jun 23, 2014 10:46 pm Post subject: |
|
|
I don't think I have door keys Tony, so might have to do the same. The handles are slightly scummy but the worst bit so far are is a quarter light frame which I would call slightly more than surface rust. But no way am I buying a new one after seeing the experience of some other people.
I am cleaning up electrics and can you confirm that the headlights beam indicator lights on the dash need the paint round the hole scratching to provide an earth?
Thanks. |
|
| Back to top |
|
|
vitesse
Joined: 03 Jun 2013
Posts: 561
|
| Posted: Mon Jun 23, 2014 11:20 pm Post subject: |
|
|
Yes it's the same on my quarter lights little pimples of rust, sorry patina. Read a lot of stories of woes with the replacements not fitting and problems with seals not being available. I must say I do love the quarter lights when driving on nice sunny days, to have the ability to open them so wide and direct nice cooling wind in you face is great. In fact they are not called quarter lights in the official Fiat bible they are "ventilation panels"!!!!!
I love this from the bible. "Air conditioning in the car interior is obtained by suitably adjusting swivel ventilator panels on doors. Moreover, when door drop glasses are cranked part way or all the way down, admission of outside air is increased to a remarkable extent, affording better ventilation in the car interior".
Well who would have guessed that opening the windows has such a major impact. You learn something new everyday.
Yes both the main beam and indicator lamps on the dash are reliant of an earth from the dash. As are the little wing indicator lights. |
|
| Back to top |
|
|
colwyn500
Joined: 21 Oct 2012
Posts: 1745
Location: Nairn, Scotland
|
| Posted: Tue Jun 24, 2014 3:02 pm Post subject: |
|
|
I need that air-conditioning today; lovely and hot so got out the Waxoyl (thanks Tony about the lights earthing by the way).
 KNO_5665 by peterthompson, on Flickr KNO_5665 by peterthompson, on Flickr
To be honest with this simple Schutz gun (thanks Tony and Steve), it didn't need the heat and hardly needed the extension pipe. I did drill two holes in each inner sill just too make sure.
Sean (Franko 500) suggested all the right places and grommets to remove. It's strange the car wasn't treated in the factory since all the right access is there.
 KNO_5662 by peterthompson, on Flickr KNO_5662 by peterthompson, on Flickr
 KNO_5667 by peterthompson, on Flickr KNO_5667 by peterthompson, on Flickr
I wouldn't bothere with any more expensive kit nor with the Waxoyl kit if you have a compressor. It needs high pressure but little volume as you use quick blasts, as Sean says, to get a thin coating.
There isn't much overspray and I still have some left from a 1 litre container!
Now I can really start on the rebuild. |
|
| Back to top |
|
|
vitesse
Joined: 03 Jun 2013
Posts: 561
|
| Posted: Tue Jun 24, 2014 11:28 pm Post subject: |
|
|
What would happen Peter with any surface rust covering it with Waxoyl? I assume it would keep it at bay?
I have squirted some down some bits from an aerosol can of Waxoyl, just wondering if it would pay me to get a bit more aggressive with it?
It wouldn't be too difficult to revisit, just undoing a few bits and squirting it around. |
|
| Back to top |
|
|
colwyn500
Joined: 21 Oct 2012
Posts: 1745
Location: Nairn, Scotland
|
| Posted: Wed Jun 25, 2014 7:37 am Post subject: |
|
|
I suspect that Waxoyl, properly applied, still acts no better than paint in respect of pre-existing rust although I think they make claims of it actively keeping it at bay. The main thing would be the car to be as dry and warm as possible at the time of application so there is no encapsulated moisture in the rust lumps and flakes.
Tony, for me , the most important areas to treat are at the inner wheelarch/front and rear wing spot-welded flanges and this is the location that I guess is least likely to have received coverage and which your presumably thinner aerosol, spray is more likely to.
I would certainly give the front more attention if it hasn't already been thoroughly done. Do you really want to mess with that lovely interior? It would pay you though, to stick your probe through the rear lights (ooh err!)
With the 90 pounds air pressure there was definitely waxy vapour travelling very long distances from front to back etc. which I don't think an aerosol could emulate.
Although I will be using my car regularly, for the moment it won't be in winter and neither of us will be parking continuously outside as in the old days. I wouldn't get too stressed. |
|
| Back to top |
|
|
Franko500
Joined: 14 Apr 2014
Posts: 24
|
| Posted: Wed Jun 25, 2014 8:11 am Post subject: |
|
|
Hi Peter, im glad that some of my advise has been usefull. I will have to let the wife know! she wont believe me.
I don't blame you for using any old parts you can. As Tony pointed out, the reproduction parts sadly are never made to the same quality as the originals, why I don't know? they have to use the same tooling set up for the production & with a little more detail and accuracy they should be able to match the originals.
Anyway enough of my rant, the old parts quite often add to its authenticity on a vehicle over 40 years old.
Sadly most of the parts on my vehicle were beyond repair so I have no alternative to buy new or old parts.
Keep up the good work, this is the time to enjoy your previous hard work, and I am sure you have had plenty of cups of tea by now and found yourself standing there staring at your 500.
regards
Sean |
|
| Back to top |
|
|
colwyn500
Joined: 21 Oct 2012
Posts: 1745
Location: Nairn, Scotland
|
| Posted: Wed Jun 25, 2014 8:17 am Post subject: |
|
|
From Tony "I love this from the bible. "Air conditioning in the car interior is obtained by suitably adjusting swivel ventilator panels on doors. Moreover, when door drop glasses are cranked part way or all the way down, admission of outside air is increased to a remarkable extent, affording better ventilation in the car interior".
 KNO_5674 by peterthompson, on Flickr KNO_5674 by peterthompson, on Flickr
Here is the cleaned "ventilator panel". The chrome that hasn't rusted through is excellent. Amazing what 20 minutes with a bit of polish can do. Even the rubbers seem OK but I must research what would help keep them supple. |
|
| Back to top |
|
|
vitesse
Joined: 03 Jun 2013
Posts: 561
|
| Posted: Wed Jun 25, 2014 10:54 pm Post subject: |
|
|
Crumbs they are in really good nick much better than mine. I have a sort of pimply surface rust on the surface of the chrome bits.
Mind you looking at your picture it shows them from interior view, what's the chrome like on the other side?
Just found a thread on the forum about preserving the rubber. Believe it or not Waxoyl gets mentioned!!!! |
|
| Back to top |
|
|
|
|
You cannot post new topics in this forum
You cannot reply to topics in this forum
You cannot edit your posts in this forum
You cannot delete your posts in this forum
You cannot vote in polls in this forum
|
php BB powered © php BB Grp.
|


