|
|
| Do you like or dislike the new dashboard ? |
| Yes I do like the new dashboard |
|
100% |
[ 7 ] |
| No I do not like the new dashboard |
|
0% |
[ 0 ] |
|
| Total Votes : 7 |
|
| Author |
Message |
ukdave2002
Joined: 23 Nov 2007
Posts: 4400
Location: South Cheshire
|
|
| Back to top |
|
 |
Ray White

Joined: 02 Dec 2014
Posts: 7652
Location: Derby
|
 Posted: Mon Aug 17, 2026 8:55 am Post subject: Posted: Mon Aug 17, 2026 8:55 am Post subject: |
 |
|
If I could fit one into the chrome bezel and squeeze into the existing hole in the wood then that would be a nice cheap fix. They are certainly worth a try.  |
|
| Back to top |
|
|
Ray White
Joined: 02 Dec 2014
Posts: 7652
Location: Derby
|
| Posted: Mon Aug 17, 2026 9:04 am Post subject: Re: Broken Light |
|
|
| bjacko wrote: | | I hope you told the company you bought the light from about the weakness? |
I only found out about it yesterday.(Sunday). I would try and get a refund from the Ebay vendor but the deadline for returns finished on the 1st August.
On examination, the brass threaded part is hollowed out for a spring. When comparing with an original, the internal diameter of the recess for the spring is too big giving the part virtually no strength. I think they must have tried to use too big a spring.
No wonder it snapped off.
 |
|
| Back to top |
|
|
ukdave2002
Joined: 23 Nov 2007
Posts: 4400
Location: South Cheshire
|
| Posted: Mon Aug 17, 2026 10:34 am Post subject: |
|
|
| Ray White wrote: | | If I could fit one into the chrome bezel and squeeze into the existing hole in the wood then that would be a nice cheap fix. They are certainly worth a try. |
I was thinking of fitting the whole cheap unit it to the repro one, keeping the repro green lens so it all looks original, it would require drilling a hole in the end of the repro unit for the inserted lamp unit to stick out, at least the repro unit has a use! |
|
| Back to top |
|
|
Ray White
Joined: 02 Dec 2014
Posts: 7652
Location: Derby
|
| Posted: Mon Aug 17, 2026 12:08 pm Post subject: |
|
|
Nice idea. I hadn't thought of doing that. I will see how my repaired original works out ...and if it fails again I can give it a go.
Thanks again for your advise.
. |
|
| Back to top |
|
|
ukdave2002
Joined: 23 Nov 2007
Posts: 4400
Location: South Cheshire
|
| Posted: Mon Aug 17, 2026 7:33 pm Post subject: |
|
|
| Ray White wrote: | Nice idea. I hadn't thought of doing that. I will see how my repaired original works out ...and if it fails again I can give it a go.
Thanks again for your advise.
. |
I thought it through during a Spinning class this morning, I figure most things out when exercising or mowing the lawn, saves overthinking stuff!! |
|
| Back to top |
|
|
Ray White
Joined: 02 Dec 2014
Posts: 7652
Location: Derby
|
| Posted: Mon Aug 17, 2026 11:07 pm Post subject: |
|
|
I get plenty of exercise with running the cattery. I also have a ridiculously big garden on a hill that is more than I can manage without adding more work.!
Jean, on the other hand is a fitness fiend. To keep her happy I have fitted out a room in our house as a gym. Including a special floor, it is fully equipped and cost a fortune...but then so long as it keeps her happy.....
My repair to the original warning light seems to be having the desired outcome. This time, however, I will make sure that there are no petrol leaks before painting. The problem area is not the main seal but the rectangular lid. It is not flat and it should be. I had previously thought the problem was with the gasket but now I am endeavouring to get a flat surface.
When it comes to sealing the lid, I may use permatex gasket sealant which I feel reasonably confident will stop the leak.
. |
|
| Back to top |
|
|
Ray White
Joined: 02 Dec 2014
Posts: 7652
Location: Derby
|
| Posted: Wed Aug 19, 2026 4:57 pm Post subject: |
|
|
The story so far is I have a working sender unit fitted to the tank and a dashboard warning light.
The flattened lid is now screwed onto the sender unit with a cork gasket and petrol resistant permatex sealer.
I will leave it over night to fully set and fill up with petrol tomorrow.
If it leaks again, I will probably have the screaming abdabs.    |
|
| Back to top |
|
|
JC T ONE
Joined: 30 Oct 2008
Posts: 1211
Location: Denmark
|
| Posted: Fri Aug 21, 2026 3:04 am Post subject: |
|
|
| Ray White wrote: | The story so far is I have a working sender unit fitted to the tank and a dashboard warning light.
The flattened lid is now screwed onto the sender unit with a cork gasket and petrol resistant permatex sealer.
I will leave it over night to fully set and fill up with petrol tomorrow.
If it leaks again, I will probably have the screaming abdabs. |
Did you seal the thread on the screws so petrol dont seep through the thread & come out from under the screw head,s.
Jens Christian
_________________
http://www.eurods.eu/wp/index.html |
|
| Back to top |
|
|
ukdave2002
Joined: 23 Nov 2007
Posts: 4400
Location: South Cheshire
|
| Posted: Fri Aug 21, 2026 7:22 am Post subject: |
|
|
| I was talking to someone about Ray's woes, they suggested that if the sender screws are not tightened gradually in a criss cross patten there can be some distortion of the sender with consequential leaks. |
|
| Back to top |
|
|
Ray White
Joined: 02 Dec 2014
Posts: 7652
Location: Derby
|
| Posted: Fri Aug 21, 2026 9:53 am Post subject: |
|
|
| ukdave2002 wrote: | | I was talking to someone about Ray's woes, they suggested that if the sender screws are not tightened gradually in a criss cross patten there can be some distortion of the sender with consequential leaks. |
Much appreciated. I did tighten the screws in the manner you describe (as it happens that is my normal practise) but the flange on my sender unit is quite thick and I doubt you could bend it by tightening.
I would say the biggest risk is stripping the threads. This is especially important with the lid, as the screws are even smaller. Incidentally, the design of the newer sender units is an improvement on the original in that the lid has four screws, rather than three...
Regrettably, the lid with my sender unit was bent and that was the reason for the second leak; the first was the main circular gasket.
The circular ribbed rubber gasket and the flat oblong lid gasket both look to me as if they have been made from rubber unsuited to modern petrol because they have badly distorted.
I made a new lid gasket from 1.5mm nitrile impregnated cork and combined it with Permatex petrol resistant sealant.
Fortunately, with petrol in the tank, both gaskets seem now to have sealed.
I still have to mask off the area and paint it again but my attention is now turning to the other significant issue; that of the ground clearance at the back.
I am considering adding extra leaves to the rear springs to slightly stiffen them and consequently raise the ride height a little ...but then again, I don't want to end up with a harsh ride!!.
I have an old spare spring with 1/4" leaves that I could cut up. That would cost me nothing but if it doesn't work out I will need to take the springs back to the suppliers for re tempering. That would be both time consuming and expensive.
Having spoken to a very helpful chap at Jones Springs this afternoon I am persuaded to take the springs to them. If there is an issue with the springs they will sort it out for me...and from what I have been told ...at no great expense.
What I have to do now is remove them from the car.
. |
|
| Back to top |
|
|
Ray White
Joined: 02 Dec 2014
Posts: 7652
Location: Derby
|
| Posted: Sun Aug 23, 2026 12:26 am Post subject: |
|
|
What should have been a quick and easy job has turned into a nightmare.
The method of spring mounting on these cars is unorthodox; to say the least. The rear leaf springs are bolted in the centre to a "tower" that is welded to the axle casing.
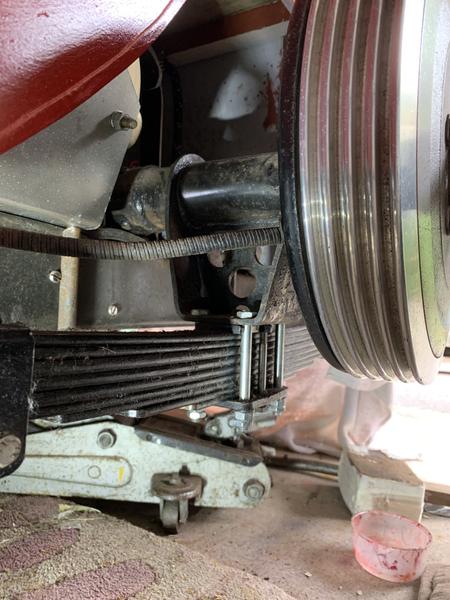
The rear of the spring is attached to a shackle ...and the front end by a silent block bush onto a pin, retained with a nut and washer.
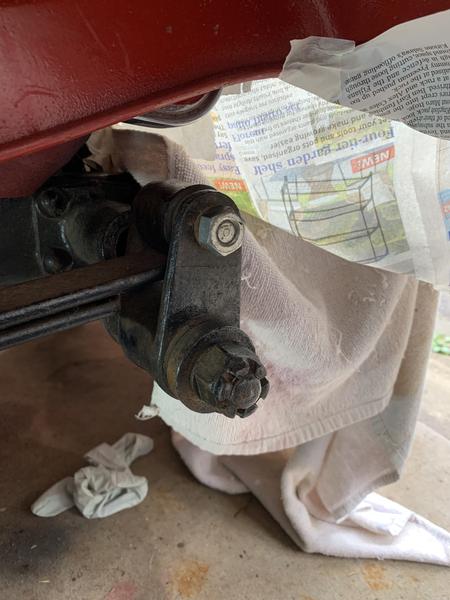
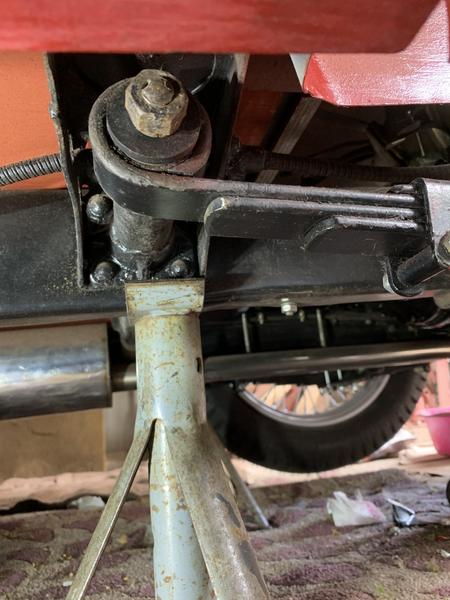
With the 6 centre bolts removed, the rear of the spring came away easily ...but the front of the spring is a different matter. With the nut and washer removed I am unable to separate either the silent block bush from the pin or the bush from the spring eye.
I have struggled with various levers and hammers but the most I can move it is 1/16".
(The photo shows nut attached )
I had this problem when I removed the springs before but back then I had a bare chassis with no bodywork to restrict access.
As I said; a nightmare.

Last edited by Ray White on Sun Aug 23, 2026 5:27 pm; edited 5 times in total |
|
| Back to top |
|
|
ukdave2002
Joined: 23 Nov 2007
Posts: 4400
Location: South Cheshire
|
| Posted: Sun Aug 23, 2026 5:10 am Post subject: |
|
|
| Could you place a scissor jack between the spring and the chassis leg, and by opening the jack drive the spring free? or a chain round the spring with a slide hammer attached to the chain, "hammer" it off? (assuming a chain gives you a bit more flexibility if it awkward to attach a slide hammer directly to the spring) |
|
| Back to top |
|
|
Ray White
Joined: 02 Dec 2014
Posts: 7652
Location: Derby
|
| Posted: Sun Aug 23, 2026 9:32 am Post subject: |
|
|
| ukdave2002 wrote: | | Could you place a scissor jack between the spring and the chassis leg, and by opening the jack drive the spring free? or a chain round the spring with a slide hammer attached to the chain, "hammer" it off? (assuming a chain gives you a bit more flexibility if it awkward to attach a slide hammer directly to the spring) |
Hi Dave. Your suggestion of a scissors jack might be the answer although the ones I have are too big. (I did have some smaller ones but they were left in the shed, rusted up and were binnned 30 years ago.!)
I don't have a slide hammer but may have to get one.
If bashing it with a club hammer or levering it like I have been doing won't shift it I don't know what will. It is the close proximity of the wooden body that worries me about using heat. |
|
| Back to top |
|
|
Keith D
Joined: 16 Oct 2008
Posts: 1198
Location: Upper Swan, Western Australia
|
| Posted: Mon Aug 24, 2026 4:50 am Post subject: |
|
|
Ray,
Is a small 3 arm puller not possible? Get it under tension and thump the end with a club hammer?
Keith
_________________
1926 Chrysler 60 tourer (100 years old! - a genuine antique!)
1950 Austin A40 tourer
1999 BMW Z3
Its weird being the same age as old people.
You are either part of the problem or part of the solution |
|
| Back to top |
|
|
|

 FAQ
FAQ Search
 Memberlist
 Usergroups
 Profile
 Log in to check your private messages
 Log in



