|
|
| Author |
Message |
Stuart2u
Joined: 06 Nov 2012
Posts: 52
Location: Nottingham
|
 Posted: Mon Dec 17, 2012 1:32 pm Post subject: 1948 Morris 8 E Steering knuckle/swivel pin Posted: Mon Dec 17, 2012 1:32 pm Post subject: 1948 Morris 8 E Steering knuckle/swivel pin |
 |
|
Hi. I have the car up on the ramp for winter for a good old going over underneath, taking it slowly and working corner to corner.....got to the drivers side front corner this morning and found a problem
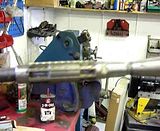
The up and down movement at the swivel pin joint to the steering knuckle is severe.....not mentioned in my recent MOT and he did set about it with levers with gusto. Anyway, I have attached a picture of the offending area and marked where the up and down movement is...so much so that when levered up, the bottom thrust washer is free to turn. Also the top bolt(marked), which locates the swivel pin appears to be stripped....it will tighted to a point but then slips over. It will unscrew out though and is in one piece.
I am guessing that the top bolt is not supposed to squeeze the location lugs of the steering knuckle to make good this movement.....its size suggests that. So if there is that much free play, is there a spacer missing or is the bottom spacer worn....... is this a normal wear point. My experience with king pin type joints is that wear causes lateral movement not vertical.
I do have a workshop manual, but it is so simplistic that as handy as I am....I couln't tackle this repair without some guidance.....anyone had experience of this please.
Stuart
[img]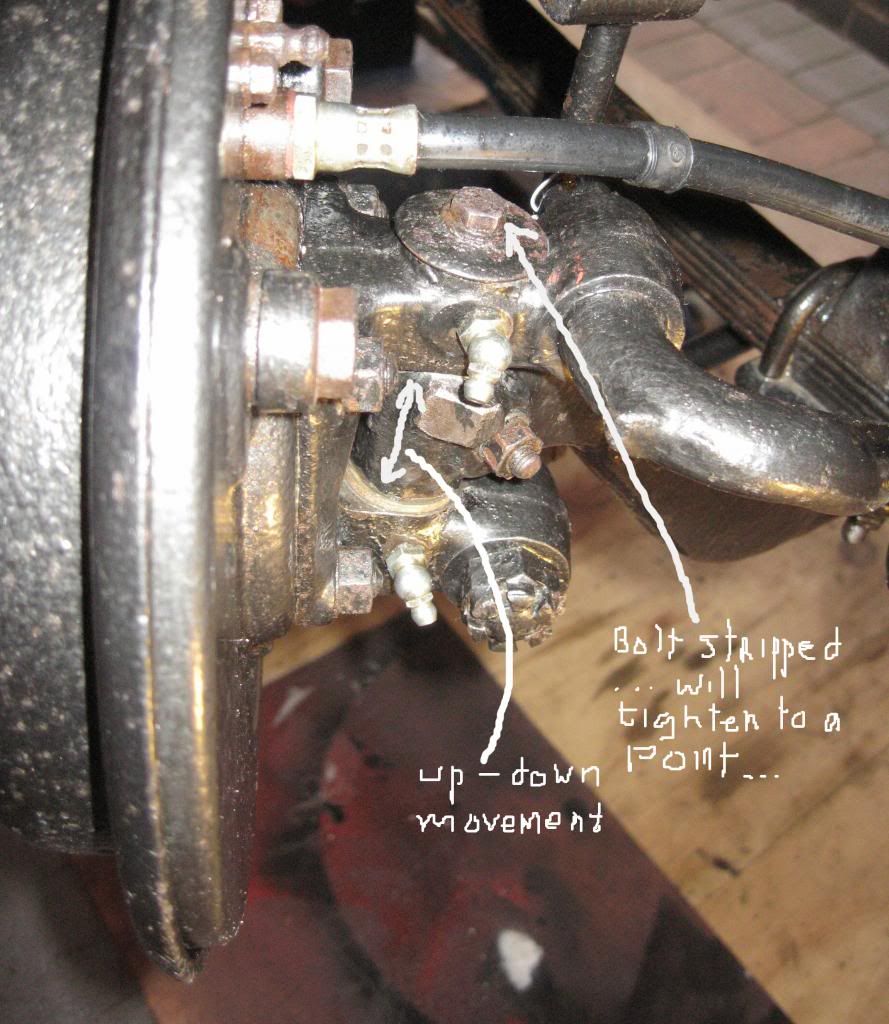 [/img] [/img]
[img] [/img] [/img] |
|
| Back to top |
|
 |
Stuart2u
Joined: 06 Nov 2012
Posts: 52
Location: Nottingham
|
| Posted: Mon Dec 17, 2012 4:43 pm Post subject: swivel pin update |
|
|
Hi I have managed to find the attached old 'how to do' script from the Morris Register. The way I read it suggests that more than one thrust washer might be needed. Anyone help?
What happens to the wheel geometry if another washer is used?.....I know that steering alignment was on my things to do list this winter because I suspected the drivers side wheel was out and I was having a heck of a job getting a correct toe in....even when I thought I had got it right I found the front drivers side tyre squeeling when taking left had turn No high speed involved..... and so my compromise was getting a near as possible to correct toe in and a reduced squeel.
Also, does any one know of the whereabouts of a pin extractor tool No 55418.......saves beating the old girl up with a club hammer........
Stuart
[img]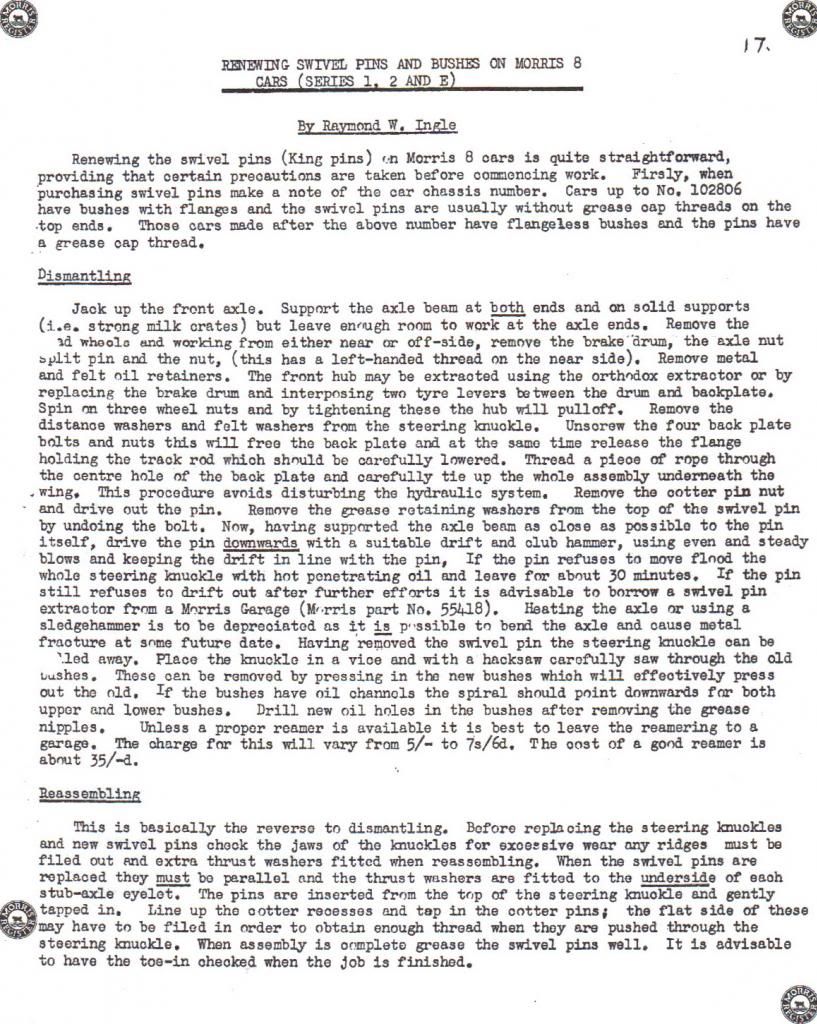 [/img] [/img] |
|
| Back to top |
|
|
Stuart2u
Joined: 06 Nov 2012
Posts: 52
Location: Nottingham
|
| Posted: Mon Dec 17, 2012 5:13 pm Post subject: Seems like I am replying to myself |
|
|
Hi again. As I sat writing the previous reply to myself I thought....'I havnt yet checked that the passenger side had one or two thrust washers fitted'. I have just been out and can confirm it has TWO....one is also fitted at the top.
To add to the puzzle on the exploded diagram in my manual there is only one washer shown.
Stuart |
|
| Back to top |
|
|
alec.elliot
Joined: 28 Feb 2012
Posts: 58
Location: Worcestershire
|
| Posted: Mon Dec 17, 2012 5:28 pm Post subject: Morris 8 Front suspension |
|
|
Hi there
I have changed my King Pins/ Bushes, etc a little while ago on my 1936 Series 1 Morris 8.
Bit of a task I am afraid and I didnt have the extractor tool either.
Everything was solid and resisted all of the way but eventually got it sorted. (it had been off the road for the best part of 20 years.
The problems overcame include:-
The head rounded off the bolts you are having problems with. Resorted to an Angle Grinder to weaken and then chisel off to retrieve the dust cover.
Cotter pins. Stuck fast until heat was applied plus lots of hammer work with suitably sized drifts.
Removing the king pin. Lots of effort with a club hammer and heat I am afraid but support the axle as close to this area as possible (not just under the centre of the car. You will save a lot of heartache.
OK, I put my hand up and own up to spoiling one set of brass bushes (easily pressed into the cleaned up housing) through my own impatience. I solved this by buying Oilite bushes which are available in the right size for this job. They have been in for a couple of hundred miles now and are not showing any signs of premature wear.
Other than that the job is straighforward nuts and bolts! Ha!
Have fun. Please feel free to ask if you have any more questions. (I currently have the engine in a zillion pieces and am waiting for the white metal bearings to be sorted.)
Best regards
Alec |
|
| Back to top |
|
|
RUSTON
Joined: 07 Mar 2011
Posts: 144
Location: Matlock.
|
| Posted: Mon Dec 17, 2012 9:17 pm Post subject: |
|
|
I must have done dozens of king pins on beam axle vehicles (not a Morris Eight though) and the procedure is always the same. Once you have it all dismantled you need to ensure that the lower jaw of the stub axle is nice and flat on the thrust face (upper) and the upper jaw is flat on the lower face. A few strokes with a large flat file will true everything up nicely. Fit your new bushes and make sure that the grease nipple holes align, also that the pin is a nice fit through the bushes and check that the axle eye is not worn allowing slop, it should be a nice tap fit.
Grease the bushes and your new thrust washer and put it all together with a new cotter pin temporarily in place to line things up, then see if there is any lift in the stub axle. If there is then either a washer or shims should be inserted between the axle beam and the UPPER stub axle face to take up the play. Aim for a nice steady movement from side to side with just a little stiffness, hit the stub axle a few times on the top and lower just to settle things in and check again that it hasn't gone too loose. Fit your dust cap and tighten the cotter pin, grease it all up and job done!
Takes longer to explain than do but that is all there is to it. Your hardest problem will be getting the old pin out, a few good clouts with a heavy hammer on the curved end of the axle beam will help to shock things loose, heating the eye is not a good idea. Worst senario may mean removing the axle to get a good swing at the kingpin if a suitable extractor is not available. Good Luck. 
Pete.
_________________
Measure twice...cut once! |
|
| Back to top |
|
|
Churchill Johnson
Joined: 11 Jan 2011
Posts: 359
Location: Rayleigh Essex
|
| Posted: Tue Dec 18, 2012 12:39 am Post subject: |
|
|
| Yes you are right the top bolt is only to keep a grease cap in place ,thrust washer's should be fitted as per manual between the BOTTOM of the beam and knuckle remember the weight of the car is pushing down on the beam forcing the wheel up, thrust washer's are made to take thrust,as you state the other side has three this is because the beam and knuckle are worn you may have to do the same, this must have been to try and keep the beam a bit more central in the knuckle jaw's but the main thickness should be at the bottom and try and use less but thicker washer's and make certain they are hard or hardened and not just plain steel, after fitting the bushes they need to be line reamered by someone who has done it before as it could alter camber angle and castor if the reamer is not kept in line. |
|
| Back to top |
|
|
Stuart2u
Joined: 06 Nov 2012
Posts: 52
Location: Nottingham
|
| Posted: Tue Dec 18, 2012 9:53 am Post subject: Thank you |
|
|
Alec, Pete and 'Churchill'.....Thanks very much for your reply and advice. Much appreciated........I am doing my head planning on how best to tackle this. Always works best for me when I think things through before doing.
I will need to get the car down off the lift in order to jack the beam up to do this job so will tackle all the other stuff first and leave this until last to do in the new year. Will keep you posted.
Stuart |
|
| Back to top |
|
|
ukdave2002
Joined: 23 Nov 2007
Posts: 4289
Location: South Cheshire
|
| Posted: Tue Dec 18, 2012 1:54 pm Post subject: |
|
|
Hi Stuart
Its quite common with 8's to now have vertical play in the kingpins, and the kits don't come with shims; just the standard size thrust washer. 60 or 70 years on the steel knuckles have worn, needing either shimming or a thicker washer.
I have a piece of phosphor bronze bar that I use to make shims or thicker washer, have done a few for Morris Register members, let me know if you need some.
I'll set you a challenge  a few months ago just prior to taking my Z Van for an MOT , I noticed a worn king pin, it was changed in just over an hour, which included fabricating the pin from a gearbox layshaft and properly reaming the bushes , my rule of thumb for reaming is that the pin should just be able to fitted in the knuckle by hand..it seems to be about right. a few months ago just prior to taking my Z Van for an MOT , I noticed a worn king pin, it was changed in just over an hour, which included fabricating the pin from a gearbox layshaft and properly reaming the bushes , my rule of thumb for reaming is that the pin should just be able to fitted in the knuckle by hand..it seems to be about right.
I use a slide hammer for the hubs, otherwise all you need are some punches, a hammer and spanners, unless the pins are seized; in which case the car won't steer, they should come out with a hammer and punch.
Cheers Dave
Postscript, I made a video of changing a Morris 8 kingpin, it will eventually find a home on the Morris Register website, here are some extracts, click on the picks to open the video
Hub Removal
Cotterpin & Kingpin Removal
Kingpin bush reaming
 |
|
| Back to top |
|
|
hunsta

Joined: 09 Sep 2013
Posts: 92
Location: Gympie Qld Australia
|
| Posted: Sat Sep 28, 2013 10:31 am Post subject: Re: Seems like I am replying to myself |
|
|
| Stuart2u wrote: | Hi again. As I sat writing the previous reply to myself I thought....'I havnt yet checked that the passenger side had one or two thrust washers fitted'. I have just been out and can confirm it has TWO....one is also fitted at the top.
To add to the puzzle on the exploded diagram in my manual there is only one washer shown.
Stuart |
| Churchill Johnson wrote: | | ,as you state the other side has three this is because the beam and knuckle are worn you may have to do the same, this must have been to try and keep the beam a bit more central in the knuckle jaw's but the main thickness should be at the bottom and try and use less but thicker washer's and make certain they are hard or hardened and not just plain steel, |
OK I know the last post was nearly a year ago, but can I ask what the outcome was. I aslo have a small amount of up/down movement (approx 1mm)between the top and bottom of the steering knuckle.
I have a spare axle beam, so my other two questions would be, what is the inside measurement (and max. wear limit) of the steering knuckle and what is the outside measurement (and max. wear limit) of the axle beam? And what part is more prone to the wear. Knuckle or axle beam?
Hope that hasnt confused the issue?
_________________
I really am a nice guy. Just ask anyone that hasn't met me. |
|
| Back to top |
|
|
ukdave2002
Joined: 23 Nov 2007
Posts: 4289
Location: South Cheshire
|
| Posted: Sat Sep 28, 2013 6:44 pm Post subject: |
|
|
Hi
Morris never specified an amount of acceptable of vertical play, as I doubt they would have thought that vehicles would still be on the road 80 years after manufacture
So we have to just see what's required; making a thrust washer or shim for one, either on a lathe or by simply filing is the answer, it's cheap and not too time consuming.
Cheers Dave |
|
| Back to top |
|
|
hunsta
Joined: 09 Sep 2013
Posts: 92
Location: Gympie Qld Australia
|
| Posted: Sun Sep 29, 2013 2:29 am Post subject: |
|
|
Thanks for that Dave. Ill have to track down some nice hardened steel or phosphorus bronze as you use to make a spacer.
Nice vids by the way. Took a little mystery out of things. Hope mine come out as easy as yours seem to.
Cheers
Craig
_________________
I really am a nice guy. Just ask anyone that hasn't met me. |
|
| Back to top |
|
|
hunsta
Joined: 09 Sep 2013
Posts: 92
Location: Gympie Qld Australia
|
| Posted: Sat Oct 12, 2013 8:27 am Post subject: |
|
|
Well after having success in stripping every thing down, and the cotter pins coming out without too much fuss, as my luck would have it the king pins are stuck hard. So its was out with the whole axle and now its off to the suspension shop to have the old pins and bushes pressed out. Then all there is to do is find new king pins. Which is proving harder than I thought. The video was very helpful, but as they say, "it never happens like it happens in the movies" 
_________________
I really am a nice guy. Just ask anyone that hasn't met me. |
|
| Back to top |
|
|
TM8
Joined: 24 Feb 2013
Posts: 53
Location: Pretoria, South Africa
|
| Posted: Thu Jan 30, 2014 12:40 pm Post subject: Series 1 King Pin Thrust Washer locations |
|
|
Hi,
I need some confrimation about which one goes where, from the pictures and what i remember the Metal one on the bottom then the Brass Thrust washer then the axel and the Copper Spacer on top of the axle or do i have the Brass and copper the wrong way around or do they all go at the bottom of the Axle.
Help would be great!
[img] [/img] [/img]
Regards
Trevor[img][/img] |
|
| Back to top |
|
|
hunsta
Joined: 09 Sep 2013
Posts: 92
Location: Gympie Qld Australia
|
| Posted: Thu Jan 30, 2014 11:35 pm Post subject: |
|
|
When I finally tracked down a kingpin kit mine only came with a new thrust washer. This went on the bottom and I shaved the old one down to take up the slack at the top. Is it possible(and I could be wrong) that yours has been done before and had a couple of spacers added to take up the slack? I would put new thrust washer on bottom then brass. Then steel at the top??
_________________
I really am a nice guy. Just ask anyone that hasn't met me. |
|
| Back to top |
|
|
Rosco663

Joined: 17 Dec 2012
Posts: 257
Location: South Australia
|
| Posted: Tue Feb 11, 2014 8:44 am Post subject: |
|
|
I bought a set of king pins some time ago off FleaBay - described as NOS suiting Morris 8/40 1934-38. They were the wrong size being approximately 3/4" OD instead of the required 5/8" OD - the set did not come with a thrust washer at all. It came with two king pins, two pairs of bronze bushes (unflanged), two fibre washers, two cotter pins with nuts and spring washers 
The set I had pressed out of my steering knuckles had a thrust washer on the bottom which looks like the one you have labeled as copper (in the centre) including the four grooves on the top side. The guy that pressed out the king pins for me is an Austin 7 enthusiast and before pressing out did comment on the approximately 1/16" up and down play mine exhibited and indicated that the up and down movement is not critical - but side to side play is definitely something that needs attention.
I have a new set coming from Ian Harris Morris Spares so when they arrive I will post a pickie for you 
BTW anyone interested in a set of 3/4" OD king pins  I am just using it for a paperweight I am just using it for a paperweight 
_________________
Rosco |
|
| Back to top |
|
|
|


